
This post will provide a tutorial of how to set up AWS Client VPN.
AWS Client VPN is a fairly recent AWS service and something I had been meaning to try out for a while. Several customers and colleagues recently asked me about whether it could be used with VMware Cloud on AWS so I thought I’d give it a go.
This first post will walk through my installation and configuration of the AWS Client VPN and a follow-up post will focus on its various use cases.
What is AWS Client VPN?
AWS Client VPN is a managed client-based VPN service that allows AWS users to access AWS resources over the open-source SSL VPN Client OpenVPN.
If you’ve never used OpenVPN before, it is essentially an open-source version of SSL VPN clients such as the good old Cisco VPN Client / Cisco AnyConnect or Juniper Pulse Secure. It enables remote users (usually at home or on the road) to access data in a DC (or in the Cloud) through encryption and authentication using SSL and TLS.
OpenVPN works with OpenSSL, an open-source cryptographic tool. OpenSSL enables you to generate certificates, keys and CSR (Certificate Signing Requests). I won’t go into too much details about these concepts in here but essentially these artefacts will enable you to secure your SSL VPN session.
We will need to generate these certificates, keys and CSR with OpenSSL and install OpenVPN on our client. I will walk through it later in this post.
What can we access?
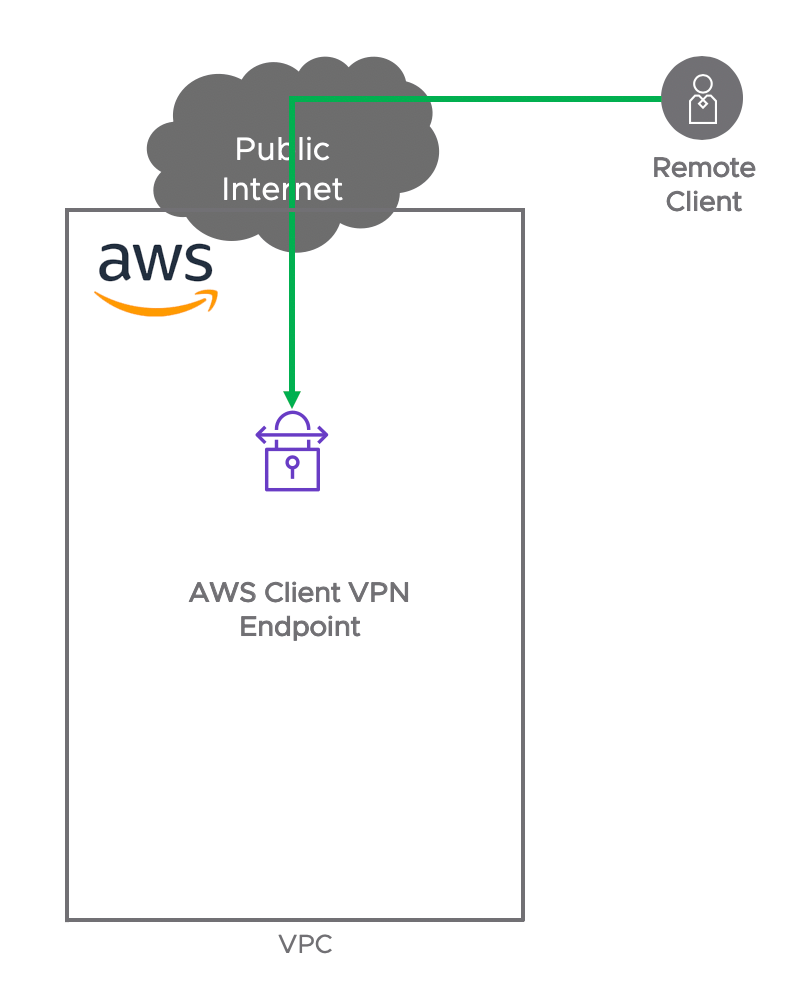
The AWS Client VPN enables clients to access resources:
- In the VPC where the AWS Client VPN Endpoint (aka SSL Server) is deployed
- In a VPC peered with the VPC where the AWS Client VPN Endpoint is deployed (I covered VPC peering in a previous post)
- In a remote site connected over VPN to the VPC where the AWS Client VPN Endpoint is deployed
- In VMware Cloud on AWS, connected to the VPC where the AWS Client VPN Endpoint is deployed over the ENI or over a VPN
Pre-Requisites
AWS Client VPN requires the use of:
- AWS Directory Services (the managed Active Directory) if AD authentication is used
- AWS Certificate Manager
- AWS VPC
Tutorial
Let’s go through the installation workflow. It didn’t take me that long but it’s not that straight-forward either.
- Create OpenSSL Certificates and Keys
- Import OpenSSL Certificate to AWS Certificate Manager
- Deploy AWS Directory Services (if not in used already)
- Deploy AWS Client VPN Endpoint
- Install OpenVPN Client
- Connect to AWS Client VPN Endpoint with OpenVPN Client
- Verify connectivity
Create OpenSSL Certificates and Keys
The best tutorial I found for using OpenSSL is here.
I used OpenSSL on my Mac Terminal. You can download it here.
The first thing we need to do is create a self-signed certificate. The command below creates a 2048-bit private key (runvmc.key) and a CSR (runvmc.csr) from scratch. You always need to enter some parameters when you create a CSR (such as Country, State, City, Organization Name).
See my example below:
bash-3.2$ openssl req \
> -newkey rsa:2048 -nodes -keyout runvmc.key \
> -out runvmc.csr
Generating a 2048 bit RSA private key
.............+++
..........+++
writing new private key to 'runvmc.key'
-----
You are about to be asked to enter information that will be incorporated into your certificate request.
What you are about to enter is what is called a Distinguished Name or a DN.
There are quite a few fields but you can leave some blank
For some fields there will be a default value,
If you enter '.', the field will be left blank.
-----
Country Name (2 letter code) []:GB
State or Province Name (full name) []:Cheshire
Locality Name (eg, city) []:Marple
Organization Name (eg, company) []:VMC
Organizational Unit Name (eg, section) []:AWS
Common Name (eg, fully qualified host name) []:runvmc.local
Email Address []:

Please enter the following 'extra' attributes
to be sent with your certificate request
A challenge password []:Secure_Password

bash-3.2$
Once your CSR is requested, you can view and verify it’s been set up correctly.
bash-3.2$ openssl req -text -noout -verify -in runvmc.csr
verify OK
Certificate Request:
    Data:
        Version: 0 (0x0)
        Subject: C=GB, ST=Cheshire, L=Marple, O=VMC, OU=AWS, CN=runvmc.local
        Subject Public Key Info:
            Public Key Algorithm: rsaEncryption
                Public-Key: (2048 bit)
                Modulus:
                    00:be:cf:88:c4:98:d8:66:2d:fd:2d:58:ef:70:c6:
                    b3:89:4a:55:4b:f2:62:db:91:53:64:0b:3c:fa:dc:
                    78:36:db:8f:e4:9e:c4:f2:4e:19:14:f7:ea:87:ef:
                    [...]
                Exponent: 65537 (0x10001)
        Attributes:
            challengePassword        :unable to print attribute
    Signature Algorithm: sha256WithRSAEncryption
         7f:7d:db:c2:ac:b5:bc:ff:e1:1a:a4:19:c0:f3:ae:01:58:31:
         86:22:f7:d9:35:ea:83:85:ff:30:64:ac:43:04:3e:a1:2c:61:
         b1:c1:d3:9c:5a:13:4b:c8:34:25:70:fb:be:f8:d0:45:4c:04:
         [...]
Then the next step is to generate a self-signed certificate (.crt file): this command below creates a self-signed certificate (runvmc.crt) from an existing private key (runvmc.key) and (runvmc.csr):
bash-3.2$ openssl x509 \
> -signkey runvmc.key \
> -in runvmc.csr \
> -req -days 365 -out runvmc.crt
Signature ok
subject=/C=GB/ST=Cheshire/L=Marple/O=VMC/OU=AWS/CN=runvmc.local
Getting Private key
I have now three files I will need for my OpenVPN connection: runvmc.crt, runvmc.key and runvmc.csr.
Import OpenSSL Certificate to AWS Certificate Manager
Log onto the AWS Console and go the AWS Certificate Manager. Click on “Import Certificate”.
In the first box (“Certificate Body”), copy-paste the content of your certificate (in my case, runvmc.crt).
In the second box (“Certificate private key”), copy-paste the content of your key (in my case, runvmc.key).
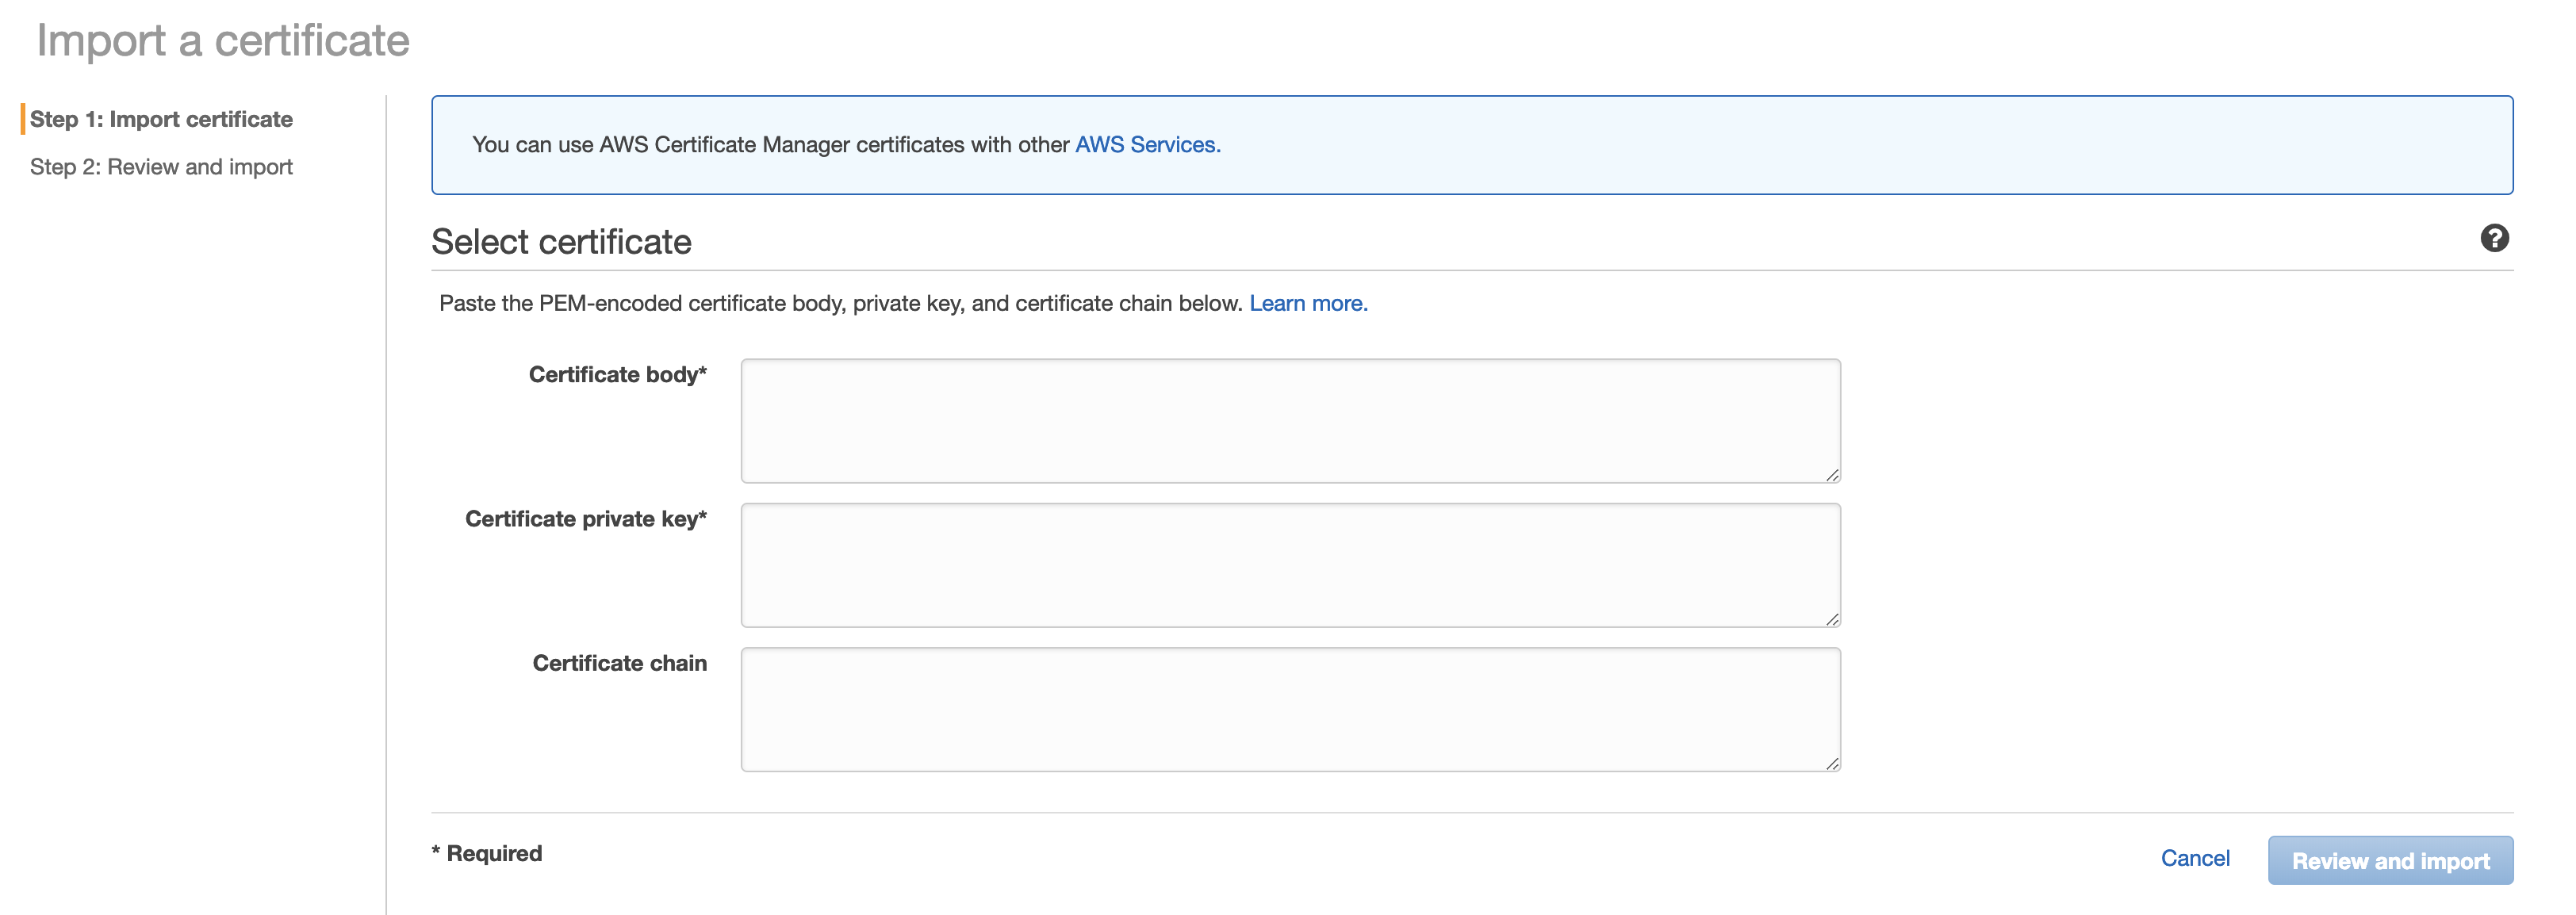
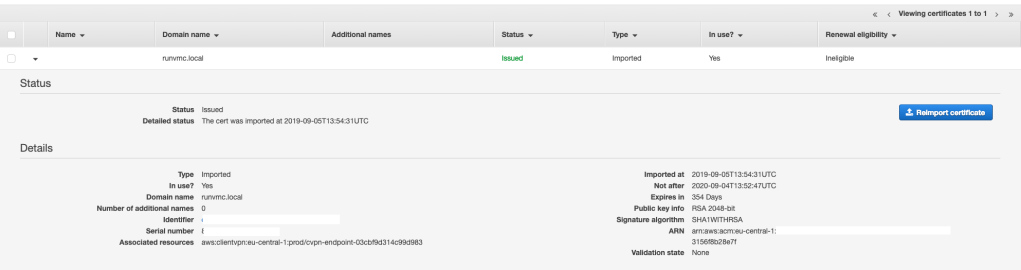
Click on “Review and Import” and “Import”.

Your certificate is now imported and you can use it with SSL client connection:
Deploy AWS Directory Services
I covered this in a previous blog. It’s really straight-forward. It takes about 2 minutes to go through the directory wizard and about 25-40 minutes for the directory to be created:

Deploy AWS Client VPN Endpoint
There are a number of steps to follow to get this right.
Go to the AWS console and VPN / Client VPN Endpoints and create a new Client VPN Endpoint.
Let’s go through the configuration below.
- Name tag: choose something that is relevant to you
- Description: specify what this VPN Endpoint is for
- Client IPv4 CIDR: this is a subnet from which your remote clients will pick up their IPs from. In my example, I used 172.33.4.0/22 and my remote Mac picked up the IP 172.33.4.162.
- Server certificate ARN: choose the ARN of the certificate you uploaded before (ARNs are Amazon Resource Names (ARNs) – ARNs uniquely identify AWS resources).
- Authentication Options: you can either use the mutual authentication or Active Directory authentication. In my case, I used the AD I created earlier.
- Connection Logging: you can log the connection details of the client connections in CloudWatch.
- DNS Server: you can allocate DNS servers to your remote clients.
- Enable split-tunnel: with this option off, all the traffic from the client is funnelled over the SSL tunnels. With this option on, only the traffic to the routes we will specify in the VPN configuration will go through the tunnel. We’ll have a look at an example shortly.

The next step is to associate a network in the VPC you want to access with your Client VPN connection.

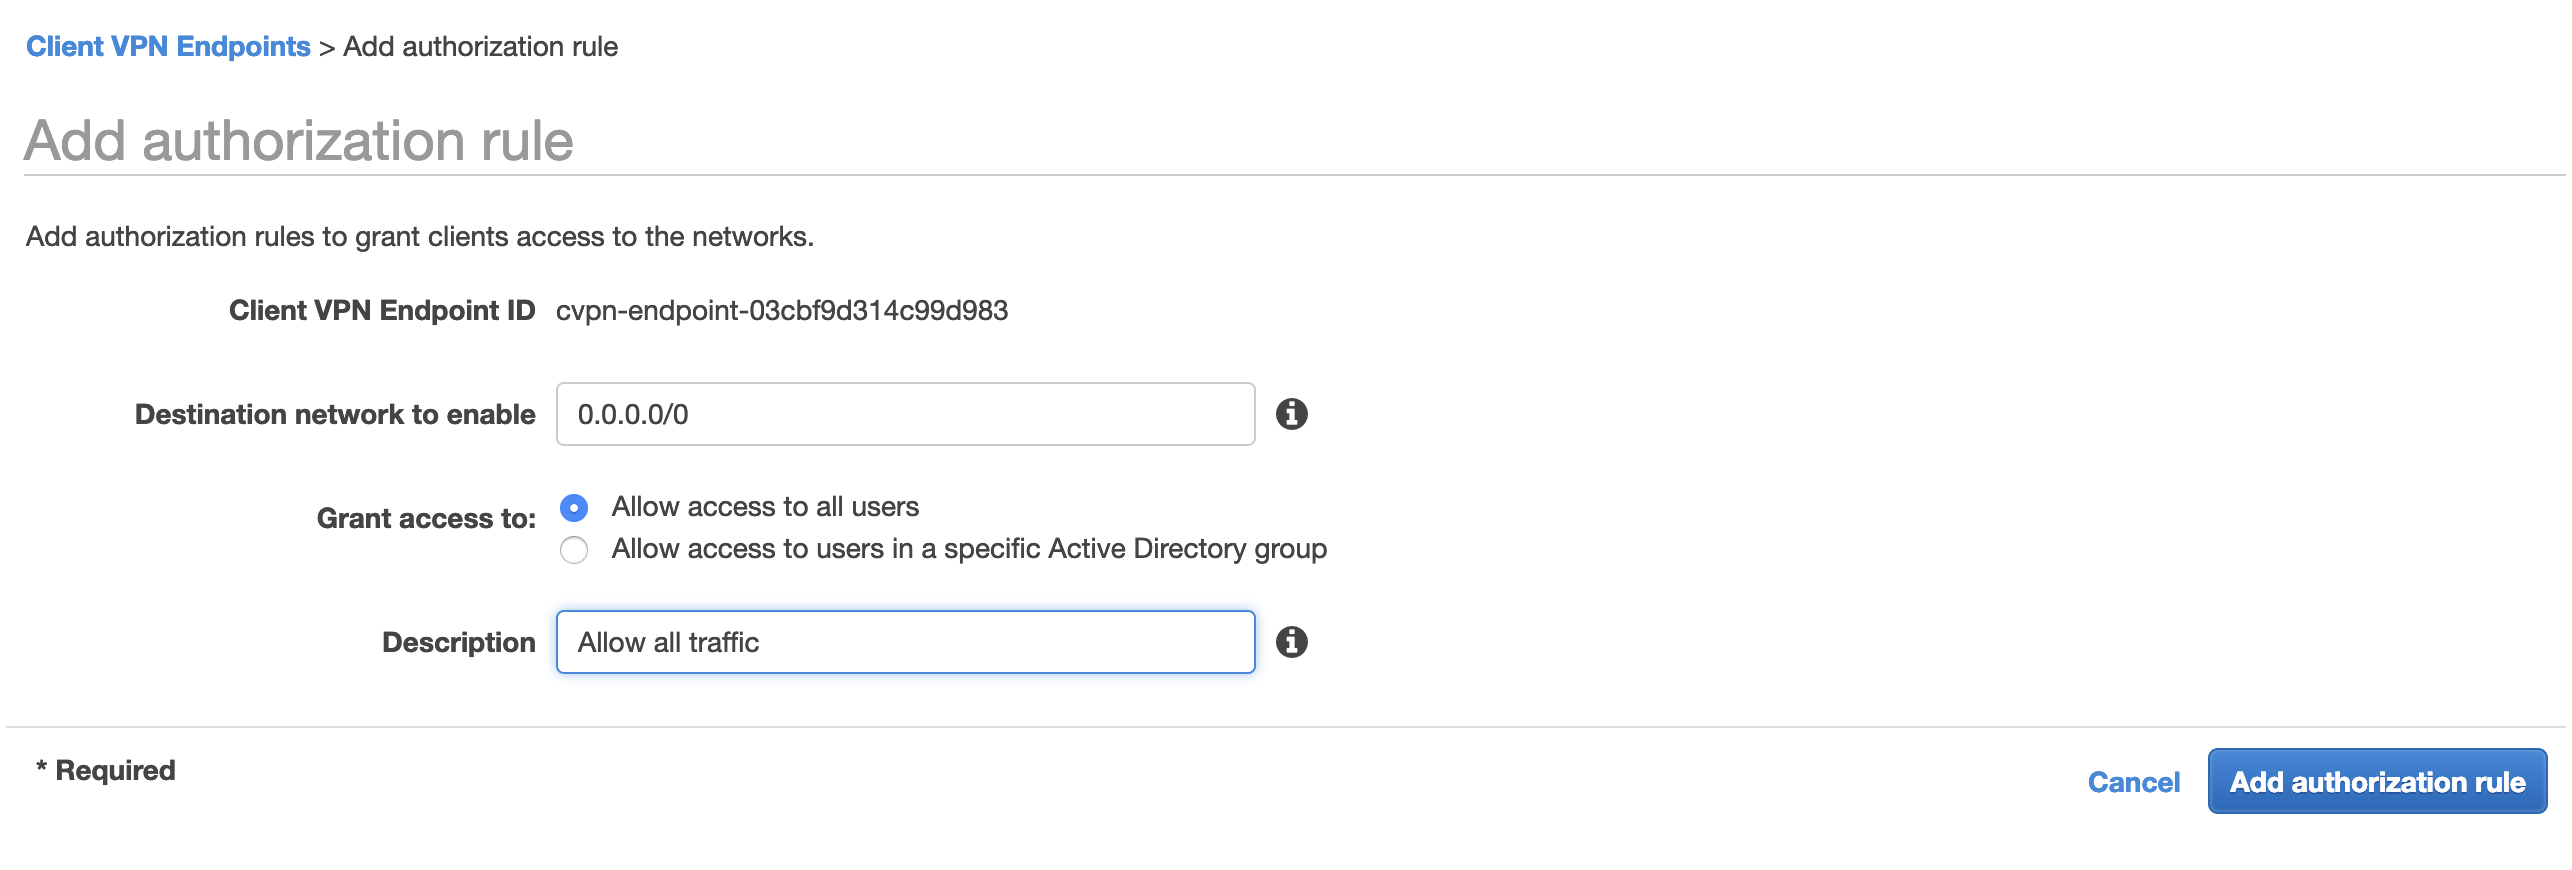
The next step is to add an Authorization Rule – this is essentially a firewall rule to restrict the traffic that can be sent. I kept it simple in mine and let all the traffic through. I could have been more specific and also restrict traffic based upon the AD group of the remote client.
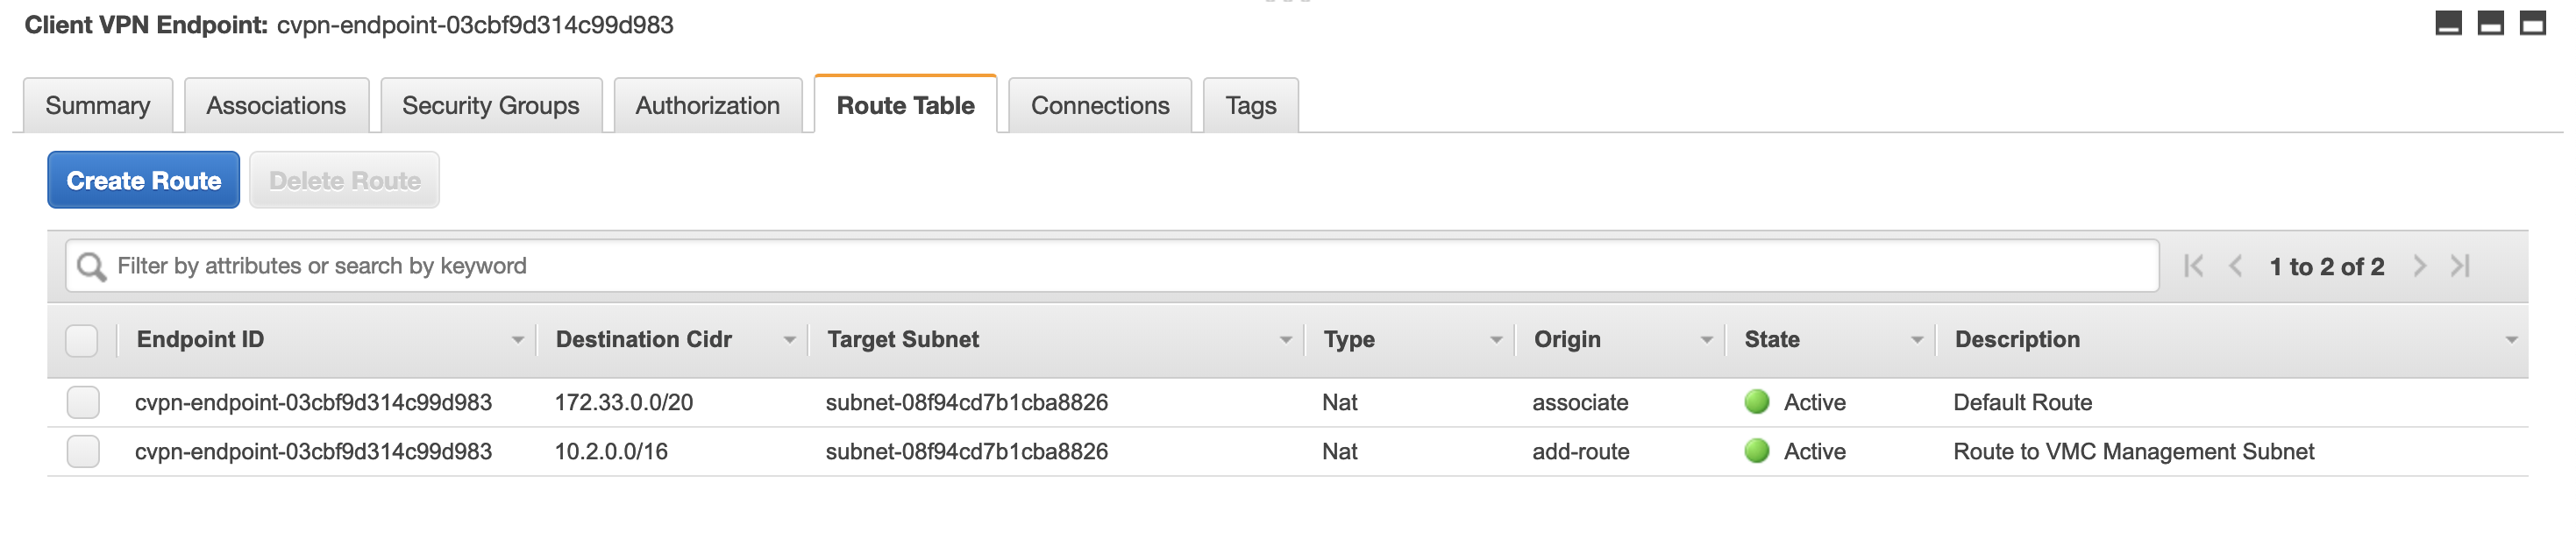
Finally, you need to edit the routes to tell the client how to reach remote resources.
To access a network beyond your local VPC (such as a peered VPC, a remote site or your VMware Cloud on AWS SDDC), you need to create a route at this stage. The 10.2.0.0/16 route in the table below is the management network of the VMware Cloud on AWS SDDC connected to the VPC where the VPN endpoint is connected. Having this route in the VPN Route Table forces the traffic from my remote client towards 10.2.0.0/16 over the VPN. Make sure the remote site has a route back to the network of your remote clients.
Once you associate a route (see above), the route is automatically added to the Client VPN route table. If you use the “split-route” VPN option, all the routes below are added to the client’s routing table as you will see in my routing table below.
bash-3.2$ netstat -nr
Routing tables

Internet:
Destination        Gateway            Flags        Refs      Use   Netif Expire
default            192.168.0.1        UGSc          162       22     en0
127                127.0.0.1          UCS             0        0     lo0
127.0.0.1          127.0.0.1          UH              4   123988     lo0
169.254            link#10            UCS             2        0     en0      !
192.168.0          link#10            UCS             4        0     en0      !
192.168.0.1/32     link#10            UCS             2        0     en0      !
192.168.0.1        48:d3:43:95:88:c8  UHLWIir        63       22     en0   1177
[...]
Once the VPN comes up, routes are added to my Mac’s routing table (see the highlighted routes below). The traffic to 172.33.4.0/20 and 10.2.0.0/16 is pushed down the tunnel.
bash-3.2$ netstat -nr
Routing tables

Internet:
Destination        Gateway            Flags        Refs      Use   Netif Expire
default            192.168.0.1        UGSc          134        0     en0
10.2/16            172.33.4.97        UGSc            0        0   utun1
127                127.0.0.1          UCS             0        0     lo0
127.0.0.1          127.0.0.1          UH              5   124864     lo0
169.254            link#10            UCS             2        0     en0      !
172.33/20          172.33.4.97        UGSc            0        0   utun1
172.33.4.96/27     172.33.4.98        UGSc            2        0   utun1
172.33.4.98        172.33.4.98        UH              1        0   utun1
192.168.0          link#10            UCS             5        0     en0      !
192.168.0.1/32     link#10            UCS             1        0     en0      !
192.168.0.1        48:d3:43:95:88:c8  UHLWIir        34       60     en0   1198
[...]
Install OpenVPN Client
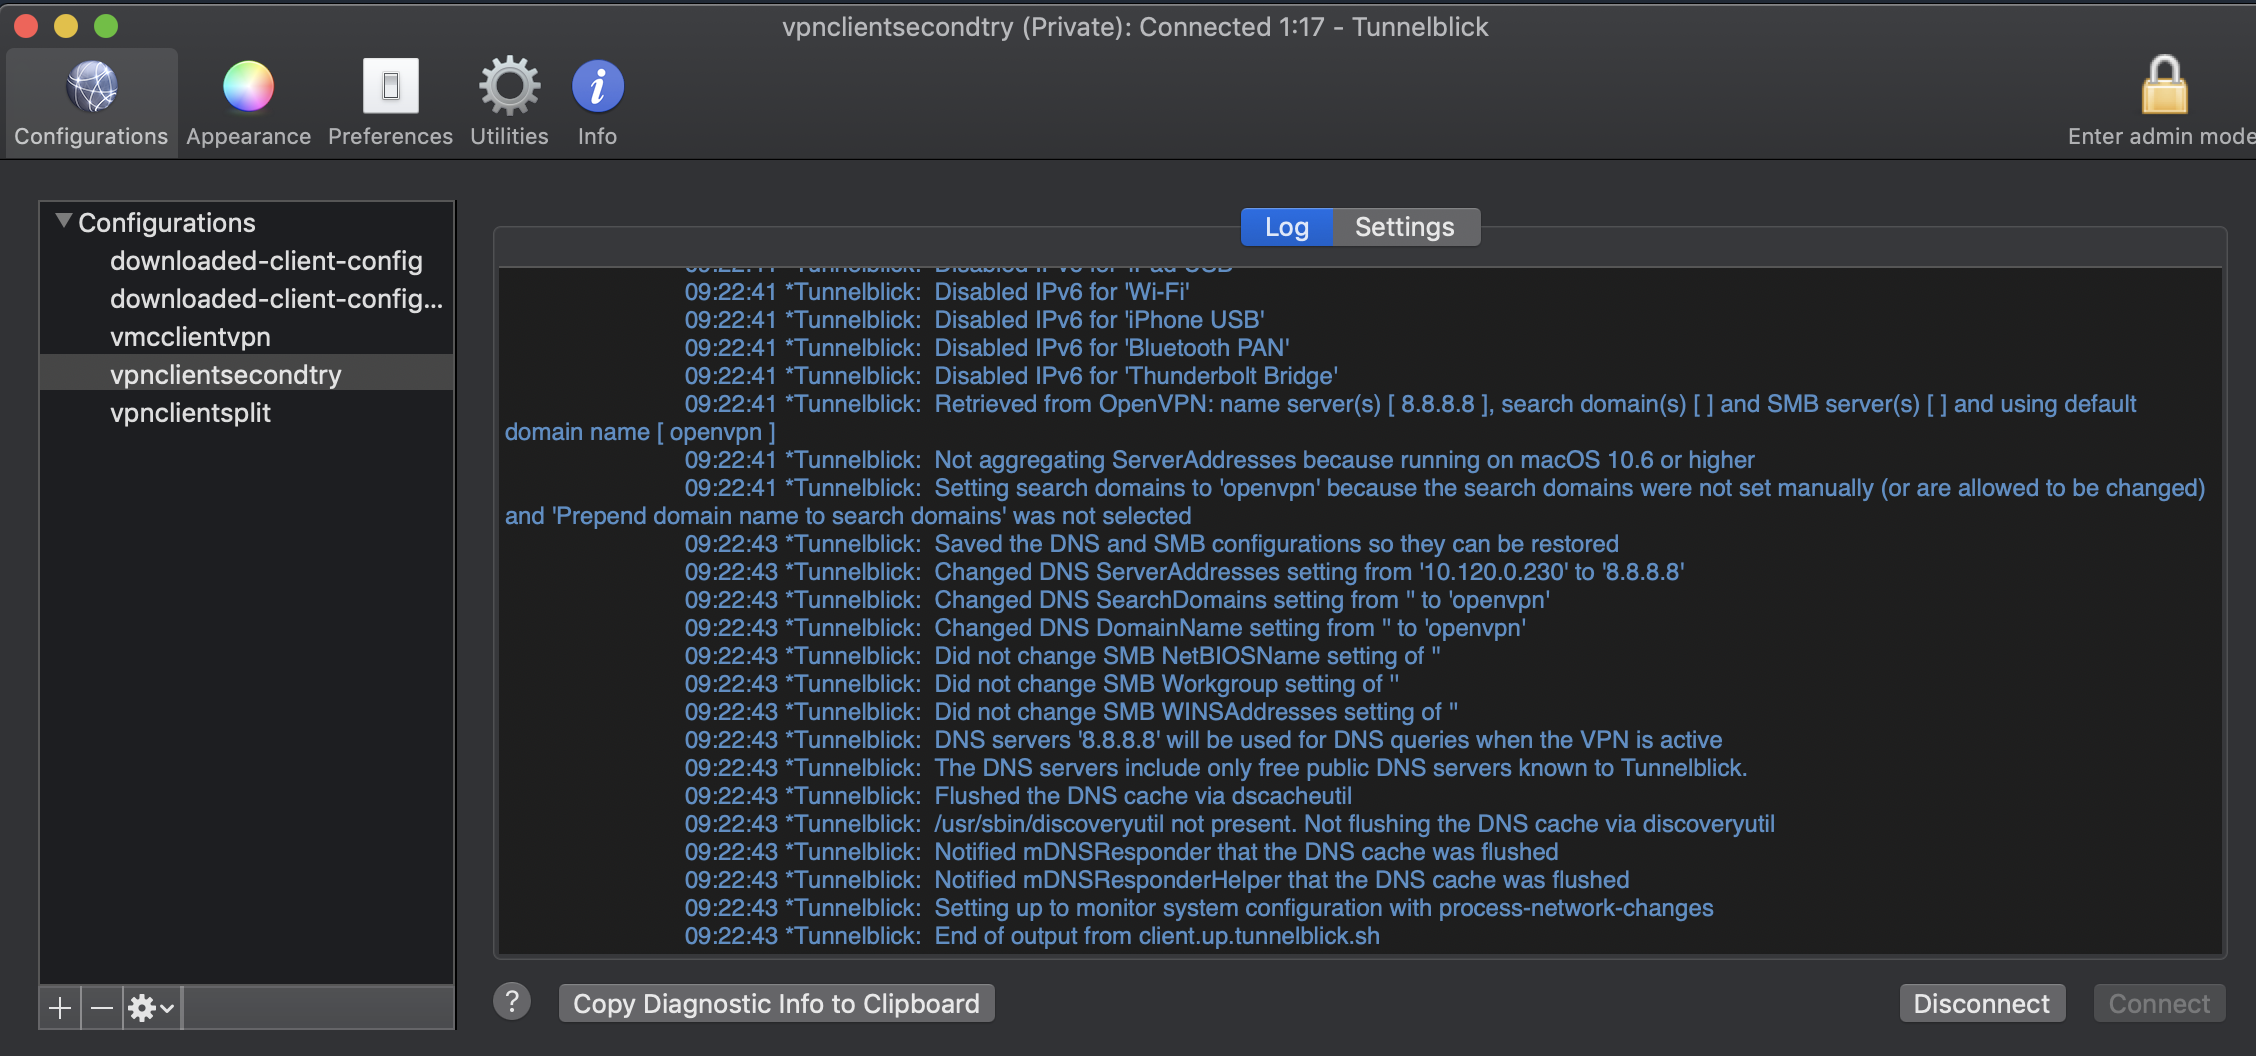
You can either use OpenVPN CLI but I choose to download TunnelBlick instead, which is an GUI of OpenVPN.
Install it. This picture below shows a connected session.
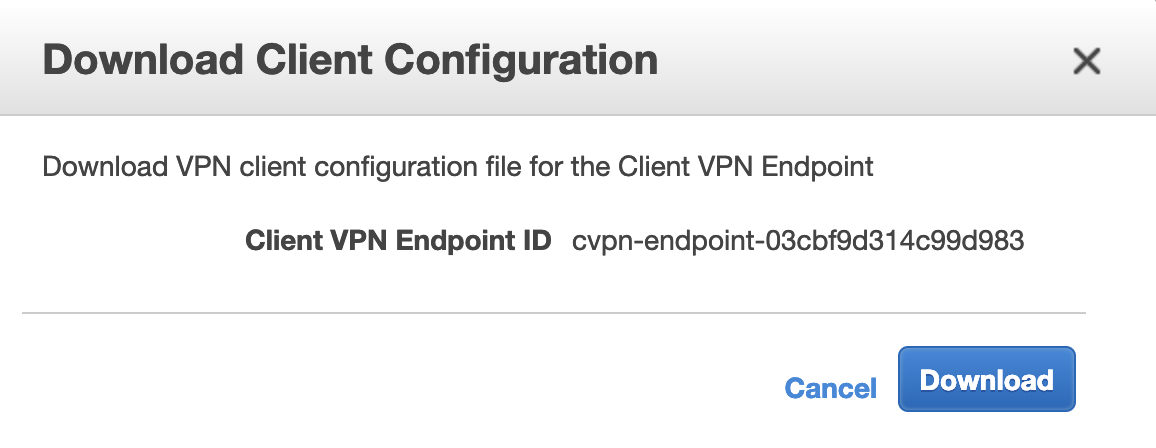
First, you need to download the OpenVPN configuration from the AWS Console:
Connect to AWS Client VPN Endpoint with OpenVPN Client
The file you’ve downloaded before will be named downloaded-client-config.ovpn. Once you open it, it should look like this:
client
dev tun
proto udp
remote cvpn-endpoint-03cbf9d314c99d983.prod.clientvpn.eu-central-1.amazonaws.com 443
remote-random-hostname
resolv-retry infinite
nobind
persist-key
persist-tun
remote-cert-tls server
cipher AES-256-GCM
verb 3
I was getting some errors (‘Certificate does not have key usage extension”) so I had to remove the “remote-cert-tls server” command from the text above.
If you’re going to use TunnelBlick like I did, you will need to place the .ovpn file below and the .crt and .key files in a folder and you need to add the .tblk extension to the folder. It will become a TunnelBlick file.
This .tblk file is now your TunnelBlick configuration file.
To install this configuration file, drag and drop it on the Tunnelblick icon in the menu bar, press Connect and you’re good to go!
Verify connectivity
Once your VPN connection is up and running, your connection will appear on the AWS console:

And I can ping a remote IP over the VPN:
bash-3.2$ ping 10.2.224.4
PING 10.2.224.4 (10.2.224.4): 56 data bytes
64 bytes from 10.2.224.4: icmp_seq=0 ttl=60 time=36.265 ms
64 bytes from 10.2.224.4: icmp_seq=1 ttl=60 time=36.763 ms
64 bytes from 10.2.224.4: icmp_seq=2 ttl=60 time=33.265 ms
^C
--- 10.2.224.4 ping statistics ---
5 packets transmitted, 5 packets received, 0.0% packet loss
round-trip min/avg/max/stddev = 33.265/36.963/40.384/2.336 m
The 10.2.224.4 happens to be the private IP of the VMC vCenter.

In practical terms, it means I am able to leverage AWS Client VPN and SSL VPN to securely connect into the AWS Cloud and connect to my VMware Cloud on AWS vCenter’s private IP:

Additional Resources
I recommend the following resources if you want to know more:
Introducing AWS Client VPN to Securely Access AWS and On-Premises Resources

great walk through! is it possible to terminate the client VPN endpoint direct into the connected VPC, rather than routing from a separate VPC into the connected VPC? or is there something that would not allow that to work?
LikeLike
Hi Adam, yes it’s possible to terminate the Client VPN into the Connected VPC. It is what I tested and I had access to VMC resources over the ENI. Thanks for reading the blog!
LikeLike
Hi Nico,
Thank you for this relevant post and many others too.
Do you know if it is possible to use the AWS Client VPN to remotely manage clients? I had a go at this but hoping I’ve misconfigured it as I couldn’t get it to work. Even if I do get that bit resolved, I can’t see how I would be able to fix the IP addresses for the clients. I may have to try spinning up an OpenVPN Access Server from the AWS Marketplace…
LikeLike