
This technical post will walk through how to set up a Transit VPC with Palo Alto Networks firewalls and how to connect it to VMware Cloud on AWS. The instructions below will also be applicable to a standard AWS VPC.
You can also use the commands further below to set up a route-based VPN from an on-prem Palo Alto Networks firewall to VMware Cloud on AWS or to an AWS VGW.
It follows the post published on the AWS blog on running Next-Gen FW with VMware Cloud on AWS and the overview on Transit VPC.
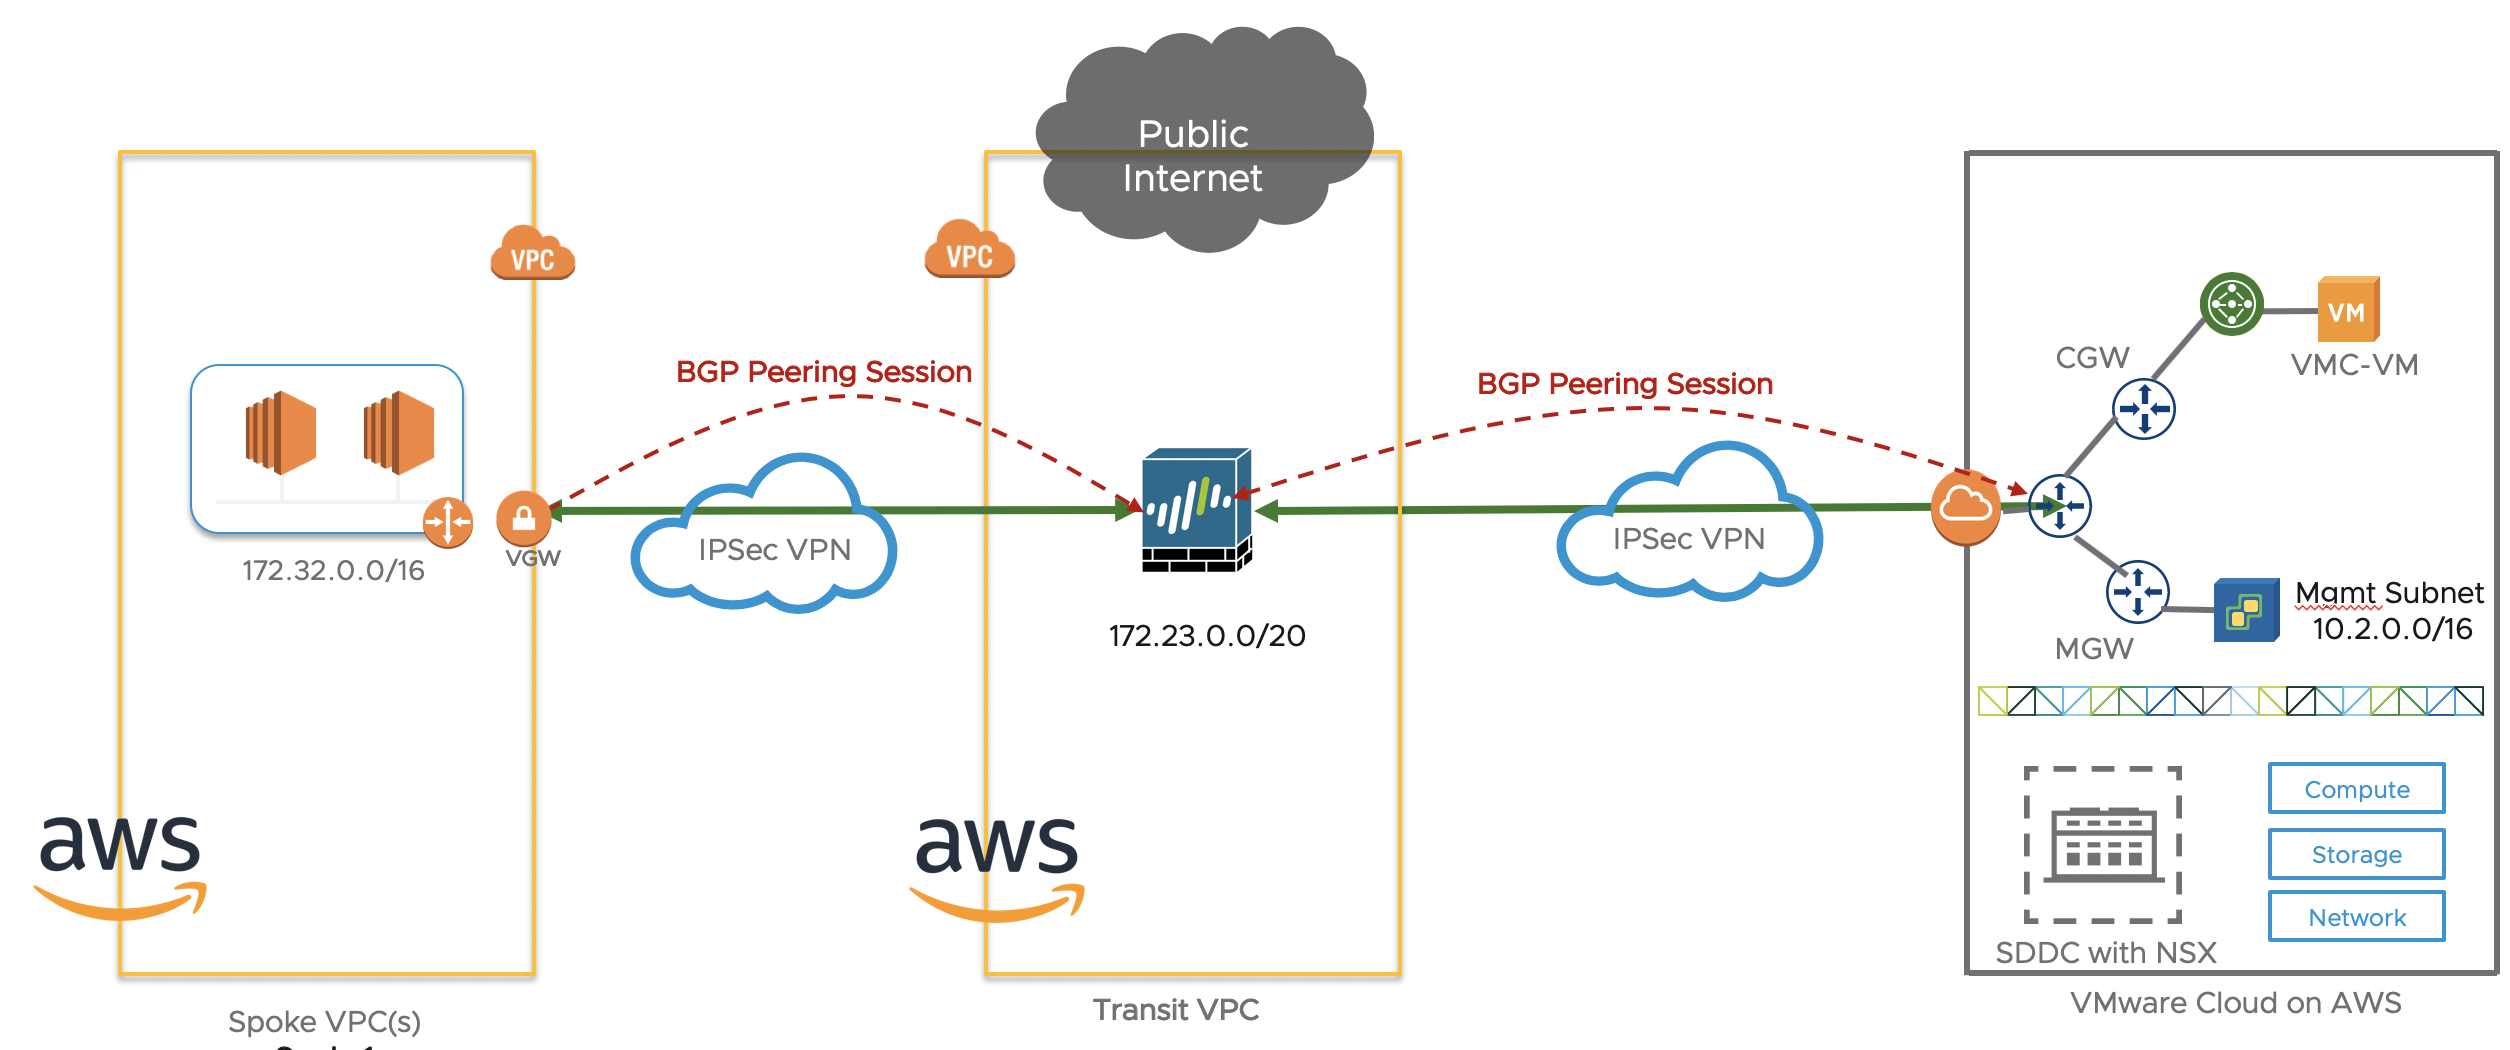
Let’s start with explaining what we are trying to do at high-level. As described in the post published on the AWS blog, we want to inspect the traffic going to/from an AWS VPC and a VMware Cloud on AWS SDDC environment with a next-gen firewall.
If you’re not familiar with the concept of Transit VPC, please read my summary post first.
Now you should understand Transit VPC and the fact that we have a next-gen FW running on top of EC2 instances (in the “transit VPC” or “hub VPC”) and spoke VPCs connected to the next-gen FW over VPN tunnels.
Throughout the post, I will use the Palo Alto Next-Gen FW but the same principle should apply to other virtual firewalls such as Cisco, CheckPoint, Juniper, Fortigate, etc…
In the context of VMware Cloud on AWS, the VMC SDDC is just considered another “spoke VPC” and we can just set up a couple of VPN tunnels from the next-gen FW to the VMware Cloud on AWS gateway.

Let’s explain in a bit more details what we’re doing.
Within the Transit VPC is a EC2 instance running a Palo Alto Firewall.
Deploying the Transit VPC and setting up the Spoke VPC and inter-connecting IPSec tunnels and BGP sessions were pretty straight-forward once you follow the official guide.
On the right-hand side are Spoke VPCs. You can have many of them. There will one or more VPNs between the Spoke VPC VGW (Virtual Gateway) and the Palo Alto FW.
The Spoke VPC will advertise its local CIDR network to the Transit VPC.
The Transit VPC will advertise the default route all other networks learned from other Spokes (including VMware Cloud on AWS).
We will connect a VMware Cloud on AWS SDDC to the Transit VPC over a route-based VPN.
The VMC SDDC will advertise the management and compute networks to the Transit VPC, and the Transit VPC will advertise these networks over to the Spoke VPC(s).
Building the Transit VPC and the Palo Alto Firewall
As mentioned before, you really ought to the follow the great step-by-step design guide Palo Alto put together. It’s very thorough and all the screenshots are very helpful.
The first step is to deploy a VPC (I assume you can do that), attach an Internet Gateway to it and deploy some Palo Alto instances from the Marketplace.
The Internet Gateway creation and attachment are straight-forward:


Deploy an EC2 instance from the AWS Marketplace and search for “Palo Alto”.

You have two versions of the Next-Gen FW – Bundle 1 and the fancier Bundle 2. I just used Bundle 1.
Select it and deploy the EC2 instance as you would normally do.
Make sure that you have:
- Auto-assign a public IP address to the EC2 instance so that you can access it over the Internet.
- A Security Group allowing 22 and 443 to the instance so that you can SSH and access the user interface over HTTPS.
First step is to SSH to the EC2 instance, using “admin” credentials and the key you specified during the deployment of the EC2 instance. You will SSH to the public IP picked up by the EC2 instance during deployment. Mine was 54.244.218.96 (it’s no longer there so don’t even bother to log onto mine, evil hacker!).
bash-3.2$ ssh -i NicoSecretKey.pem admin@54.244.218.96
Last login: Fri Jul 26 18:43:29 2019 from 38.98.37.141
Then issue the following commands to set up the GUI admin password.
configure
set mgt-config users admin password
Make sure you commit each configuration change (with the “commit” command) before going ahead and accessing the GUI of the Palo Alto. I’ve got to say – it’s a pretty ugly user interface. You can do better, Palo Alto.

The configuration of the Palo Alto can be done over CLI (on the SSH session you had previously set up) or over the GUI. I have used a combination of both in the past.
I will say it again as it often causes confusion – make sure you commit your changes (whether on the CLI or the UI).
Now you need to go back to the AWS console and create a network interface for the Palo Alto (right now, your Palo Alto only has a management interface but no actual interface to carry data traffic). This is going to referred to our interface ethernet 1/1 later on.
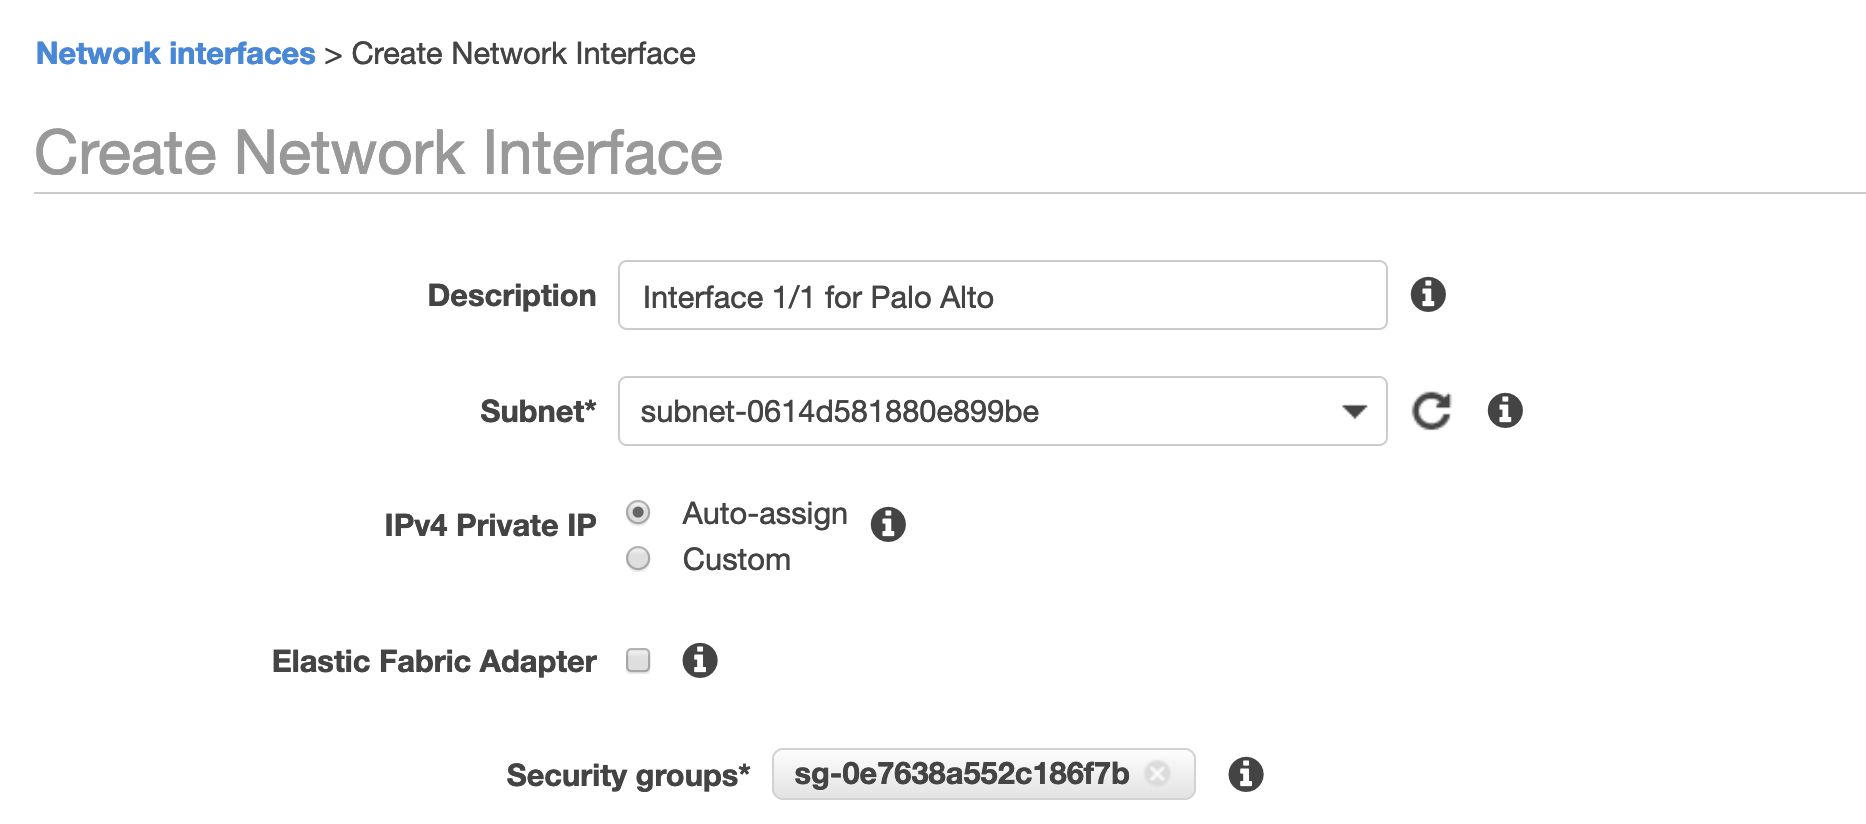
One thing you need to do first is to disable Source/Dest Check on the interface:

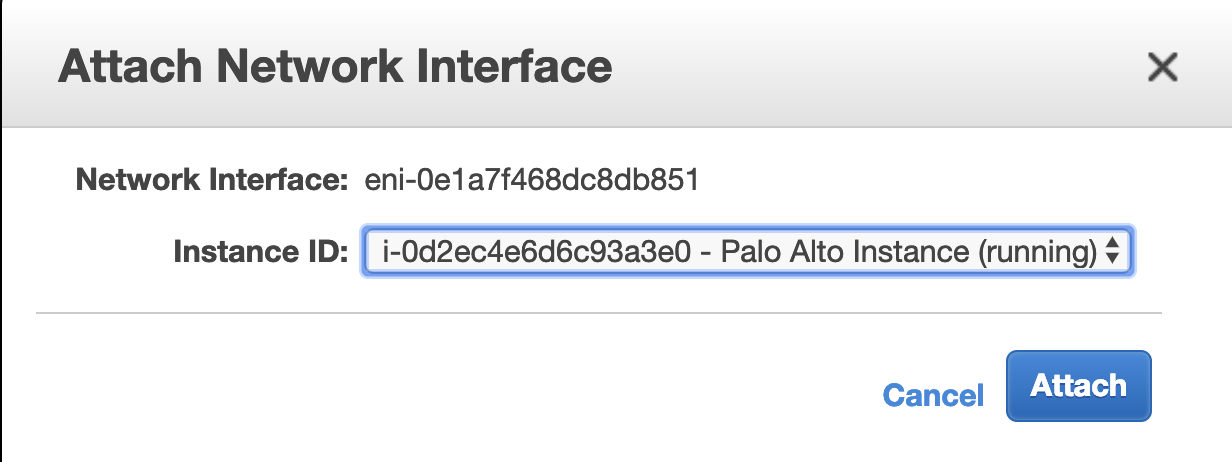
Then you need to attach it to the Palo Alto instance.
When you log onto the user interface of the PAN, you will see an ethernet 1/1 interface (in Network/Interfaces/Ethernet menu). It should have picked up an IP as expected:
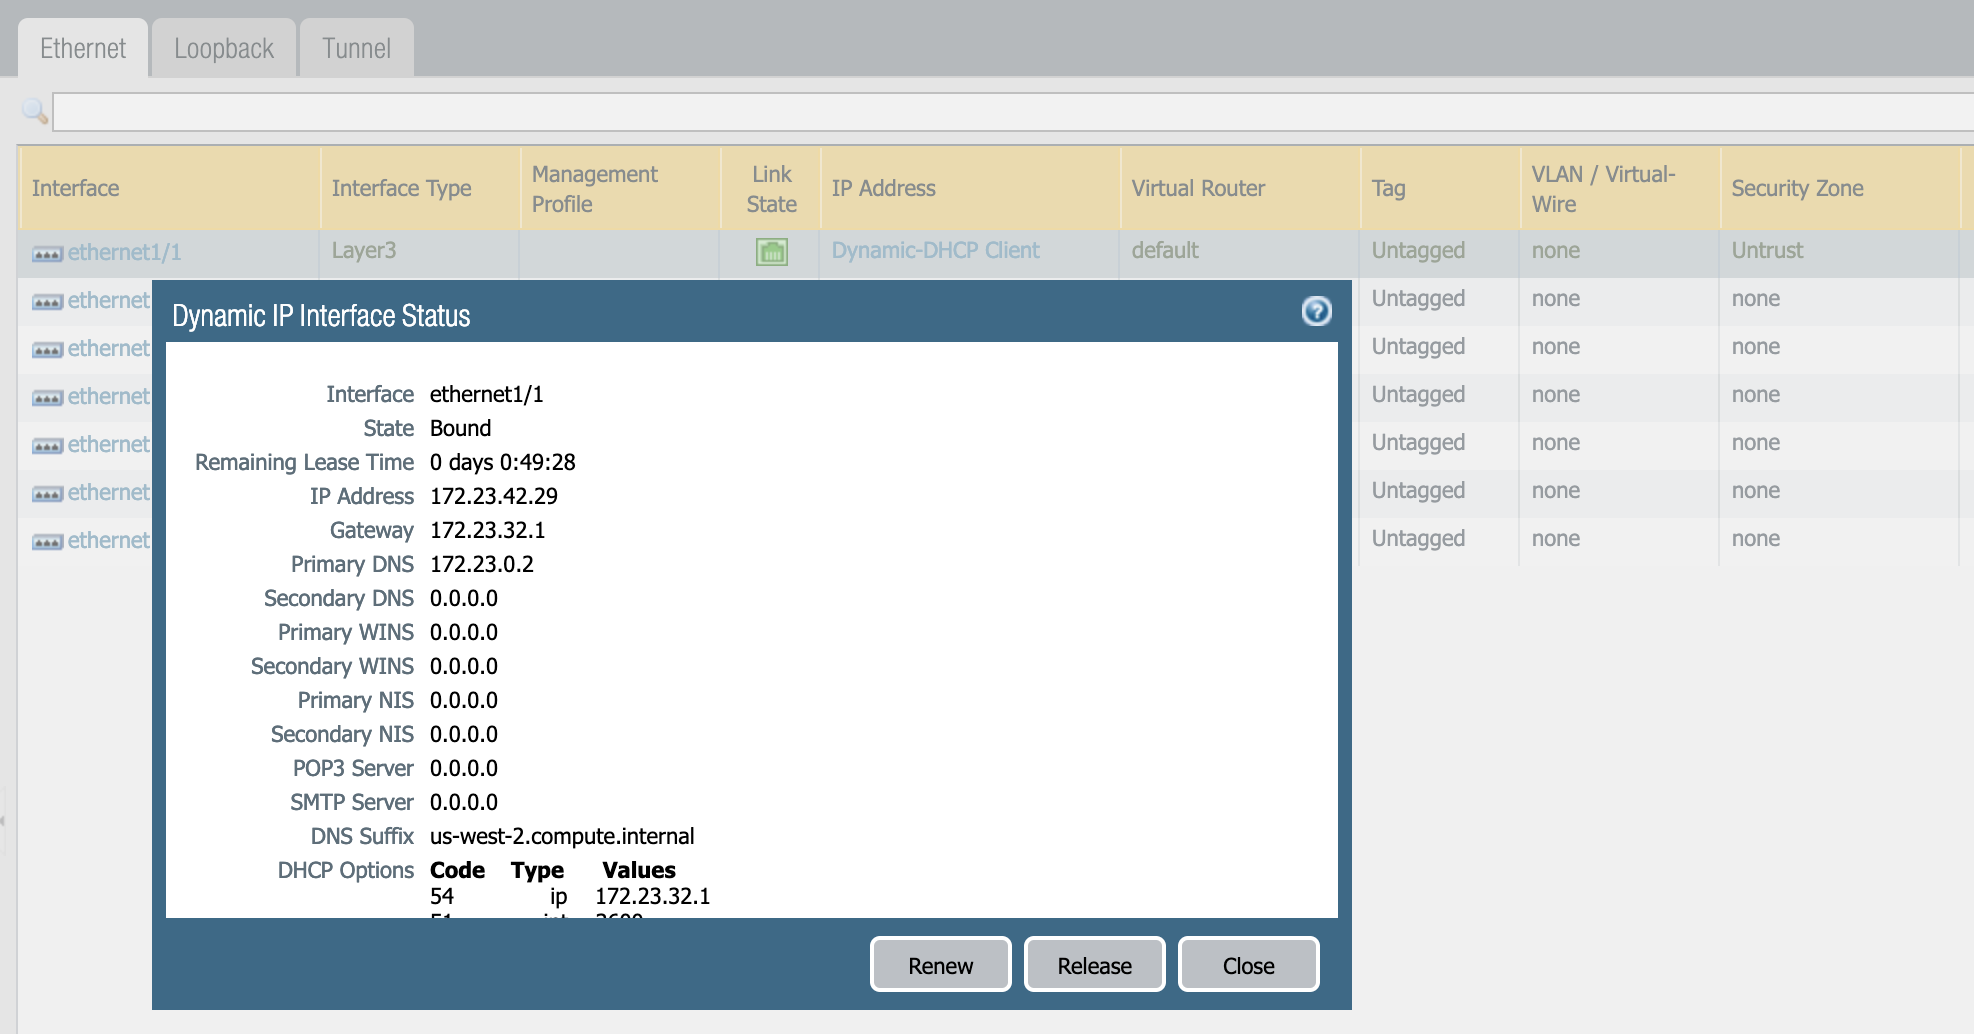
Now this IP also needs to be NATTed to a public IP so that we can establish VPNs to remote sites. So we need to request a public IP (Elastic IP) from AWS and associate with this private IP (in my case, with 172.23.42.29).
Go back to the AWS console and in the EC2 dashboard (“Elastic IPs”), request an IP and associate it with the network interface you have created.

Final step is to set up a “Customer Gateway” with the public IP of the Palo Alto firewall and you’re good to go.

The Palo Alto Firewall is ready to be configured. If you want to connect a spoke VPC to the Transit VPC, follow the instructions in Section 3 onwards in the Palo Alto docs. They are quite straight-forward and there’s little value in me repeating what they do in the doc.
I will focus however on connecting the Palo Alto Firewall to VMware Cloud on AWS.
Set up the VPN between VMware Cloud on AWS and Palo Alto
The configuration can be done on the GUI or on the CLI.
If you want to use the CLI, you can use the script below. It leverages the automatic configuration templated generated by AWS but I have tested it in my lab and it also worked fine with VMware Cloud on AWS.
I will show the matching configuration of VMware Cloud on AWS on the picture gallery further below if you want to use the GUI instead (you can also read the document as the configuration described for AWS VGW also works with VMware Cloud on AWS).
You can also find the scripts on my GitHub repo: https://github.com/nvibert/paloalto
You need to apply the configuration below via the SSH session.
! --------------------------------------------------------------------------------
! IPSec Tunnel #1
! --------------------------------------------------------------------------------
! #1: Internet Key Exchange (IKE) Configuration
!
! A policy is established for the supported ISAKMP encryption,
! authentication, Diffie-Hellman, lifetime, and key parameters.
! Please note, these sample configurations are for the minimum requirement of AES128, SHA1, and DH Group 2.
! You will need to modify these sample configuration files to take advantage of AES256, SHA256, or other DH groups like 2, 14-18, 22, 23, and 24.
!
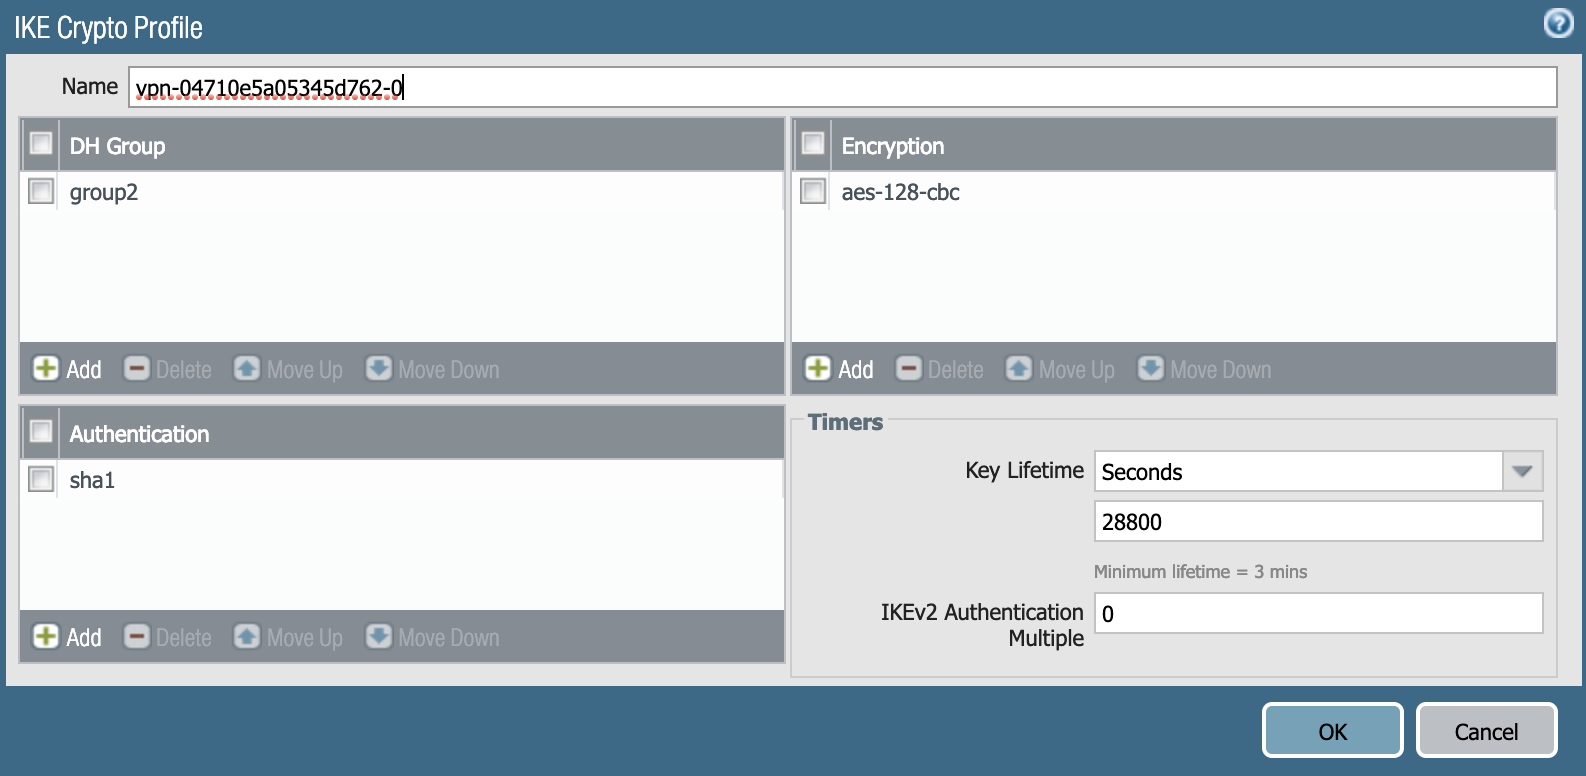
configure
edit network ike crypto-profiles ike-crypto-profiles vpn-04710e5a05345d762-0
set dh-group group2
set hash sha1
set lifetime seconds 28800
set encryption aes-128-cbc
top
! Update the public IPs below as you see fit. In my environment, 3.8.43.36 is the IP address of VMware Cloud on AWS and 52.42.95.209 is the public IP of the Palo Alto EC2 instance. As you can see, I used an unbreakable password for my IPSec connection.
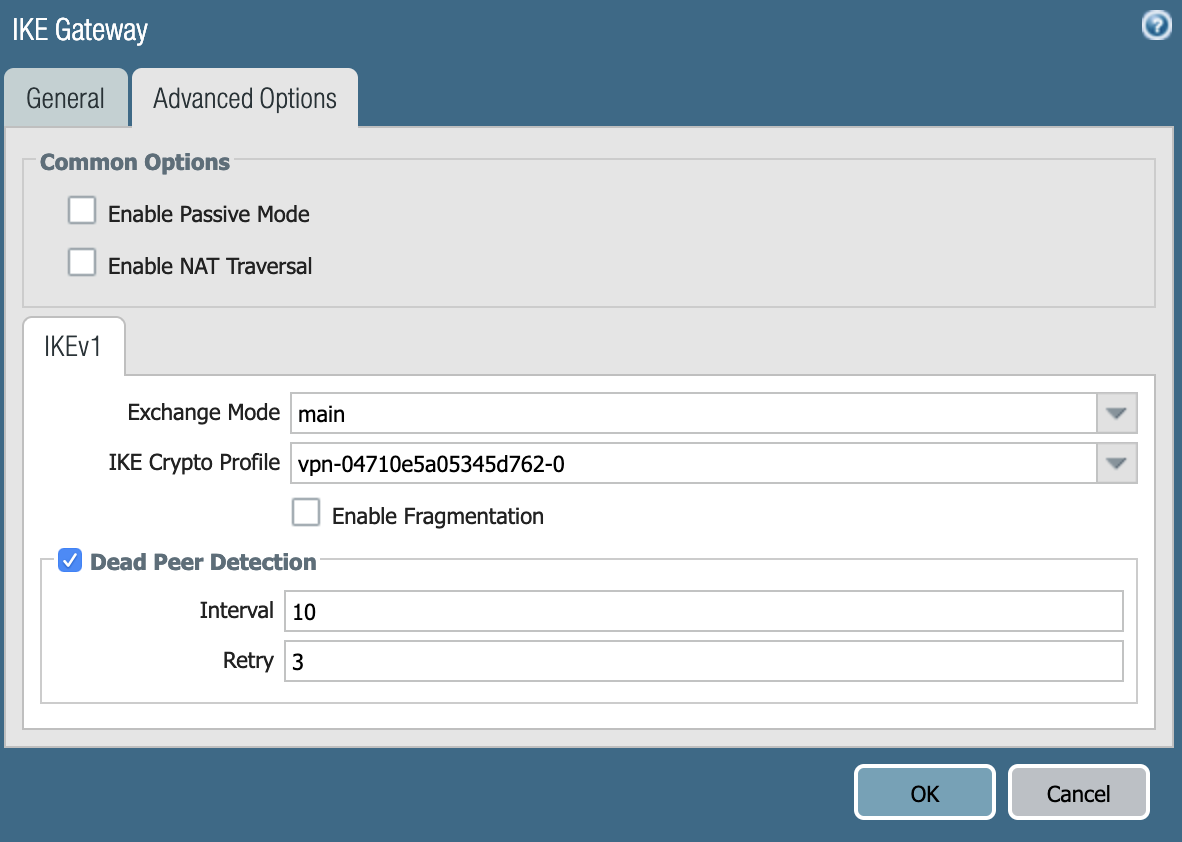
edit network ike gateway PAN-to-VMC
set protocol ikev1 ike-crypto-profile vpn-04710e5a05345d762-0 exchange-mode main
set protocol ikev1 dpd interval 10 retry 3 enable yes
set authentication pre-shared-key key VMware1!VMware1!
set local-address ip 52.42.95.209
set local-address interface ethernet1/1
set peer-address ip 3.8.43.36
top
#2: IPSec Configuration
!
! The IPSec transform set defines the encryption, authentication, and IPSec
! mode parameters.
!
! Please note, you may use these additionally supported IPSec parameters for encryption like AES256 and other DH groups like 2, 5, 14-18, 22, 23, and 24.
edit network ike crypto-profiles ipsec-crypto-profiles ipsec-vpn-04710e5a05345d762-0
set esp authentication sha1
set esp encryption aes-128-cbc
set dh-group group2 lifetime seconds 3600
top
! --------------------------------------------------------------------------------
! #3: Tunnel Interface Configuration
!
! A tunnel interface is configured to be the logical interface associated
! with the tunnel.
!
! Association with the IPSec security association is done through the
! "tunnel protection" command.
!
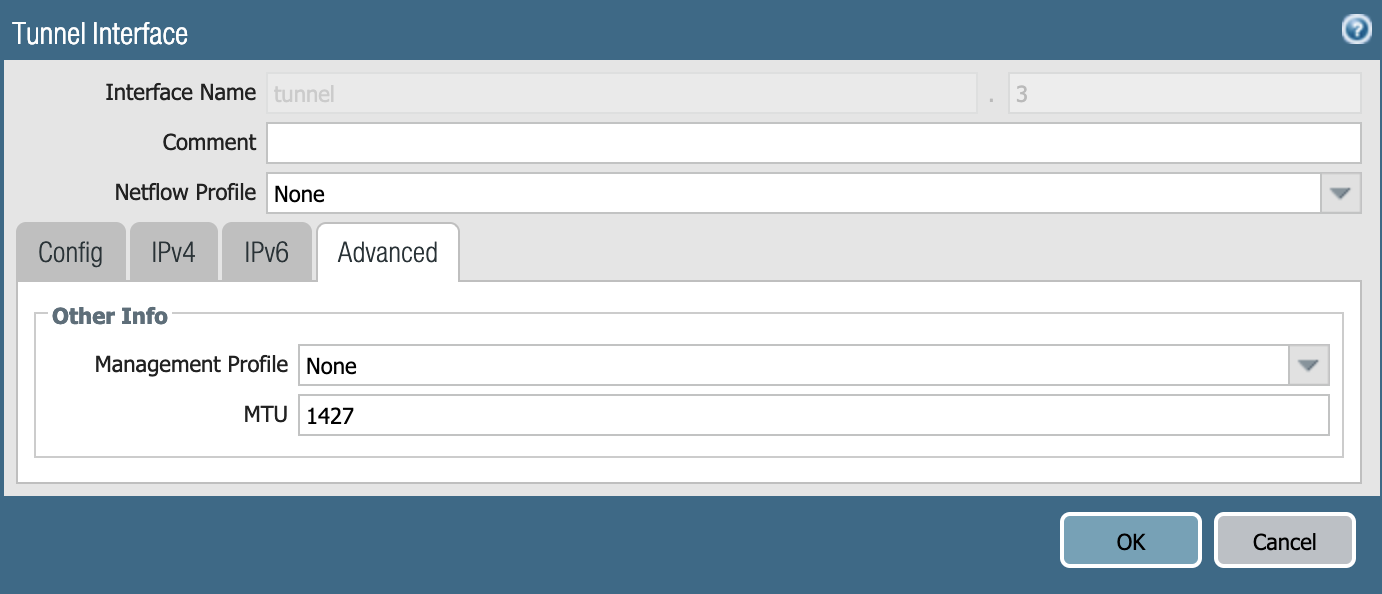
edit network interface tunnel units tunnel.3
set ip 169.254.112.118/30
set mtu 1427
top
!
! Tunnel interface needs to be associated to Zone, we are using Untrust zone as an example, please adjust according
!
set zone Untrust network layer3 tunnel.3
! Tunnel interface needs to be associated to a virtual router, we are using default as an example, please adjust accordingly
!
set virtual-router default interface tunnel.3
top
edit network tunnel ipsec ipsec-tunnel-3
set auto-key ipsec-crypto-profile ipsec-vpn-04710e5a05345d762-0
set auto-key ike-gateway PAN-to-VMC
set tunnel-interface tunnel.3
set anti-replay yes
top
! --------------------------------------------------------------------------------
! #4: Border Gateway Protocol (BGP) Configuration
!
! BGP is used within the tunnel to exchange prefixes between the
! VMC and the Palo Alto instance.
!
!
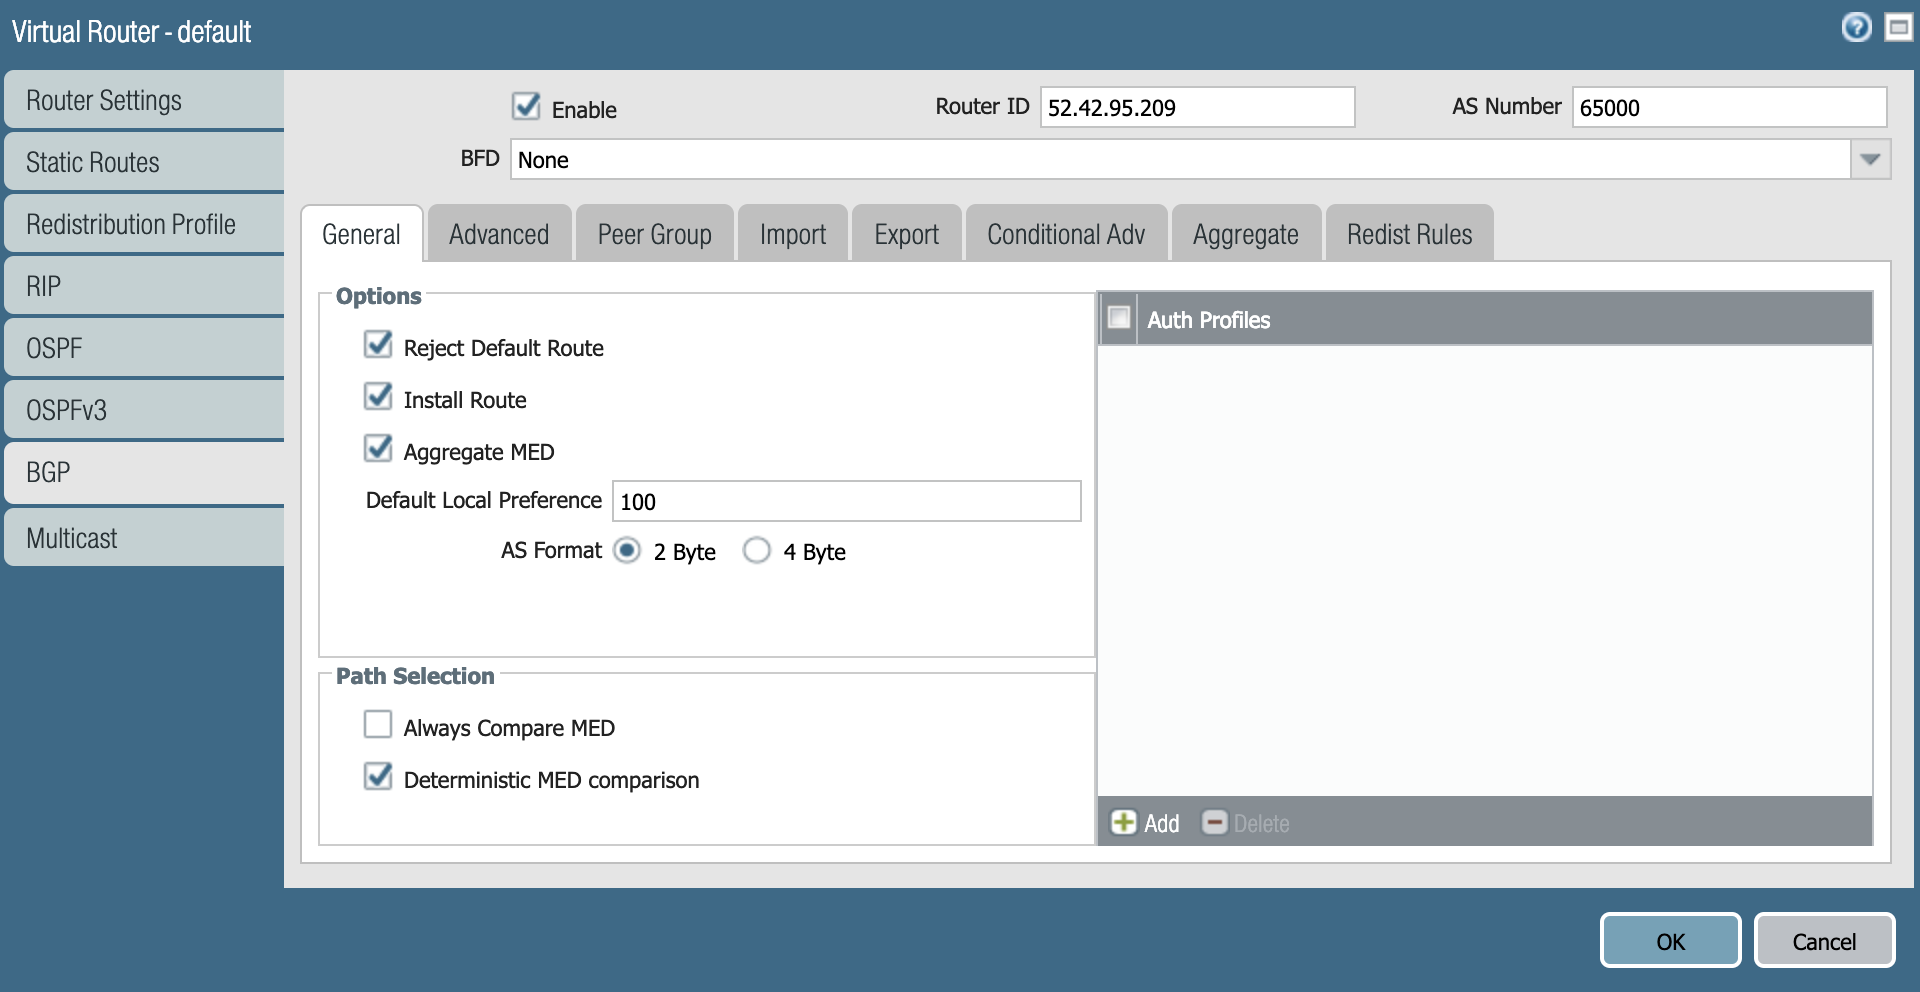
edit network virtual-router default protocol bgp
edit peer-group VMCBGP
edit peer VMC
set peer-as 65100
set connection-options keep-alive-interval 10
set connection-options hold-time 30
set enable yes
set local-address ip 169.254.112.118/30
set local-address interface tunnel.3
set peer-address ip 169.254.112.117
top
!
! Your gateway can advertise a default route 0.0.0.0/0 to AWS VPCs or VMC on AWS for which you would need to create a
! redistribution profile as follows, allow redistribution of default route and finally
! apply the redistribution profile under bgp
!
edit network virtual-router default protocol redist-profile Default_to_VPC
set filter type static
set filter destination 0.0.0.0/0
set priority 10
set action redist
top
edit network virtual-router default protocol bgp
set allow-redist-default-route yes
top
edit network virtual-router default protocol bgp redist-rules Default_to_VPC
set enable yes
set set-origin incomplete
top
If you want to do it on the GUI instead, look at the gallery below. What’s on the CLI above configures what’s below:


This is what you have to configure on VMware Cloud on AWS for the tunnel to come up:
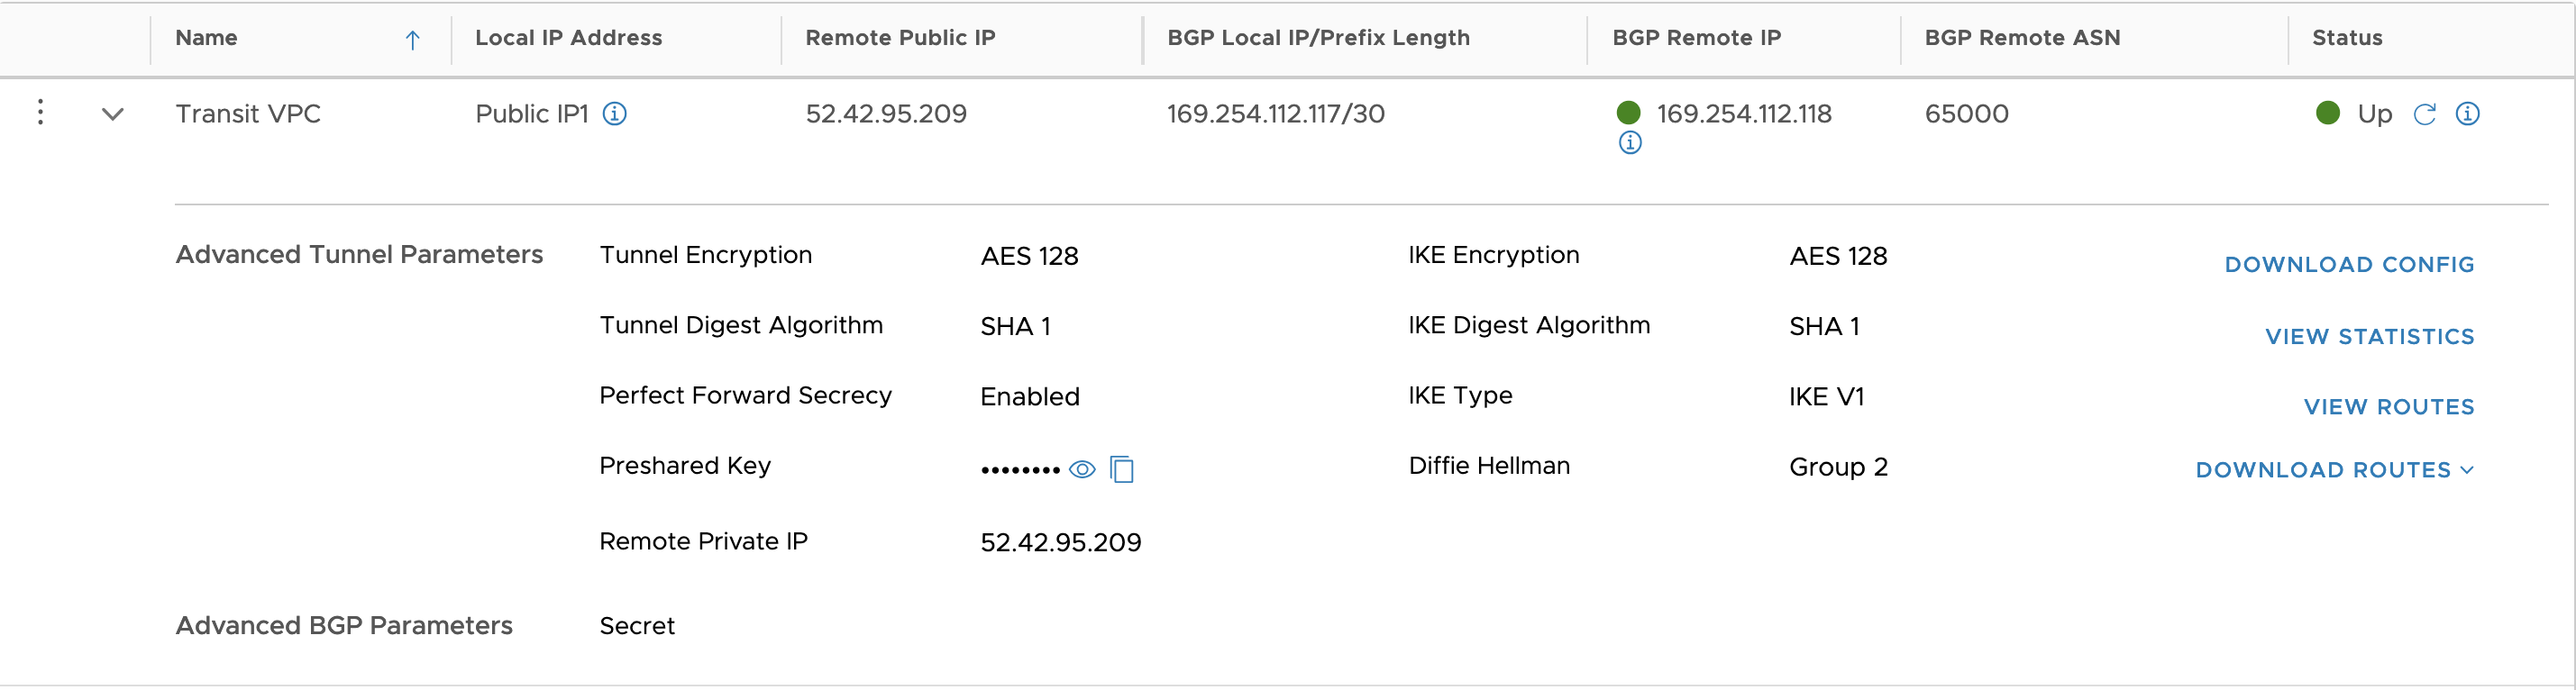
As you can see below, the tunnel and the BGP sessions have both come up.
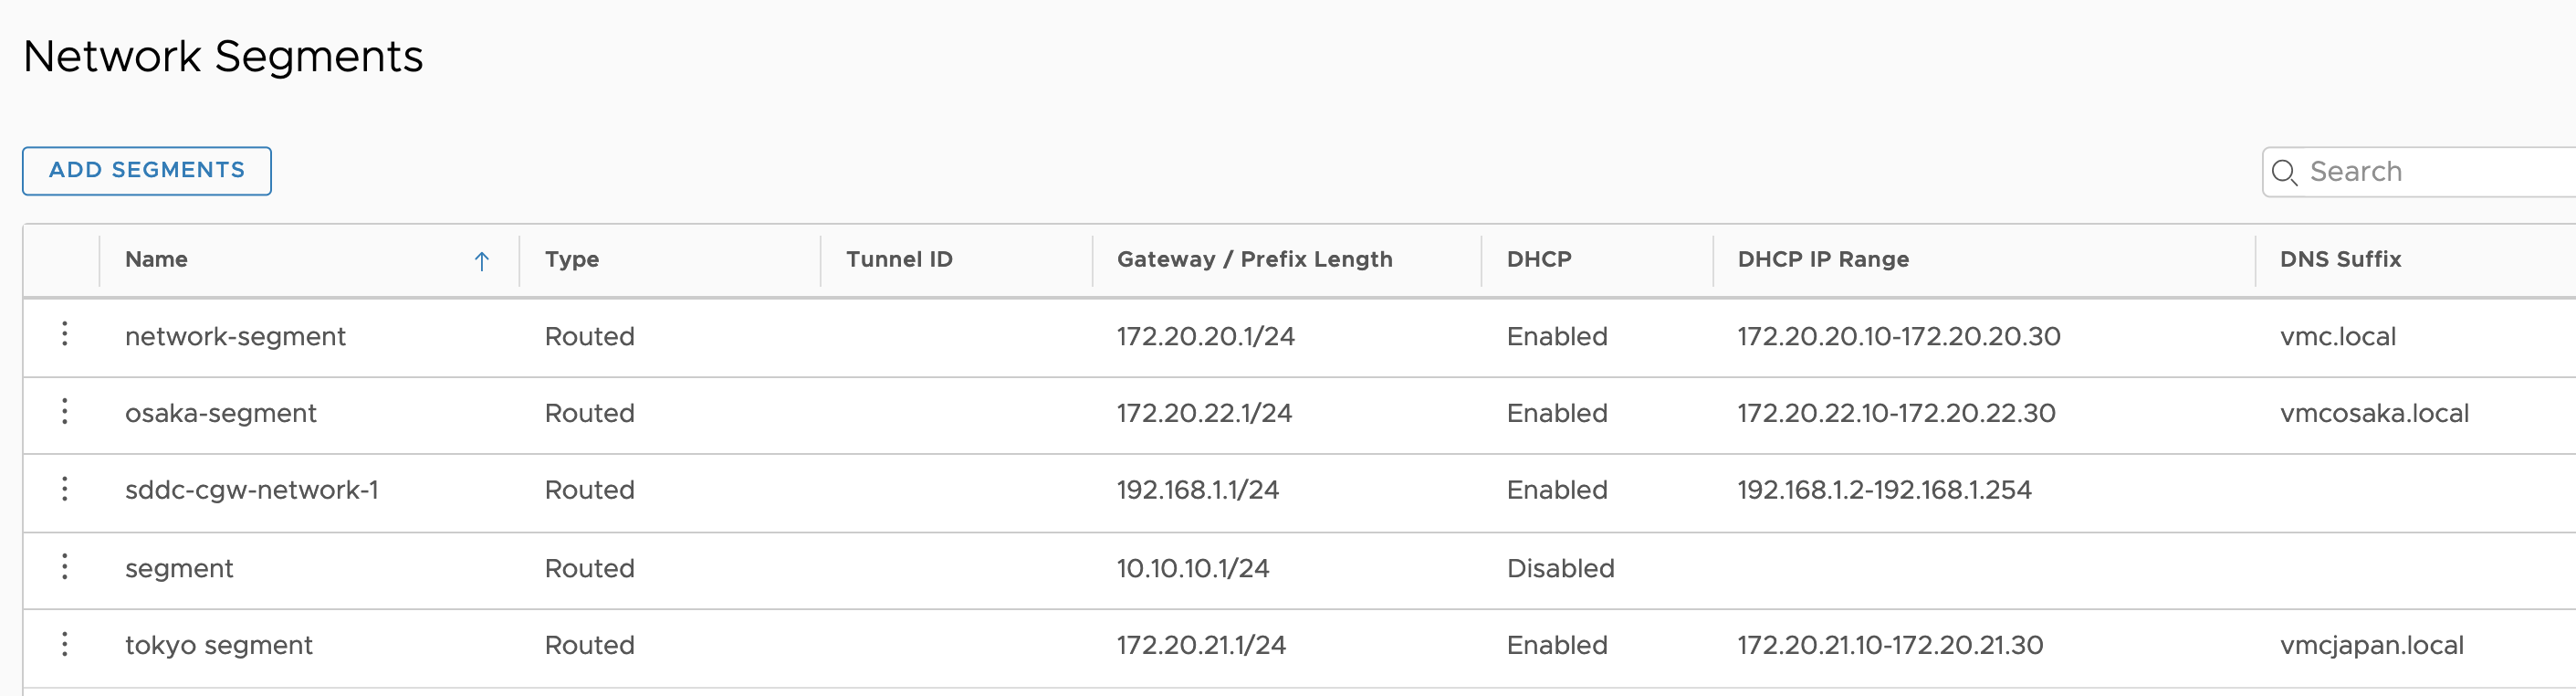
When you look at the routes advertised from VMC, we can see all the local network segments and the management subnet (10.2.0.0/16):

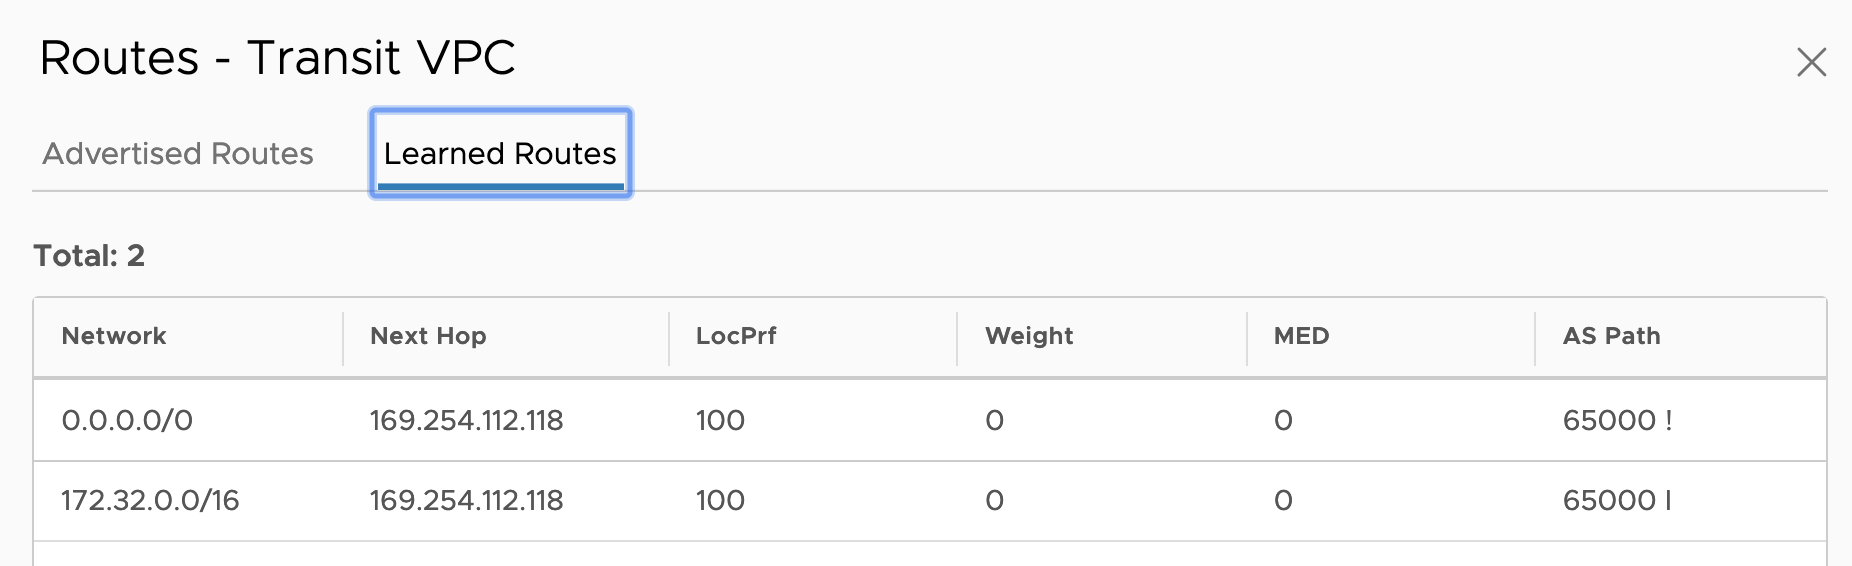
The VMC SDDC is learning two routes:
- The default route, from the Palo Alto instance.
- 172.32.0.0/16, which is the CIDR from an AWS Spoke VPC.
And that’s it – you now have your Transit VPC up and running all the traffic from your VMware Cloud on AWS is going through the Transit VPC for inspection.
Thanks for reading.

One thought on “AWS Transit VPC (Part 2) – with Palo Alto Networks and VMware Cloud on AWS”