
With the recent VMware Cloud on AWS release 1.9 out comes a ton of new networking and security features. Most of the focus of these features is on making the platform easier to manage and secure VMs in the cloud.
There are all summarized in this post, except the Terraform NSX-T Policy provider which will be covered in a subsequent post.
Tags
You can assign tags to just about anything (VPN, groups, services, security rules). These tags are different from security tags and vSphere tags though (read more here).
For VPN, the main use case is to be able to search faster. If you look below, I create a tag and attach it to my VPN. When I search based on the tag, I can very quickly find the right VPN.

I love the ability to use tags and metadata to improve our ability to use the service.
Groups
You can create ’groups’ based upon different criteria such as ‘VM’, ‘Segment Port’, ‘Segment’ and ’IPSET’.
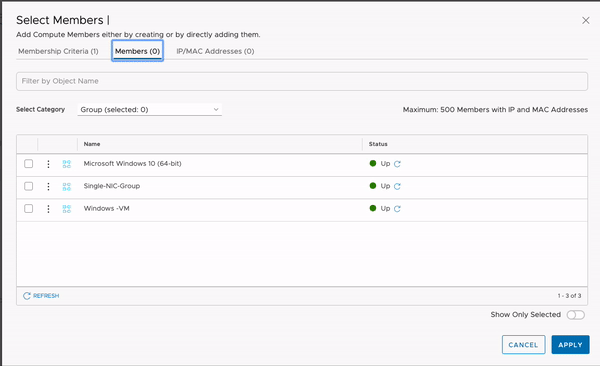
What’s new is the ability to create groups (and therefore security policies) based on the OS Name. It’s particularly useful for customers that needed the ability to micro-segment legacy OS easily.

In this example, I have a VM called ‘nvibert-Test-VM’ running Microsoft Windows (64-bit).
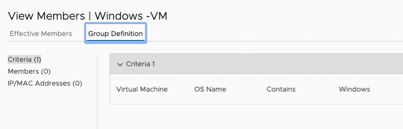
I create a group that matches by the criteria (Virtual Machine OS Name Contains Windows) and my VM is automatically added to the ‘Windows-VM’ group.

We can then create a security group based upon this group and secure workloads based on their operating system. Imagine you lift-and-shift and migrate your whole VM estate to VMware Cloud on AWS, you could easily quarantine some of the legacy VMs using this feature.
We can also now create groups nested inside other groups (also called ‘nested groups’). This gives you the ability to apply security policies encompassing wider groups but also more granular rules. We can now enable you to have security policies as close as business and compliance policies.
As an example, you might want to apply a policy across all Windows machine allowing port 389 for LDAP but you might also want to apply different policies on your Windows 10 virtual desktops and on your Windows Server 2012 R2 servers.
In the video below, I create a group called “Microsoft Windows” and it includes two groups “Microsoft Windows 10 (64-bit)” and “Microsoft Windows Server 2012” using the ‘OS’ criteria explained earlier.
Overview Windows
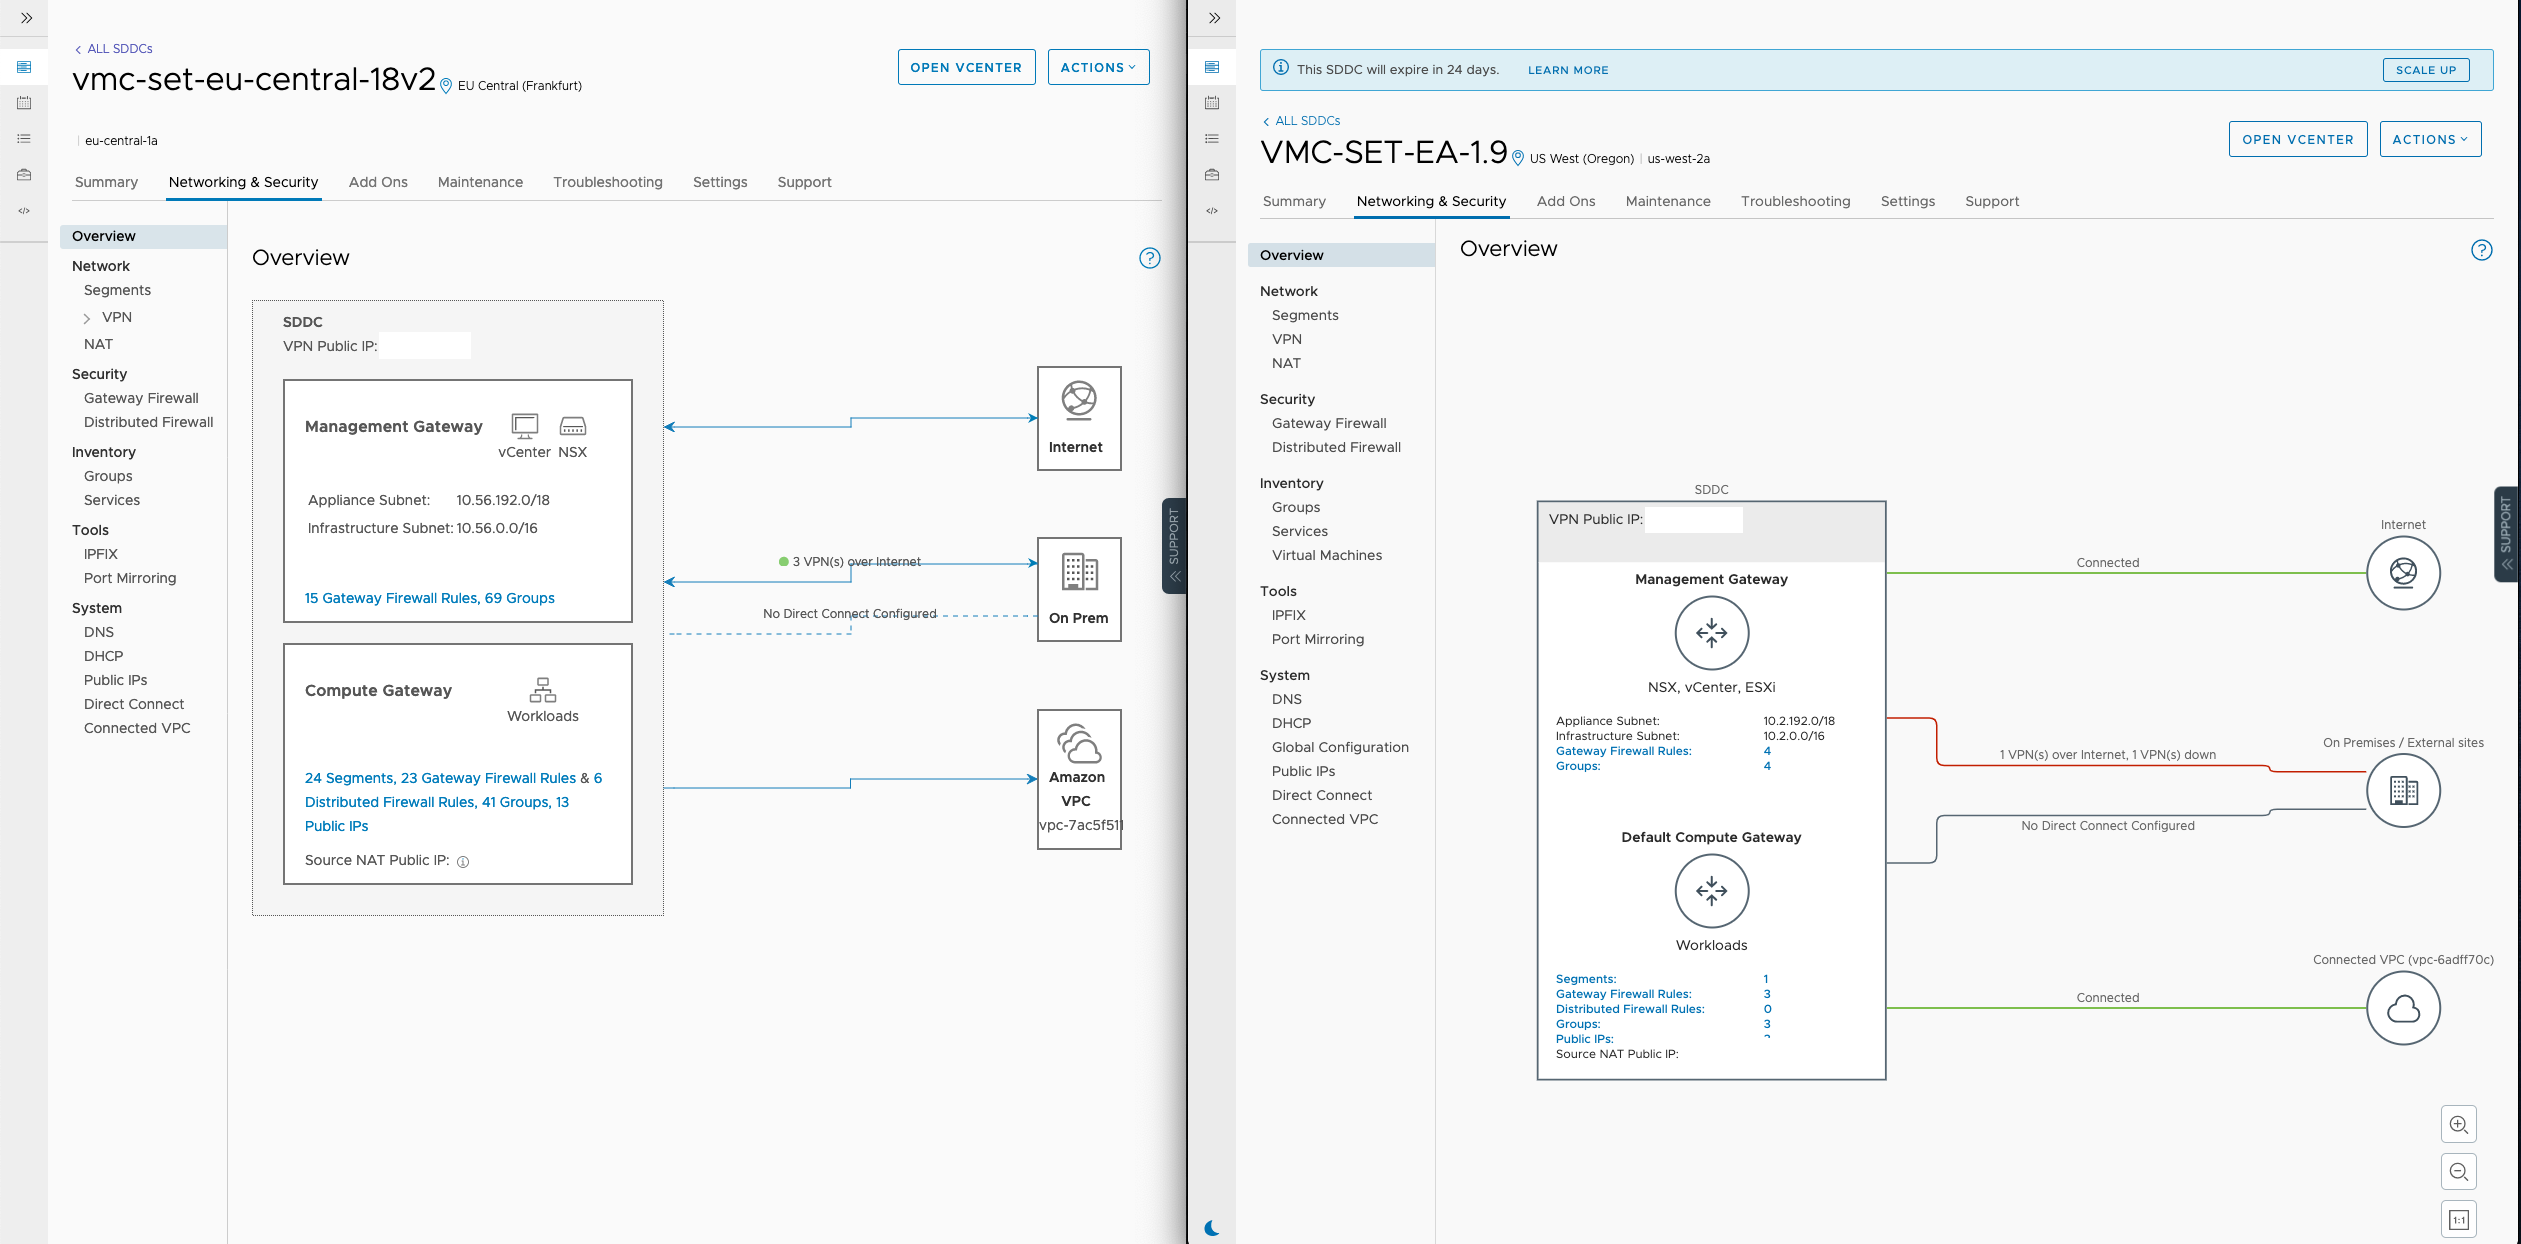
The Overview Window has been updated and it just looks nicer. I especially like the links between SDDC and Internet/On-Prem/Connected VPC – they look neater!
APIs
When you click on the 3 dots next to a network segment or a security rule, you now have the option to ‘copy path to clipboard’.
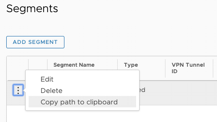
For a network segment, the path might look like this:
/infra/segments/sddc-cgw-network-
For a security rule on the compute/provider firewall, it might look like this:
/infra/domains/cgw/gateway-policies/default/rules/c9e66670-11ee-11ea-ab30-9376b8a49ef3
These paths can be used to make API requests. Trust me – this is handy for any customer looking at using the APIs. Below is the full API path for a network security rule in M8:
https://nsx-18-187-13-233.rp.vmwarevmc.com/vmc/reverse-proxy/api/orgs/84e84f83-bb12-4e12-9fe0-aaf3a4efcd87/sddcs/936708f6-9ef9-47bc-a87a-c42e4746e080/sks-nsxt-manager/policy/api/v1/infra/domains/cgw/communication-maps/f80fc9b1-1262-11e9-a445-1db5a66a70d8/communication-entries
Another change to be aware of is that some API paths are changed in VMware Cloud on AWS from version 1.8 to version 1.9.
Here is a security policy API path in version 1.8:
/infra/domains/cgw/communication-maps/f80fc9b1-1262-11e9-a445-1db5a66a70d8/communication-entries
In 1.9, it becomes:
/infra/domains/cgw/security-policies/bdd1fad0-12bf-11ea-8d2e-9bebc1ed75f0/rules
While this seems minor, this means it’s a bit more obvious to read (I don’t know about you but ‘security policies’ means more to me than ‘communication maps’).
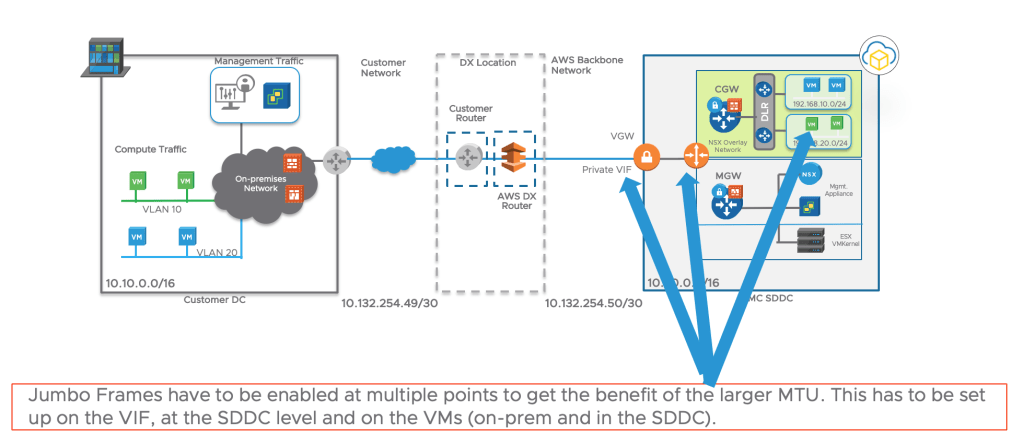
Direct Connect – Jumbo MTU
Recap on MTU:
What is MTU?
MTU is the Maximum Transmission Unit. It defines the largest packet that can be sent over the network. MTU on most networks is 1,500 bytes.
Jumbo frames are packets larger than 1,500 bytes.
What would I want to change the MTU?
A higher MTU would typically enable higher throughput: as a Jumbo MTU reduces the number of packets sent (as you can fit more data into a single packet), it alleviates the load on network devices (often the bottleneck for network devices is the number of packets processed by seconds).
What would I not want to change the MTU?
For some customers, this might be too much effort. Changing the MTU requires changes at the VM Guest Os (little point having a large MTU on one of the hops if we haven’t updated on all of them).
MTU on AWS and on VMware Cloud on AWS
AWS supports 9,001 byte jumbo frames within a VPC.
VPC peering and traffic leaving a VPC support up to 1,500 byte packets, including Internet traffic.
AWS has recently introduced support of Jumbo Frames over Direct Connect.
From version 1.9, we can use Jumbo MTU over Direct Connect to VMC.

From version 1.9 onwards, there is a new tab in the VMware Cloud on AWS console (‘Global Configuration’) to allow users to update the MTU.
The Jumbo MTU applies only to DX connections. Any VPN, whether or not it connects over DX, uses an MTU of 1500, regardless of other settings.
You should also verify that the interface MTU of workload VMs that use the DX connection is set to a value that matches the Intranet MTU Value.
This value should be less than or equal than the smallest MTU set on the DX VIFs.
The user needs to have set the Jumbo on their private VIFs on their accounts beforehand.
If the user uses a AWS partner, they need to check if their port supports MTU first.
To leave room for the NSX-T Geneve (Generic Network Virtualization Encapsulation) headers, the SDDC intranet MTU is capped at 8900 bytes to avoid packet fragmentation at the VIF.
Firewall Enhancements
Usability
In previous versions of VMware Cloud on AWS, the user experience on the VMC Networking and Security console was fine but there were a few minor areas of improvements:
- Updating the name of the rule takes a few seconds (see the video below). Editing required to click on the context menu and edit.
- You cannot ‘undo’ minor changes (changes that are done while editing the rules (before publishing)).
- Inability to select multiple rules.
- No statistics or hit count.
In the new release, there are lots of tiny updates that just make it easier to use the console:
- You now can update the name of the rule in only a few seconds (‘inline edit’), saving you a few clicks in the process.
- You now can ‘undo’ minor changes (changes that are done while editing the rules (before publishing)).
- You now can easily drag and drop rules to change the order of rules.
- You now can to select multiple rules.
- You now can see rule statistics or hit count (read on more for details).
It’s much easier to navigate the rules, especially if you have a lot of segmentation rules, by using the Filter window:

Statistics
We now expose firewall statistics within the user interface. Just click on the graph icon:

The statistics are all self-explanatory apart from the following:
- Hit Count: Number of times the rule was triggered since it was created.
- Popularity Index: Number of times the rule was triggered in the past 24 hours.
Statistics start accumulating as soon as the rule is enabled.
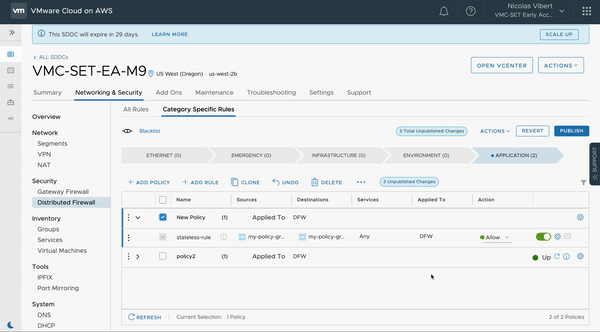
Distributed Firewall Enhancements
Default DFW Behaviour
By default, in the previous version of VMware Cloud on AWS, all the traffic is allowed by the Distributed Firewall.
Read more the VMware Cloud on AWS Distributed Firewall on this blog post I published back in April 2019.
All rules added will be used to block forbidden traffic (blacklist model).
To deny all and only allow specific traffic (whitelist model), a specific rule needs to be created to drop all the traffic. This rule needs to be the last (in the Application Rules category).
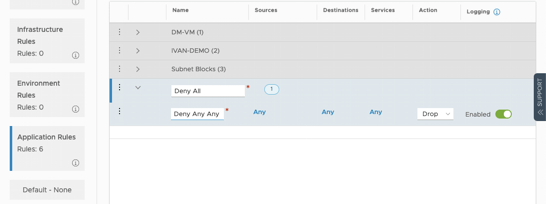
In this new version of VMware Cloud on AWS, you can change the default FW behaviour in a couple of clicks ; again making the experience more user-friendly. You can select the following options:
- Blacklist
- Blacklist with logging
- Whitelist
- Whitelist with logging
Configuration Saving
You can now save DFW configurations. Either because it’s a ‘safe’ template or possibly because you want to build it in advance before applying at a time of your convenience (perhaps during a maintenance window).

Even better – the console will let you know the delta before you actually configure the changes.

DFW “Applied To” field
A feature often asked by customers who use NSX on-premises: we can now use the “Applied-To” feature where we can apply a security rule to a specific group instead of across all workloads

DFW Exclusion List
In the new 1.9 version, we now expose the NSX DFW Exclusion List.
The Exclusion List lets you keep VMs excluded from consideration by the Distributed Firewall.
By default, vCenter, NSX Manager ands NSX Controllers are on the Exclusion List but this option now adds the ability to add more VMs to it.

Stateless Firewall
By default, the NSX-T Distributed Firewall is stateful. A stateful firewall performs stateful packet inspection and tracks the state of network connections.
Packets matching a known active connection are allowed by the firewall and packets which do not are inspected against the firewall rules.
A stateful firewall offers more security than a stateless firewall.
Because of the DFW stateful nature, asymmetric traffic is by default dropped by the DFW. In 1.9, we now have an option to make a section of the DFW rules stateless to enable asymmetric traffic to go through. This is a niche use case but it comes up occasionally.
And that’s it for now. All these features will make it easier for our customers to run, secure and manage their VMs in the Cloud.

Reblogged this on Nguoidentubinhduong and commented:
Network and Security Updates in VMware Cloud on AWS version 1.9
LikeLike