
HashiCorp Terraform 0.12 was released back in May 2019 but most of my work with TF was using v0.11 or earlier.
Some viewers of my previous post let me know they had some issues with the previous template configuration I had provided so here is an updated and validated version with 0.12.
This post will look at this new Terraform for vSphere template config (with some kudos to Gilles, whom with I have been working on several Terraform projects).
The configuration has also been tested by some of my customers and works for VMware Cloud on AWS but should work well with any vSphere version, as long as you update folders, templates, resource pool and other variables accordingly.
As always I need to re-iterate the standard disclaimer: do this at your own risk as I won’t be responsible for any issues you might run into with using the configuration. With that being said, let’s crack on…
There were some minor syntax changes in Terraform 0.12 and while previous configurations are still supported, you get lots of warning messages such as:
Warning: Interpolation-only expressions are deprecated

  on myvm.tf line 27, in resource "vsphere_virtual_machine" "vm":
  27:   resource_pool_id = "${data.vsphere_resource_pool.pool.id}"

Terraform 0.11 and earlier required all non-constant expressions to be
provided via interpolation syntax, but this pattern is now deprecated. To
silence this warning, remove the "${ sequence from the start and the }"
sequence from the end of this expression, leaving just the inner expression.

Template interpolation syntax is still used to construct strings from
expressions when the template includes multiple interpolation sequences or a
mixture of literal strings and interpolations. This deprecation applies only
to templates that consist entirely of a single interpolation sequence.
What this means is that you need to update lines such as:
${data.vsphere_resource_pool.pool.id}
with:
data.vsphere_resource_pool.pool.id
It actually makes your code more readable so in general, I would recommend you switch to 0.12 now.
The template below leverages Terraform Modules as we will be using multiple Terraform providers together in other blogs and presentations (see Gilles’ post) and Modules allow you to structure your code nicely.
Most of everything else I said in my previous post still applies so I won’t repeat much about the theory of Terraform so we will go straight-in.
Usage
Download and install Terraform.
Head out to my GitHub repo: https://github.com/nvibert/terraform-vsphere-0.12. Clone to your desktop.
Go to the ‘main’ folder. You will see 3 TF files: main, variables and version.
Variables.tf refer to the vCenter details and where we’re going to deploy our VMs (which vCenter, cluster, datastore and resource pool). For VMC on AWS, the details below should work for just about anyone.
variable "data_center"        {default = "SDDC-Datacenter"}
variable "cluster"            {default = "Cluster-1"}
variable "workload_datastore" {default = "WorkloadDatastore"}
variable "compute_pool"       {default = "Compute-ResourcePool"}
Versions.tf specify which version of Terraform and the vSphere provider it will work for. This means you will need Terraform version 0.12 or later.
terraform {
  required_version = ">= 0.12"
}
In our main.tf file, we have our secret variables. Best practices would be to list them in a separate terraform.tfvars file but we’ll keep it simple here.
Update with the appropriate credentials (works with VMC on AWS or with on-prem).
provider "vsphere" {
  user                  = "XXXXXXXXXXXXXX"
  password              = "YYYYYYYYYYYYYY"
  vsphere_server        = "vcenter.sddc-A-B-C-D.vmwarevmc.com"
  allow_unverified_ssl  = true
}


/*================
Deploy Virtual Machimes
=================*/

module "VMs" {
  source = "../VMs"
  data_center         = var.data_center
  cluster             = var.cluster
  workload_datastore  = var.workload_datastore
  compute_pool        = var.compute_pool
}
The file also refers to a VM ‘module’. When you go into the folder “VMs”, you will see a VMs.tf file where we specify the actual details of the VMs. See below.
variable "data_center" {}
variable "cluster" {}
variable "workload_datastore" {}
variable "compute_pool" {}

data "vsphere_datacenter" "dc" {
  name          = var.data_center
}
data "vsphere_compute_cluster" "cluster" {
  name          = var.cluster
  datacenter_id = data.vsphere_datacenter.dc.id
}
data "vsphere_datastore" "datastore" {
  name          = var.workload_datastore
  datacenter_id = data.vsphere_datacenter.dc.id
}

data "vsphere_resource_pool" "pool" {
  name          = var.compute_pool
  datacenter_id = data.vsphere_datacenter.dc.id
}

data "vsphere_network" "network" {
  name          = "sddc-cgw-network-1"
  datacenter_id = data.vsphere_datacenter.dc.id
}
data "vsphere_virtual_machine" "vm_template" {
  name          = "centos-vm"
  datacenter_id = data.vsphere_datacenter.dc.id
}


# ================================================

resource "vsphere_virtual_machine" "vm1" {
  name             = "terraform-nico-testVM"
  resource_pool_id = data.vsphere_resource_pool.pool.id
  datastore_id     = data.vsphere_datastore.datastore.id
  folder           = "Workloads"
  num_cpus = 2
  memory   = 1024
  guest_id = "centos6_64Guest"

  network_interface {
    network_id = data.vsphere_network.network.id
  }

  disk {
    label = "disk0"
    size  = 20
  }
  clone {
    template_uuid = data.vsphere_virtual_machine.vm_template.id
  }
}
As you can see, we are using the new TF 0.12 syntax and the code is neater.
It’s pretty much human-readable. We’re going to create a resource (a VM) in the dc, cluster, datastore, pool we specified previously. We’re going to attach it to the “sddc-cgw-network-1” and use the “centos-vm” VM template as a starting point. What we’re actually doing is cloning this template.
It’s not elegant but to get my template, I first create a VM from an OVA in my Content Library. I update the VMtools on the VM (Terraform likes up-to-date VMtools) and once that’s done, I convert that VM to a template.
Once you’ve updated the files, go back to the “main” folder and run the following commands:
terraform init
terraform version
terraform validate
terraform plan
terraform apply
The VM will be called “terraform-nico-testVM”. You can see below the cloning process is started once “terraform apply” is executed.

Here is the full walkthrough in video (with audio) where I explain the whole thing.
If you want to delete the VM, run “terraform destroy“. If you want to change a characteristic of the VM, update the VMs.tf file and run “terraform apply” again and the VM will be updated accordingly.
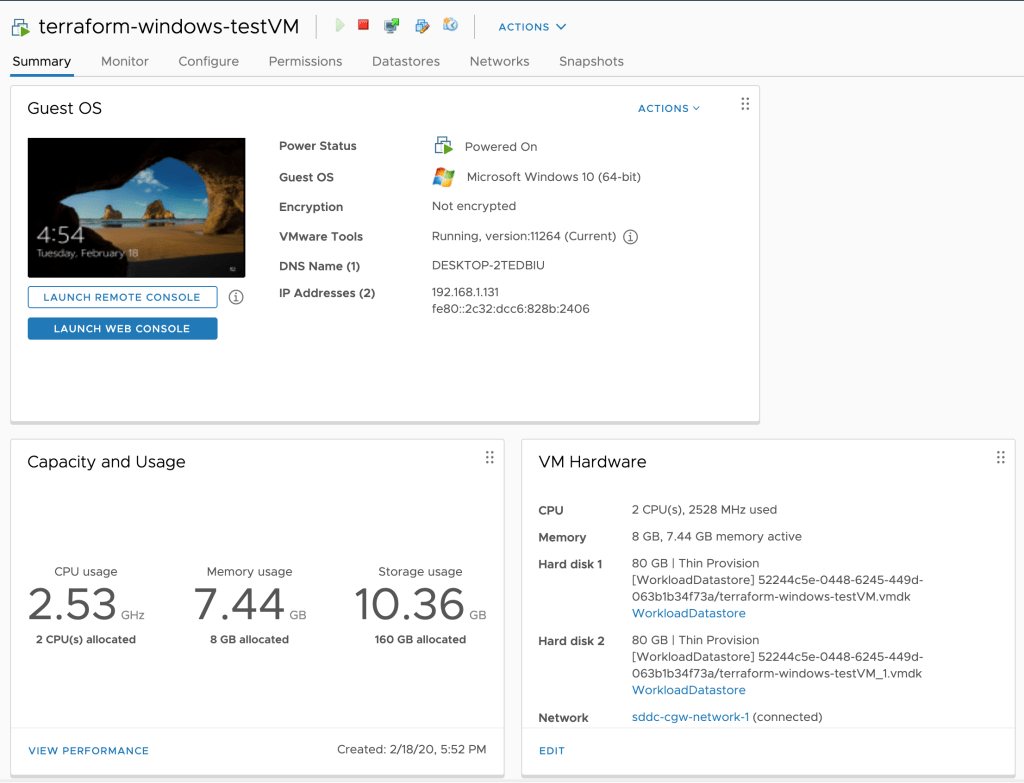
Windows Template
If I add the following code to the VMs.tf file and run “terraform plan” again, it will add the Windows VM:
data "vsphere_virtual_machine" "windows_template" {
  name          = "windows-template"
  datacenter_id = data.vsphere_datacenter.dc.id
}


# ================================================

resource "vsphere_virtual_machine" "vm2" {
  name             = "terraform-windows-testVM"
  resource_pool_id = data.vsphere_resource_pool.pool.id
  datastore_id     = data.vsphere_datastore.datastore.id
  folder           = "Workloads"
  num_cpus         = 2
  memory           = 8192
  guest_id         = "windows9_64Guest"

  network_interface {
    network_id = data.vsphere_network.network.id
  }

  scsi_type         = data.vsphere_virtual_machine.windows_template.scsi_type

  disk {
    label           = "disk0"
    size            = 80
  }
  disk {
    label           = "disk1"
    size            = 80
 unit_number     = 1
  }

  clone {
    template_uuid = data.vsphere_virtual_machine.windows_template.id
  }
}
Windows Guest Customization is also supported if you had some customize options in the “cloning” section of the Terraform file:
  clone {
    template_uuid = data.vsphere_virtual_machine.windows_template.id

    customize {
      network_interface {
      }
      windows_options {
        computer_name  = "terraform-test-customization"
        time_zone       = 002
  }
}
}
With this configurations, I specify that I will be using DHCP (otherwise, I would have specified the actual IP address of the VM in the network_interface field), I am setting up the computer name at boot time and the time zone (002 is actually the Hawaiian Time Zone!).
Thanks for reading!

Thanks for the well laid out instructions. Did you deploy your VM from a content folder? I am researching this and it looks to be a feature request. Not sure if that is implemented in the latest version of terrraform.
LikeLike