
This blog post will walk through what HashiCorp Terraform is and how to set up Terraform with VMware, including a few examples with VMware Cloud on AWS.

Terraform is another tool offered by HashiCorp (I covered Packer in a previous post).
Packer provided the ability to create and manage virtual machines from a template written as a code (in JSON format).
Terraform expands on this by not only deploying virtual machines but also storage, networking and security entities across multiple infrastructures, clouds and vendors.
Thanks to Gilles and Prabhu for introducing me to Terraform a few years ago. Also Ryan in my team documented using Terraform on VMC on AWS in his blog.
Here are a few things about Terraform:
- Part of Hashicorp DevOps Tool suite. Others are Vagrant, Packer, Vault, Consul, Nomad.
- It’s open-source.
- It’s designed to build, change, version, infrastructure across multiple providers – AWS, Azure, Google Cloud, vSphere, OpenStack, etc…
- It’s Infrastructure as Code, written in JSON or in HCL (HCL is the HashiCorp configuration language).
- You describe the end-state of the infrastructure you want to build in a high-level syntax and Terraform will deploy it for you.
- You can run a command to validate the code before deploying (terraform validate)
- You can run a command to understand what will be deployed (terraform plan).
- You can easily deploy the whole infrastructure with a single command (terraform apply).
- Terraform keeps a state of what’s already deployed and if you run the terraform apply command again after having updated the code, it will only apply the ‘delta’ (instead of creating it again).
Now let’s see a few examples.
Terraform In Action
With Terraform, it’s best practice to store your secrets, passwords and variables into separate files:
- terraform.tfvars for your variables
- vars.tf to define what your variables would be.
For example, vars.tf will look like this:
variable "vsphere_user" {}
variable "vsphere_password" {}
variable "vsphere_server" {}
And terraform.tfvars will look like that:
vsphere_user= "cloudadmin@vmc.local"
vsphere_password= "XXXXXXXXXXXXXXX"
vsphere_server= "vcenter.sddc-A-B-C-D.vmwarevmc.com"
Now onto the main file, often appropriately named main.tf. This is where you will define the resources you will create. It’s human-friendly to read and is straight-forward to understand what we’re planning on creating.
We will be using Terraform to deploy a VM in vCenter. My vCenter is in the Cloud but yours can be anywhere.
In main.tf, we first have data sources:
data "vsphere_datacenter" "dc" {
  name = "SDDC-Datacenter"
}

data "vsphere_datastore" "datastore" {
  name          = "WorkloadDatastore"
  datacenter_id = "${data.vsphere_datacenter.dc.id}"
}

data "vsphere_compute_cluster" "cluster" {
    name          = "Cluster-1"
    datacenter_id = "${data.vsphere_datacenter.dc.id}"
}

data "vsphere_resource_pool" "pool" {
  name          = "Compute-ResourcePool"
  datacenter_id = "${data.vsphere_datacenter.dc.id}"
}

data "vsphere_network" "network" {
  name          = "segment"
  datacenter_id = "${data.vsphere_datacenter.dc.id}"
}

data "vsphere_virtual_machine" "template" {
  name          = "Windows Template"
  datacenter_id = "${data.vsphere_datacenter.dc.id}"
}
A data block requests that Terraform read from a given data source (“vsphere_datacenter”) and export the result under the given local name (“SDDC-Datacenter”). The name is used to refer to this resource from elsewhere in the same Terraform module, but has no significance outside of the scope of a module.
The data source and name together serve as an identifier for a given resource.
The datacenter, datastore, resource pool, and network are discovered via the vsphere_datacenter, vsphere_datastore, vsphere_resource_pool and vsphere_network data sources respectively.
Next, we will define what we will create with our resources.
resource "vsphere_virtual_machine" "vm" {
    name             = "terraform-test"
    folder           = "Workloads"
    resource_pool_id = "${data.vsphere_compute_cluster.cluster.resource_pool_id}"
    datastore_id     = "${data.vsphere_datastore.datastore.id}"
    firmware         = "${data.vsphere_virtual_machine.template.firmware}"

    num_cpus = 2
    memory   = 4096
    guest_id = "${data.vsphere_virtual_machine.template.guest_id}"

    network_interface {
        network_id   = "${data.vsphere_network.network.id}"
        adapter_type = "${data.vsphere_virtual_machine.template.network_interface_types[0]}"
    }

    disk {
        label            = "disk0"
        size             = "${data.vsphere_virtual_machine.template.disks.0.size}"
        eagerly_scrub    = "${data.vsphere_virtual_machine.template.disks.0.eagerly_scrub}"
        thin_provisioned = "${data.vsphere_virtual_machine.template.disks.0.thin_provisioned}"
    }

    scsi_type = "${data.vsphere_virtual_machine.template.scsi_type}"
Again, this reads fairly easily – we’re creating a resource (of the “vsphere_virtual_machine” type). The VM name is “terraform-test”, it will be placed in the Workloads folder and it will be deployed in the resource pool and datastore we discovered earlier. Same for network and disk.
With the template file completed, we can go ahead and deploy our resources with terraform apply. As mentioned before, you can run terraform validate (to make sure you have written your code right), terraform plan (to understand what Terraform will create, update or delete) and terraform destroy (I’m sure you can work out what this command will do).
Here is the Terraform output:
bash-3.2$ terraform apply
data.vsphere_datacenter.dc: Refreshing state...
data.vsphere_compute_cluster.cluster: Refreshing state...
data.vsphere_network.network: Refreshing state...
data.vsphere_virtual_machine.template: Refreshing state...
data.vsphere_datastore.datastore: Refreshing state...
data.vsphere_resource_pool.pool: Refreshing state...

An execution plan has been generated and is shown below.
Resource actions are indicated with the following symbols:
  + create

Terraform will perform the following actions:

  # vsphere_virtual_machine.vm will be created
  + resource "vsphere_virtual_machine" "vm" {
      + boot_retry_delay                        = 10000
      + change_version                          = (known after apply)
      + cpu_limit                               = -1
      + cpu_share_count                         = (known after apply)
      + cpu_share_level                         = "normal"
      + datastore_id                            = "datastore-43"
      + default_ip_address                      = (known after apply)
      + ept_rvi_mode                            = "automatic"
      + firmware                                = "bios"
      + folder                                  = "Workloads"
      + force_power_off                         = true
      + guest_id                                = "windows9_64Guest"
      + guest_ip_addresses                      = (known after apply)
      + host_system_id                          = (known after apply)
      + hv_mode                                 = "hvAuto"
      + id                                      = (known after apply)
      + imported                                = (known after apply)
      + latency_sensitivity                     = "normal"
      + memory                                  = 4096
      + memory_limit                            = -1
      + memory_share_count                      = (known after apply)
      + memory_share_level                      = "normal"
      + migrate_wait_timeout                    = 30
      + moid                                    = (known after apply)
      + name                                    = "terraform-test"
      + num_cores_per_socket                    = 1
      + num_cpus                                = 2
      + reboot_required                         = (known after apply)
      + resource_pool_id                        = "resgroup-9"
      + run_tools_scripts_after_power_on        = true
      + run_tools_scripts_after_resume          = true
      + run_tools_scripts_before_guest_shutdown = true
      + run_tools_scripts_before_guest_standby  = true
      + scsi_bus_sharing                        = "noSharing"
      + scsi_controller_count                   = 1
      + scsi_type                               = "lsilogic-sas"
      + shutdown_wait_timeout                   = 3
      + swap_placement_policy                   = "inherit"
      + uuid                                    = (known after apply)
      + vapp_transport                          = (known after apply)
      + vmware_tools_status                     = (known after apply)
      + vmx_path                                = (known after apply)
      + wait_for_guest_ip_timeout               = 0
      + wait_for_guest_net_routable             = true
      + wait_for_guest_net_timeout              = 5

      + clone {
          + template_uuid = "42065f41-1191-b400-b9bf-44b787a38842"
          + timeout       = 30
        }

      + disk {
          + attach           = false
          + datastore_id     = "<computed>"
          + device_address   = (known after apply)
          + disk_mode        = "persistent"
          + disk_sharing     = "sharingNone"
          + eagerly_scrub    = false
          + io_limit         = -1
          + io_reservation   = 0
          + io_share_count   = 0
          + io_share_level   = "normal"
          + keep_on_remove   = false
          + key              = 0
          + label            = "disk0"
          + path             = (known after apply)
          + size             = 32
          + thin_provisioned = true
          + unit_number      = 0
          + uuid             = (known after apply)
          + write_through    = false
        }

      + network_interface {
          + adapter_type          = "e1000e"
          + bandwidth_limit       = -1
          + bandwidth_reservation = 0
          + bandwidth_share_count = (known after apply)
          + bandwidth_share_level = "normal"
          + device_address        = (known after apply)
          + key                   = (known after apply)
          + mac_address           = (known after apply)
          + network_id            = "network-o28"
        }
    }

Plan: 1 to add, 0 to change, 0 to destroy.

Do you want to perform these actions?
  Terraform will perform the actions described above.
  Only 'yes' will be accepted to approve.

  Enter a value: yes

vsphere_virtual_machine.vm: Creating...
vsphere_virtual_machine.vm: Still creating... [10s elapsed]
vsphere_virtual_machine.vm: Still creating... [20s elapsed]
vsphere_virtual_machine.vm: Still creating... [30s elapsed]
vsphere_virtual_machine.vm: Still creating... [40s elapsed]
vsphere_virtual_machine.vm: Still creating... [50s elapsed]
vsphere_virtual_machine.vm: Still creating... [1m0s elapsed]
vsphere_virtual_machine.vm: Still creating... [1m10s elapsed]
vsphere_virtual_machine.vm: Still creating... [1m20s elapsed]
vsphere_virtual_machine.vm: Still creating... [1m30s elapsed]
vsphere_virtual_machine.vm: Still creating... [1m40s elapsed]
vsphere_virtual_machine.vm: Creation complete after 1m41s [id=42060cb8-442a-98bc-1ca6-9ade030a24c0]

Apply complete! Resources: 1 added, 0 changed, 0 destroyed.
Customization
It gets more interesting when you start applying customization during deployment.
With the snippet below, we specify we are cloning the VM from an existing template and that we will call it ‘terraform-test’.
  clone {
    template_uuid = "${data.vsphere_virtual_machine.template.id}"

    customize {
      linux_options {
        host_name = "terraform-test"
        domain    = "test.internal"
      }
      network_interface {}
    }
  }
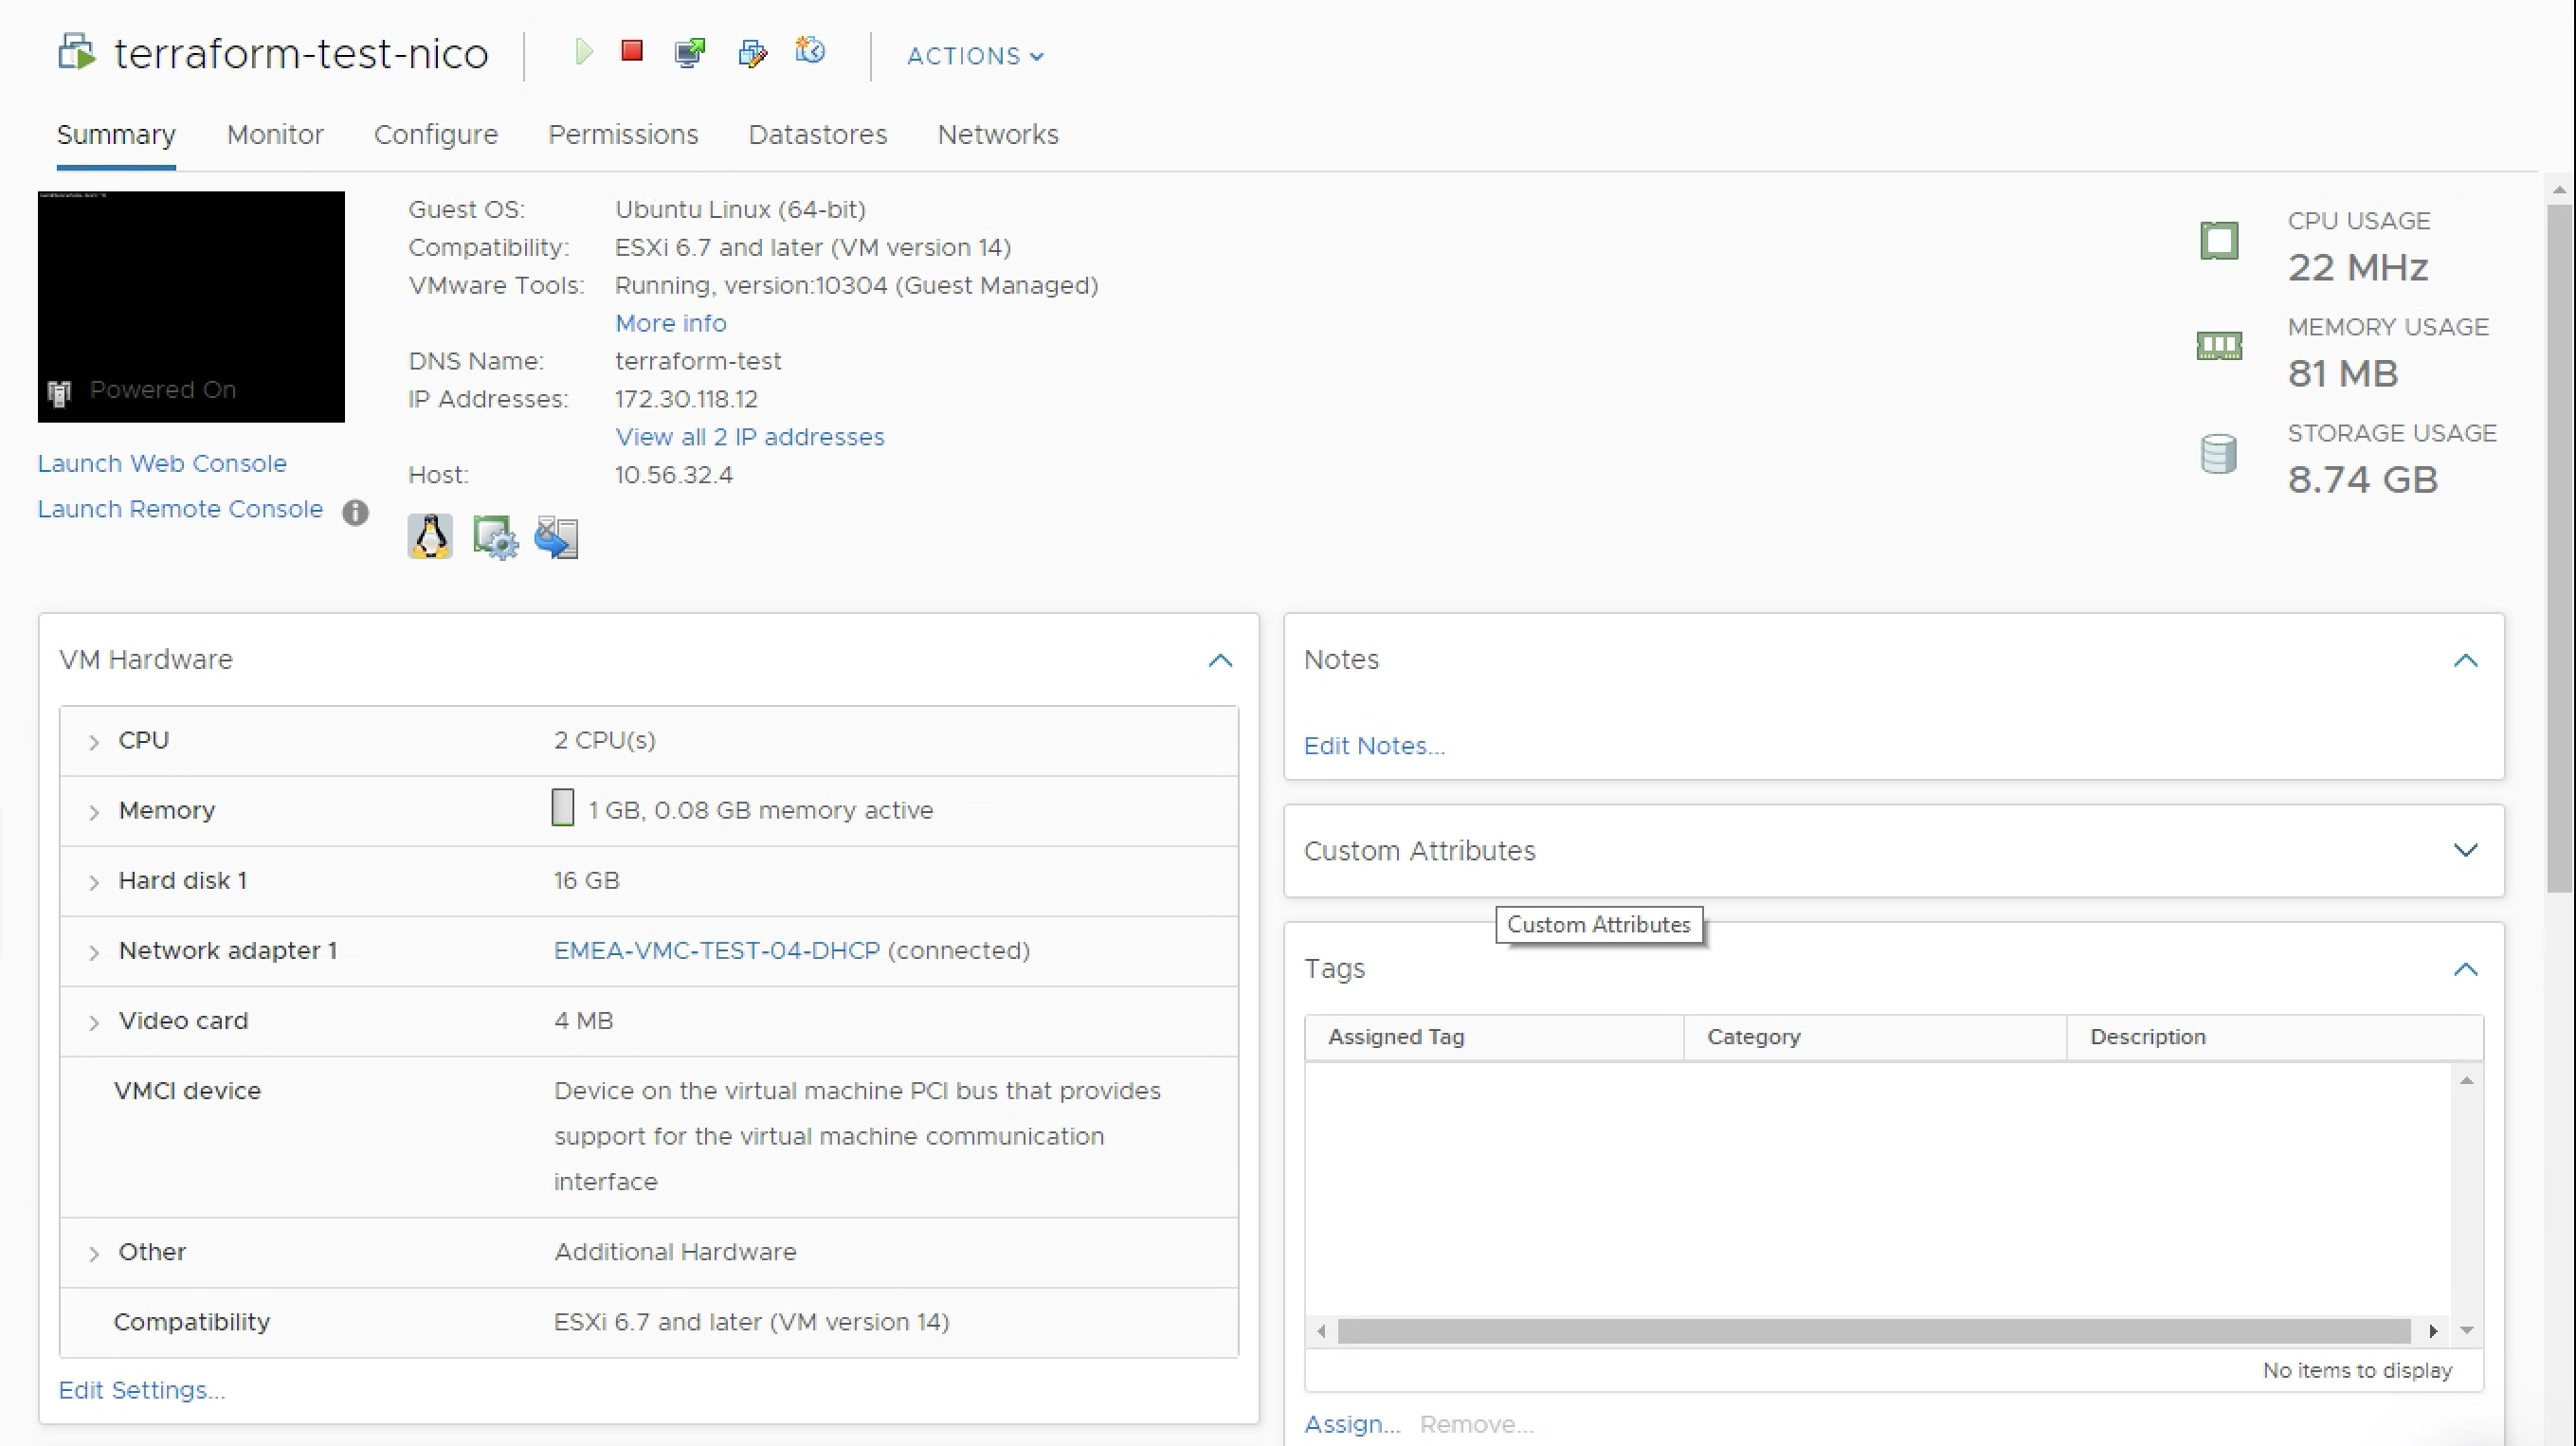
An empty network_interface means the VM will pick up its IP via DHCP. As you can see below, we’ve attached the VM to a DHCP-enabled network and the VM has picked up an IP. If you wanted to assign a static IP, you would specify it within the {}.
As you can see below, the VM has the name we specified in the terraform file (“terraform-test”).
Idempotence
The beauty of using idempotent declarative infrastructure as code is that Terraform will work out what changes it needs to do. As it captures state, it’s clever enough to realize what changes to make and for example, not to deploy the same infrastructure twice but instead to apply the delta.
As an example, what if you wanted to apply vSphere tags to the VM you’ve just created with Terraform?
We update our main.tf plan with the following:
resource "vsphere_tag_category" "environment" {
    name        = "environment"
    cardinality = "SINGLE"

    associable_types = [
        "VirtualMachine"
    ]
}

resource "vsphere_tag_category" "region" {
    name        = "region"
    cardinality = "SINGLE"

    associable_types = [
        "VirtualMachine"
    ]
}

resource "vsphere_tag" "environment" {
    name        = "test-dev"
    category_id = "${vsphere_tag_category.environment.id}"
}

resource "vsphere_tag" "region" {
    name         = "UK"
    category_id = "${vsphere_tag_category.region.id}"
}

resource "vsphere_virtual_machine" "vm" {
### cut for brevity
tags = [
        "${vsphere_tag.environment.id}",
        "${vsphere_tag.region.id}",
   ]
We have created a couple of tag categories (environment and region) and a couple of tags (test-dev and UK) in these respective categories.
That’s what one of my customers is doing by the way. They use Terraform and these vSphere tags for automation – based upon the tags, Puppet will decide what config to apply to the newly deployed VM.
When we run terraform plan, Terraform works out it needs to create these 4 vSphere constructs (2 tag categories and 2 tags) and update 1 (the VM, with the newly configured tags).
bash-3.2$ terraform plan
Refreshing Terraform state in-memory prior to plan...
The refreshed state will be used to calculate this plan, but will not be persisted to local or remote state storage.

data.vsphere_datacenter.dc: Refreshing state...
data.vsphere_resource_pool.pool: Refreshing state...
data.vsphere_datastore.datastore: Refreshing state...
data.vsphere_network.network: Refreshing state...
data.vsphere_compute_cluster.cluster: Refreshing state...
data.vsphere_virtual_machine.template: Refreshing state...
vsphere_virtual_machine.vm: Refreshing state... [id=42060cb8-442a-98bc-1ca6-9ade030a24c0]

------------------------------------------------------------------------

An execution plan has been generated and is shown below.
Resource actions are indicated with the following symbols:
  + create
  ~ update in-place

Terraform will perform the following actions:

  # vsphere_tag.environment will be created
  + resource "vsphere_tag" "environment" {
      + category_id = (known after apply)
      + id          = (known after apply)
      + name        = "test-dev"
    }

  # vsphere_tag.region will be created
  + resource "vsphere_tag" "region" {
      + category_id = (known after apply)
      + id          = (known after apply)
      + name        = "UK"
    }

  # vsphere_tag_category.environment will be created
  + resource "vsphere_tag_category" "environment" {
      + associable_types = [
          + "VirtualMachine",
        ]
      + cardinality      = "SINGLE"
      + id               = (known after apply)
      + name             = "environment"
    }

  # vsphere_tag_category.region will be created
  + resource "vsphere_tag_category" "region" {
      + associable_types = [
          + "VirtualMachine",
        ]
      + cardinality      = "SINGLE"
      + id               = (known after apply)
      + name             = "region"
    }

  # vsphere_virtual_machine.vm will be updated in-place
  ~ resource "vsphere_virtual_machine" "vm" {

## cut for brevity
Plan: 4 to add, 1 to change, 0 to destroy.

---------------------------------------------------------------------
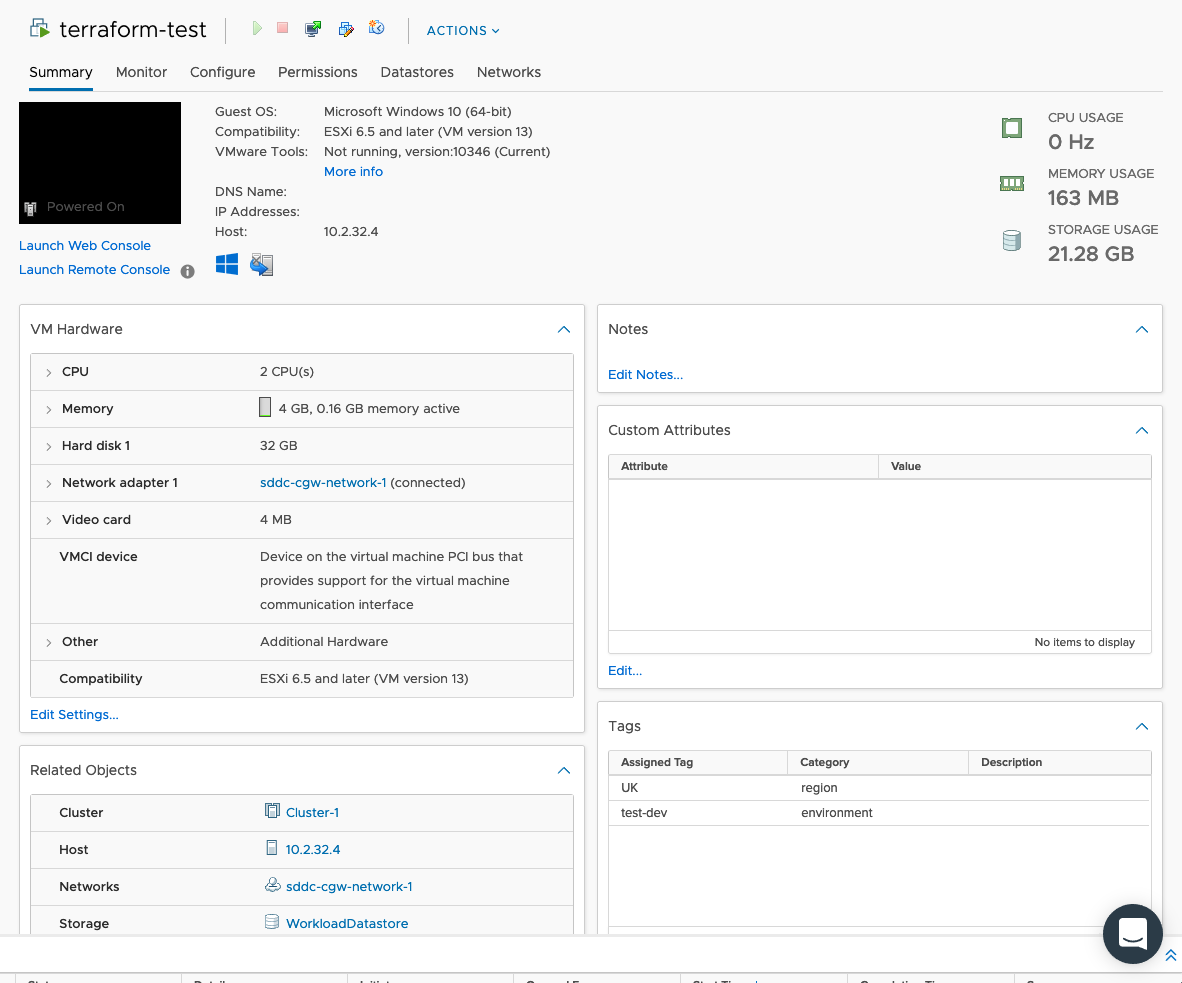
Once I run terraform apply, Terraform updates it all pretty smoothly.
There isn’t a new VM but an updated VM with the right vSphere Tags applied.
Caveats and comments
- For VMware Cloud on AWS, make sure you deploy in the WorkloadDatastore and in the Compute-ResourcePool otherwise the VM will not be deployed.
- The NSX-T Terraform Provider is not compatible with VMware Cloud on AWS. So you can’t create network segments or firewall rules through Terraform on VMware Cloud on AWS yet. This is work-in-progress.
- Make sure VMtools are up-to-date and running on the VM, otherwise Terraform will not be happy and time-out on you.
- I struggled personally with customizing the Windows machines. You might have more luck.
- Troubleshooting Terraform… can be a challenge. That’s probably my biggest gripe with the tool.
How to get started
On a Mac, the easiest thing would be to:
- Install brew : https://brew.sh/
- Install Terraform using brew : brew install terraform
On Windows or other platforms, you can always download it directly there: https://www.terraform.io/downloads.html
- Download the files from GitHub
- Update the files with the right variables (cluster, resource pool, template, network, passwords, etc… )
- Run the following commands (make sure Terraform is in the PATH or if not, that the files are in the same place as your Terraform exe if you’re using Windows):
- terraform init
- terraform plan
- terraform apply
- [terraform destroy]
- And that’s it!
Thanks for reading.

5 thoughts on “Infrastructure-As-Code with HashiCorp Terraform, VMware and VMware Cloud on AWS”