
Since I released PyVMC (a Python-based client to manage VMware Cloud on AWS co-created with Matt Dreyer) on my blog and as a VMware Fling, I’ve seen a fair bit of interest from engineers that need to automate the configuration of their VMC SDDC or that need to configure a large amount of security rules.
One request came from one of my colleagues who wanted me to add “Distributed Firewall” support to the Fling. One of our customers is migrating hundreds of VMs to the Cloud and as part of the migration, transfer the firewall rules across to the VMC Edge Firewalls and Distributed Firewall.
While the Fling supported Edge Firewall configuration, I hadn’t had the time to code Distributed Firewall support until last week. With this new feature, customers will be able to deploy DFW security rules at speed.
Where can I find the new code?
The new code can be found the official VMware GitHub page here but will also be available on the Fling page once updated. As the Fling is open source, it will soon be uploaded on the VMware GitHub page.
Distributed Firewall Support
Let’s look now at how you can use PyVMC with the VMC Distributed Firewall.
If you want to create a DFW security rule, you want to specify:
- The DFW Security Section where it’s located
- Source (defined as a Group)
- Destination (defined as a Group)
- Protocol (such as TCP or UDP) and port (defined as a Service)
- Action (“ALLOW”, “DROP” or “REJECT”).
DFW Security Policy (also called Section)
As explained in the blog I published on the VMware NSX Blog, there are multiple pre-defined categories you can fit your DFW rules into. The categories are Ethernet, Emergency, Infrastructure, Environment and Application. Within each category, you can create a new section in which you will create a security rule.
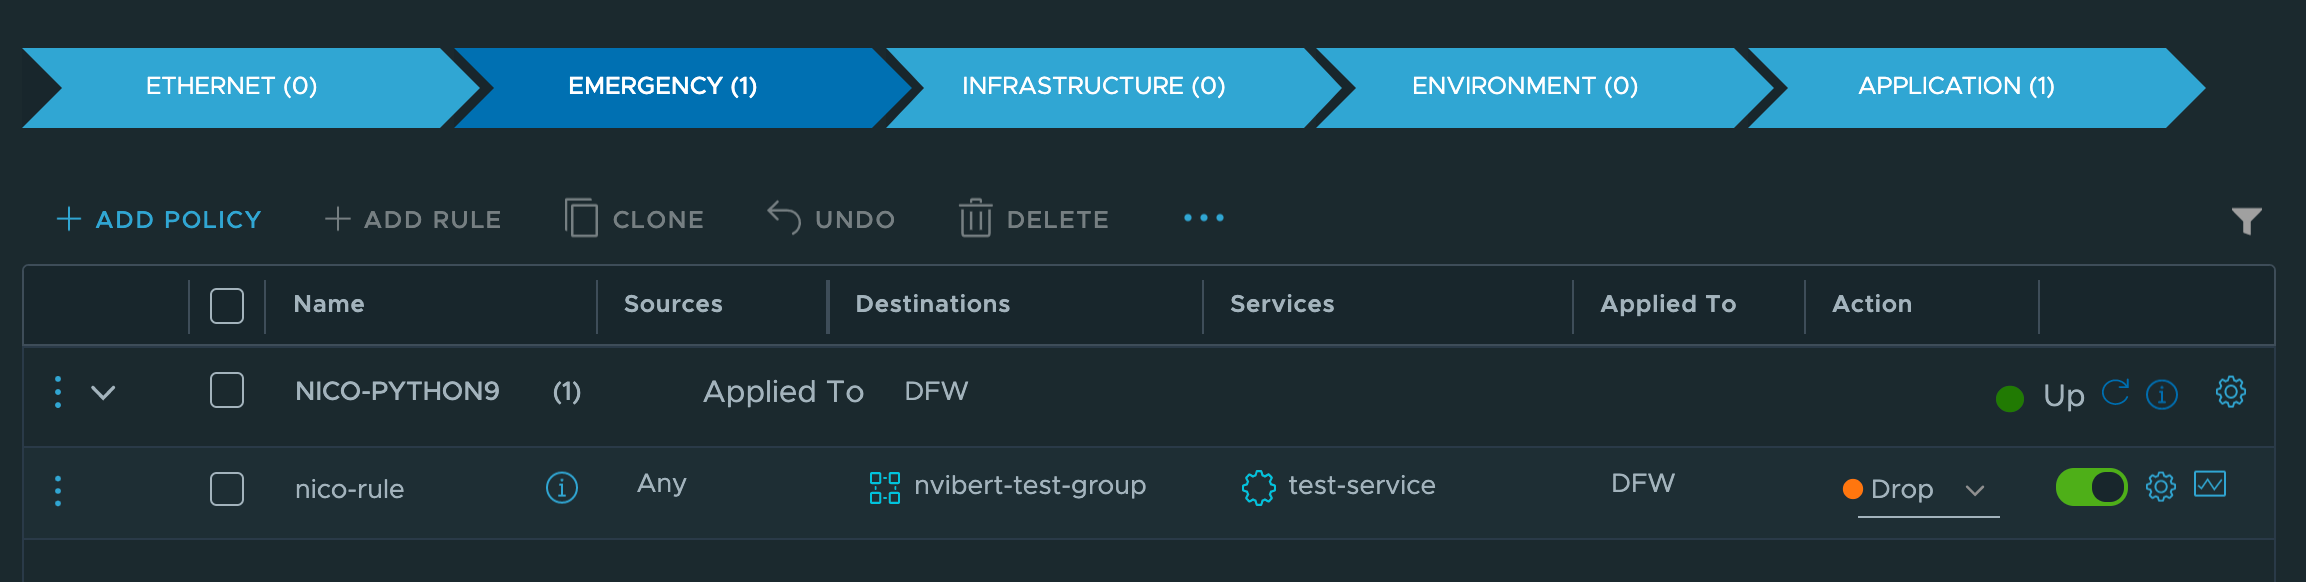
For example, in the above, in the “Emergency” Category, I have a Section/Policy called “NICO-PYTHON9” and within that section, I have a security rule called “nico-rule” dropping the traffic from the source “ANY” to the group “nvibert-test-group” over the ports and protocol defined in the “test-service” service.
Reading, creating and deleting a DFW Section (I personally much prefer this term than the “Policy” one) is very easy with PyVMC 1.1:
The syntax to create one is new-dfw-section [NAME][CATEGORY].
bash-3.2$ ./pyVMC.py new-dfw-section nico-section-infra Infrastructure
Success:

The section nico-section-infra has been created in the Infrastructure category.
+--------------------------------------+---------------------+----------------+-----------------+
|                  id                  |         Name        |    Category    | Sequence Number |
+--------------------------------------+---------------------+----------------+-----------------+
|             NICO-PYTHON9             |     NICO-PYTHON9    |   Emergency    |        0        |
|          nico-section-infra          |  nico-section-infra | Infrastructure |        0        |
|             NICO-PYTHON2             |     NICO-PYTHON2    |  Environment   |        0        |
|             NICO-PYTHON              |     NICO-PYTHON     |  Application   |        0        |
| 899cb3b0-a0e3-11ea-96e7-db16228c1157 | nvibert-gui-section |  Application   |        10       |
|             NICO-PYTHON5             |     NICO-PYTHON5    |    Ethernet    |        0        |
|             NICO-PYTHON6             |     NICO-PYTHON6    |    Ethernet    |        0        |
+--------------------------------------+---------------------+----------------+-----------------+
If you don’t specify the “Category”, it will be deployed in the “Application” one:
bash-3.2$ ./pyVMC.py new-dfw-section nico-section-11
Success:

The section nico-section-11 has been created in the Application category.
+--------------------------------------+---------------------+----------------+-----------------+
|                  id                  |         Name        |    Category    | Sequence Number |
+--------------------------------------+---------------------+----------------+-----------------+
|             NICO-PYTHON9             |     NICO-PYTHON9    |   Emergency    |        0        |
|          nico-section-infra          |  nico-section-infra | Infrastructure |        0        |
|             NICO-PYTHON2             |     NICO-PYTHON2    |  Environment   |        0        |
|             NICO-PYTHON              |     NICO-PYTHON     |  Application   |        0        |
|           nico-section-10            |   nico-section-10   |  Application   |        0        |
|           nico-section-11            |   nico-section-11   |  Application   |        0        |
| 899cb3b0-a0e3-11ea-96e7-db16228c1157 | nvibert-gui-section |  Application   |        10       |
|             NICO-PYTHON5             |     NICO-PYTHON5    |    Ethernet    |        0        |
|             NICO-PYTHON6             |     NICO-PYTHON6    |    Ethernet    |        0        |
+--------------------------------------+---------------------+----------------+-----------------+
Deleting is easy with the command remove-dfw-section.
bash-3.2$ ./pyVMC.py remove-dfw-section nico-section-11
The section nico-section-11 has been deleted.
+--------------------------------------+---------------------+----------------+-----------------+
|                  id                  |         Name        |    Category    | Sequence Number |
+--------------------------------------+---------------------+----------------+-----------------+
|             NICO-PYTHON9             |     NICO-PYTHON9    |   Emergency    |        0        |
|          nico-section-infra          |  nico-section-infra | Infrastructure |        0        |
|             NICO-PYTHON2             |     NICO-PYTHON2    |  Environment   |        0        |
|             NICO-PYTHON              |     NICO-PYTHON     |  Application   |        0        |
|           nico-section-10            |   nico-section-10   |  Application   |        0        |
| 899cb3b0-a0e3-11ea-96e7-db16228c1157 | nvibert-gui-section |  Application   |        10       |
|             NICO-PYTHON5             |     NICO-PYTHON5    |    Ethernet    |        0        |
|             NICO-PYTHON6             |     NICO-PYTHON6    |    Ethernet    |        0        |
+--------------------------------------+---------------------+----------------+-----------------+
To list all sections, just use the command show-dfw-section:
bash-3.2$ ./pyVMC.py show-dfw-section
+--------------------------------------+---------------------+----------------+-----------------+
|                  id                  |         Name        |    Category    | Sequence Number |
+--------------------------------------+---------------------+----------------+-----------------+
|             NICO-PYTHON9             |     NICO-PYTHON9    |   Emergency    |        0        |
|          nico-section-infra          |  nico-section-infra | Infrastructure |        0        |
|             NICO-PYTHON2             |     NICO-PYTHON2    |  Environment   |        0        |
|             NICO-PYTHON              |     NICO-PYTHON     |  Application   |        0        |
|           nico-section-10            |   nico-section-10   |  Application   |        0        |
| 899cb3b0-a0e3-11ea-96e7-db16228c1157 | nvibert-gui-section |  Application   |        10       |
|             NICO-PYTHON5             |     NICO-PYTHON5    |    Ethernet    |        0        |
|             NICO-PYTHON6             |     NICO-PYTHON6    |    Ethernet    |        0        |
+--------------------------------------+---------------------+----------------+-----------------+
Finally, you can list all security rules within a section with the command show-dfw-section-rules [SECTION].
bash-3.2$ ./pyVMC.py show-dfw-section-rules NICO-PYTHON
+------------+------------+---------+------------------------+----------+--------+-----------------+
|     ID     |    Name    |  Source |      Destination       | Services | Action | Sequence Number |
+------------+------------+---------+------------------------+----------+--------+-----------------+
| rule-cli-8 | rule-cli-8 | ['ANY'] | ['nvibert-test-group'] | ['ANY']  |  DROP  |        20       |
+------------+------------+---------+------------------------+----------+--------+-----------------+
The brief video below describes it:
Source and Destination Groups
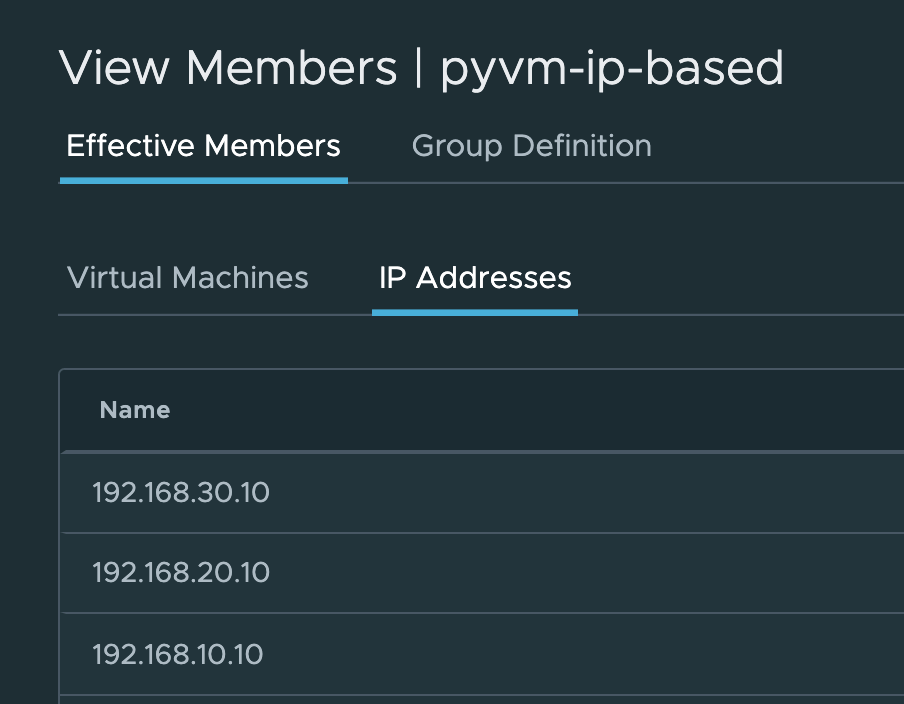
When you create a DFW rule, you specify the source and destination of the traffic in “compute groups”. In the UI, you can do it in “Groups”. With PyVMC, you need to use the following command:
bash-3.2$ ./pyVMC.py new-group cgw pyvm-ip-based ip-based
Please enter IP address ("172.16.10.20") or type 'done' when your list is finished: 192.168.10.10
Please enter IP address ("172.16.10.20") or type 'done' when your list is finished: 192.168.20.10
Please enter IP address ("172.16.10.20") or type 'done' when your list is finished: 192.168.30.10
Please enter IP address ("172.16.10.20") or type 'done' when your list is finished: done
200

bash-3.2$ ./pyVMC.py new-group cgw pyvmc-ip-based-2 ip-based 192.168.10.0/24,172.16.30.0/24
200
bash-3.2$
The groups created are below:

Services
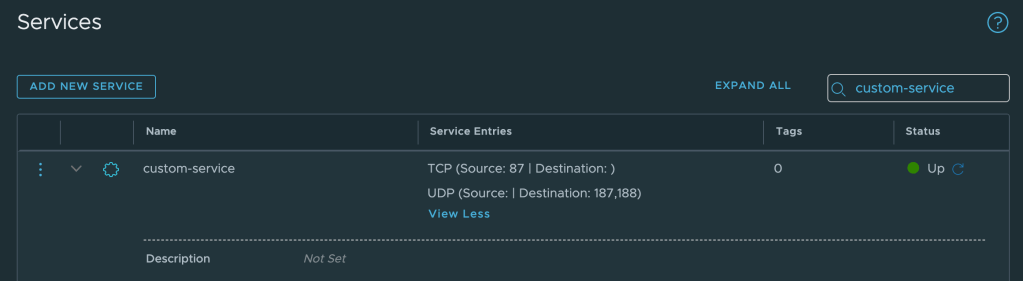
With PyVMC, you can easily create new services, following the interactive syntax above:
bash-3.2$ ./pyVMC.py new-service
Please input the name of the service:custom-service
Please enter the Service Entry ID:custom-service-entry
Please enter the L4 Protocol:TCP
Plese enter the Source Ports or type 'done' when your list is finished:87
Plese enter the Source Ports or type 'done' when your list is finished:done
Plese enter the Destination Ports, type 'next' when you want to define another service entry or 'done' if you have finished:next
Please enter the Service Entry ID:custom-service-entry-2
Please enter the L4 Protocol:UDP
Plese enter the Source Ports or type 'done' when your list is finished:done
Plese enter the Destination Ports, type 'next' when you want to define another service entry or 'done' if you have finished:187
Plese enter the Destination Ports, type 'next' when you want to define another service entry or 'done' if you have finished:188
Plese enter the Destination Ports, type 'next' when you want to define another service entry or 'done' if you have finished:done
+------------------------+------------------------+----------+--------------+-------------------+
|           ID           |          Name          | Protocol | Source Ports | Destination Ports |
+------------------------+------------------------+----------+--------------+-------------------+
|  custom-service-entry  |  custom-service-entry  |   TCP    |    ['87']    |         []        |
| custom-service-entry-2 | custom-service-entry-2 |   UDP    |      []      |   ['187', '188']  |
+------------------------+------------------------+----------+--------------+-------------------+
This is what it looks like in the UI, once completed:
Note, you don’t necessarily need to create a new service as there are 400 pre-defined services.
Putting it all together
You can now create a new rule with the new-dfw-rule [NAME] [SOURCE-GROUPS] [DESTINATION-GROUPS] [SERVICE] [ACTION] [SECTION] [SEQUENCE-NUMBER] command (the Sequence-Number is optional).
bash-3.2$ ./pyVMC.py new-dfw-rule nico-test-DFW-rule pyvm-ip-based pyvmc-ip-based-2 custom-service DROP NICO-PYTHON9

 The rule has been created.
+-------------------------+--------------------+-------------------+------------------------+--------------------+--------+-----------------+
|            ID           |        Name        |       Source      |      Destination       |      Services      | Action | Sequence Number |
+-------------------------+--------------------+-------------------+------------------------+--------------------+--------+-----------------+
| nico-rule-to-be-deleted |     nico-rule      |      ['ANY']      | ['nvibert-test-group'] |  ['test-service']  |  DROP  |        0        |
|    nico-test-DFW-rule   | nico-test-DFW-rule | ['pyvm-ip-based'] |  ['pyvmc-ip-based-2']  | ['custom-service'] |  DROP  |        0        |
+-------------------------+--------------------+-------------------+------------------------+--------------------+--------+-----------------+
Or you can the existing pre-defined services. For example, if you want to allow traffic over HTTP and HTTPS, just specify them like this:
bash-3.2$ ./pyVMC.py new-dfw-rule nico-test-DFW-rule-2 pyvm-ip-based pyvmc-ip-based-2 HTTP,HTTPS ALLOW NICO-PYTHON9

 The rule has been created.
+-------------------------+----------------------+-------------------+------------------------+--------------------+--------+-----------------+
|            ID           |         Name         |       Source      |      Destination       |      Services      | Action | Sequence Number |
+-------------------------+----------------------+-------------------+------------------------+--------------------+--------+-----------------+
| nico-rule-to-be-deleted |      nico-rule       |      ['ANY']      | ['nvibert-test-group'] |  ['test-service']  |  DROP  |        0        |
|    nico-test-DFW-rule   |  nico-test-DFW-rule  | ['pyvm-ip-based'] |  ['pyvmc-ip-based-2']  | ['custom-service'] |  DROP  |        0        |
|   nico-test-DFW-rule-2  | nico-test-DFW-rule-2 | ['pyvm-ip-based'] |  ['pyvmc-ip-based-2']  | ['HTTPS', 'HTTP']  | ALLOW  |        0        |
Here is a brief video to show an example:
How does the code actually work?
Note that, while the code is written in Python, you don’t need to know any Python to use it… If you’re curious about how the code was written and you want to understand a bit more about Python, read on.
Disclaimer: I am not a professional coder and I am sure this code is not optimal and could be improved. If you spot any areas of improvements or bugs, let me know.
Let’s review the code to create a DFW rule with the following:
import requests

def newSDDCDFWRule(proxy_url, sessiontoken, display_name, source_groups, destination_groups, services, action, section, sequence_number):
    myHeader = {'csp-auth-token': sessiontoken}
    myURL = (proxy_url + "/policy/api/v1/infra/domains/cgw/security-policies/" + section + "/rules/" + display_name)
    json_data = {
    "action": action,
    "destination_groups": destination_groups,
    "direction": "IN_OUT",
    "disabled": False,
    "display_name": display_name,
    "id": display_name,
    "ip_protocol": "IPV4_IPV6",
    "logged": False,
    "profiles": [ "ANY" ],
    "resource_type": "Rule",
    "services": services,
    "source_groups": source_groups,
    "sequence_number": sequence_number
    }
    response = requests.put(myURL, headers=myHeader, json=json_data)
    json_response_status_code = response.status_code
    return json_response_status_code
Let’s review it in more details:
import requests
The command above imports the “requests” package to our code and enables us to make HTTP API calls. That’s how the code is built on: it makes API calls to our public APIs, using the refresh token to authenticate.
def newSDDCDFWRule(proxy_url, sessiontoken, display_name, source_groups, destination_groups, services, action, section, sequence_number)
The command above creates a Python Function that will take a number of parameters as input (proxy_url, sessiontoken, etc…).
As we will make an API call over HTTPS, we will need to make sure the HTTPS packet has the right fields, with the right HTTP header (includes the token for authentication)…
myHeader = {'csp-auth-token': sessiontoken}
… the URL (in our case, it will be the URL where we need to create the security rule)….
myURL = (proxy_url + "/policy/api/v1/infra/domains/cgw/security-policies/" + section + "/rules/" + display_name)
… the actual payload (in our case, the payload of the packet has the information about the security rule)….
    json_data = {
    "action": action,
    "destination_groups": destination_groups,
    "direction": "IN_OUT",
    "disabled": False,
    "display_name": display_name,
    "id": display_name,
    "ip_protocol": "IPV4_IPV6",
    "logged": False,
    "profiles": [ "ANY" ],
    "resource_type": "Rule",
    "services": services,
    "source_groups": source_groups,
    "sequence_number": sequence_number
    }
…. and finally, the type of API requests we are making (in our case, we make a “PUT” call to create a new DFW rule), using the variables we created earlier:
response = requests.put(myURL, headers=myHeader, json=json_data)
We capture the response code to make sure we are happy that the API call has been successful (200 is the expected response code):
    json_response_status_code = response.status_code
    return json_response_status_code
Later on in the code, we specify when this function is actually invoked. We use sys.argv which is a Python list of arguments passed at the command-line:
if len(sys.argv) > 1:
    intent_name = sys.argv[1].lower()
else:
    intent_name = ""
So if you look at the command:
./pyVMC.py new-dfw-rule nico-test-DFW-rule-2 pyvm-ip-based pyvmc-ip-based-2 HTTP,HTTPS ALLOW NICO-PYTHON9
new-dfw-rule will be sys.argv[1] (the first argument after the name of the script). sys.argv[1] is actually referred in my code as intent_name. If my intent_name is “new-dfw-rule“, then I will define display_name (“nico-test-DFW-rule-2”) as sys.argv[2] which will be the name of the firewall rule:
elif intent_name == "new-dfw-rule":
    sequence_number = 0
    display_name = sys.argv[2]
What I do afterwards is to take the other arguments and manipulate them to that the value sent during the API call is accepted. The following commands simply manipulate the arguments and do things like converting a text string to lower-case (using .lower() ) or upper-case (using .upper() ) or split a string into a list separated by commas, using split() (this is to, for example, enable the user to list multiple security groups or services).
    sg_string = sys.argv[3]
    dg_string = sys.argv[4]
    group_index = '/infra/domains/cgw/groups/'
    scope_index = '/infra/labels/cgw-'
    list_index = '/infra/services/'
    if sg_string.lower() == "connected_vpc":
        source_groups == ["/infra/tier-0s/vmc/groups/connected_vpc"]
    elif sg_string.lower() == "directconnect_prefixes":
        source_groups == ["/infra/tier-0s/vmc/groups/directConnect_prefixes"]
    elif sg_string.lower() == "s3_prefixes":
        source_groups == ["/infra/tier-0s/vmc/groups/s3_prefixes"]
    elif sg_string.lower() == "any":
        source_groups = ["ANY"]
    else:
        sg_list = sg_string.split(",")
        source_groups= [group_index + x for x in sg_list]
    if dg_string.lower() == "connected_vpc":
        destination_groups == ["/infra/tier-0s/vmc/groups/connected_vpc"]
    elif dg_string.lower() == "directconnect_prefixes":
        destination_groups == ["/infra/tier-0s/vmc/groups/directConnect_prefixes"]
    elif dg_string.lower() == "s3_prefixes":
        destination_groups == ["/infra/tier-0s/vmc/groups/s3_prefixes"]
    elif dg_string.lower() == "any":
        destination_groups = ["ANY"]
    else:
        dg_list = dg_string.split(",")
        destination_groups= [group_index + x for x in dg_list]
    services_string = sys.argv[5]
    if services_string.lower() == "any":
        services = ["ANY"]
    else:
        services_list = services_string.split(",")
        services = [list_index + x for x in services_list]
    action = sys.argv[6].upper()
    section = sys.argv[7]
Finally, I invoke the Python function using the arguments the user inputed and validate that it was successful by checking the return code. If it equals 200, then it’s been successfully created. If not, the user gets an error message.
new_rule = newSDDCDFWRule(proxy, session_token, display_name, source_groups, destination_groups, services, action, section, sequence_number)
if new_rule == 200:
    print("\n The rule has been created.")
    print(getSDDCDFWRule(proxy,session_token, section))
else:
    print("Incorrect syntax. Try again.")
Thanks for reading. If you start using PyVMC, drop me a Tweet: I would love to get some feedback.

2 thoughts on “Fling Update: PyVMC 1.1 release (and a walkthrough through some Python code)”