
This blog post will walk through how to use PowerCLI, Pester for VMware Cloud on AWS, NSX-T and vCenter. No prior knowledge of PowerCLI or PowerShell is required to read this blog.
In recent weeks, I have had the opportunity to participate in the construction of the VMware Hands-On Labs as a Lab Captain. I didn’t realize how much work was involved in the process but I had heard (from previous Lab Captains and Lab Principals) that it was a pretty thorough process.
Labbing is my preferred method to learn anything and when I joined VMware 4.5 years ago, I spent a fair bit of time on the VMware Hands-On Labs familiarize myself with the VMware products I wasn’t aware of.

My focus was building the scripts for the gamified version of the Hands-On Labs: VMware Odyssey.
While we encourage the Hands-On Labs participants to take their time and make sure they understand the products they are evaluating, the Odyssey labs challenge the users to complete a number of tasks as quickly as possible. Once they complete a task, they click on a “Validate” button to verify that they have done the task correctly.
How do we verify that the user has successfully done the task? By using PowerShell and PowerCLI, including Pester, a testing framework.
I’m going to assume you have no to little knowledge of PowerCLI/PowerShell – I’ve only been using it on and off for three years or so and I’ve found it a great introduction to programming and automation.
Installation
First and foremost, we will have to start a PowerShell session. On my Mac terminal, just enter the pwsh command:
bash-3.2$ pwsh
PowerShell 7.0.2
Copyright (c) Microsoft Corporation. All rights reserved.

https://aka.ms/powershell
Type 'help' to get help.

PS /Users/nicolasvibert>
If you don’t have it installed yet, run the brew cask install powershell command from your terminal.
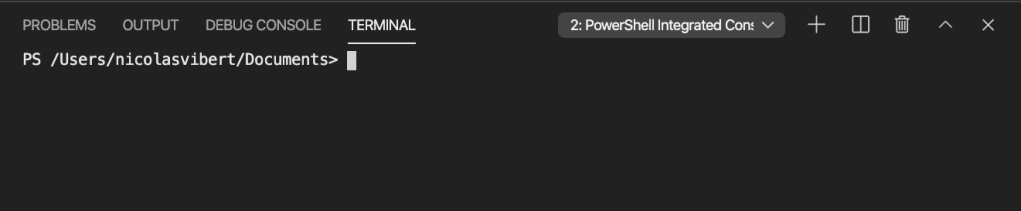
Most of the PowerShell I do is from the Visual Studio Code. It has an integrated PowerShell console.
We’re going to need to install PowerCLI first if we’ve never used it before. PowerCLI i a tool based on PowerShell that will let us consume and manage VMware resources (vCenter, vROPS, SRM, NSX, VMC, etc…).
Install-Module -Name VMware.PowerCLI
The lab I am working on is the VMware Cloud on AWS lab so I had to use PowerCLI modules for VMC and NSX-T. Kudos to William Lam amongst others for building it.
Install-Module -Name VMware.VMC
Install-Module -Name VMware.VMC.NSXT
The first thing we need to do is connect to the VMware Cloud Services and connect us to the NSX Reverse-Proxy in the Cloud.
First, we are defining some PowerShell variables with the “$” character. Once defined, we can use the variables throughout our PowerShell session. You can easily get the name of your VMware Cloud organization and your VMC SDDC (remember to use the name, not the id). The refresh token is required for any API operations.
PS /Users/nicolasvibert> $RefreshToken = "xxxxxxxxxx"

PS /Users/nicolasvibert> $OrgName = "xxxxxxxxxxxx"

PS /Users/nicolasvibert> $SDDCName = "xxxxxxxxxxx"

PS /Users/nicolasvibert/> Connect-VmcServer -RefreshToken $RefreshToken
Server                         User
------                         ----
vmc.vmware.com                 nvibert

PS /Users/nicolasvibert/> Connect-NSXTProxy -RefreshToken $RefreshToken -OrgName $OrgName -SDDCName $SDDCName
To install Pester for the tests we’ll perform in the last part of the blog pot, it’s a single command:
Find-Module pester -Repository psgallery | Install-Module
NSX-T
Once you have run Connect-VmcServer and Connect-NSXTProxy, you are now connected and can run VMC NSXT commands. We’ll be looking at network and firewall operations (on the edge firewalls and on the distributed firewall).
You might want to check a specific firewall rule. I create a variable $correct_mgw_rule_name and run the following command to get the firewall rule based on the name. Remember VMC has two edge firewalls so we have to specify which firewall with “-GatewayType“.
PS /Users/nicolasvibert/> $correct_mgw_rule_name = "vCenter Inbound Rule"
PS /Users/nicolasvibert/> $vcenterMGWRule = Get-NSXTFirewall -GatewayType MGW -Name $correct_mgw_rule_name
PS /Users/nicolasvibert/> $vcenterMGWRule

                                                                                                                                                                            SequenceNumber : 10                                                                                                                                                         Name           : vCenter Inbound Rule                                                                                                                                       ID             : 0b39e4b0-b3fe-11ea-bd4e-4f79e6ea72ab
Source         : {ANY}
Destination    : {vCenter}
Services       : {HTTPS}
Scope          : {MGW}
Action         : ALLOW
The previous firewall rule is an object and its properties are ‘members’. To get the members of a PowerShell object, just add “.” and press Tab (auto-completion) and the options will be automatically proposed:

So if I want the destination of my FW rule, it’s simply:
PS /Users/nicolasvibert/> $vCenterMGWRuleDestination = $vCenterMGWRule.Destination

PS /Users/nicolasvibert/> $vCenterMGWRuleDestination

vCenter
We can also use PowerCLI for the Security groups and to create Distributed Firewall sections and security policies:
PS /Users/nicolasvibert> New-NSXTGroup -Name Group_Power_CLI -GatewayType CGW -Tag "PowerCLI-NSX-Tag"

Successfully created new NSX-T Group Group_Power_CLI                                                                                                                                                            display_name    id                                                                                      ------------    --
Group_Power_CLI f71830c6-fd3a-4269-8764-ffde7040578d

PS /Users/nicolasvibert> New-NSXTDistFirewallSection -Name "PowerCLI-DFW-Section" -Category "Application"

Successfully created new NSX-T Distributed Firewall Section @{display_name=Odyssey-Policy; id=d3b69320-b4cb-11ea-934e-8944a7a8e6fd}                                                                                                                                                                                     display_name         id
------------         --
PowerCLI-DFW-Section 4fb179f7-7bfc-4c3e-9abb-1730d9292547

PS /Users/nicolasvibert> New-NSXTDistFirewall -Name "PowerCLI-DFW-FW" -Section "PowerCLI-DFW-Section" -SourceGroup Group_Power_CLI -DestinationGroup Group_Power_CLI -Service Any -Action DROP -SequenceNumber 100

Successfully created new NSX-T Distributed Firewall Rule PowerCLI-DFW-FW                                                                                                                                        display_name    id                                                                                      ------------    --
PowerCLI-DFW-FW a055eb40-218e-4418-9419-88bc0be278a1
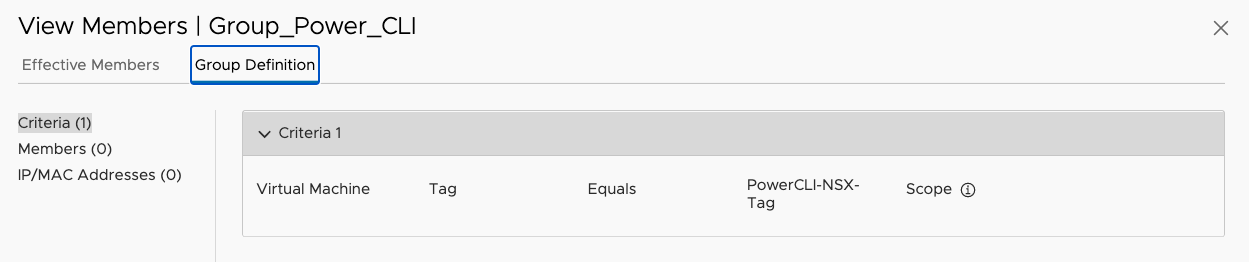
In the User Interface, the security group is indeed configured as we expect:
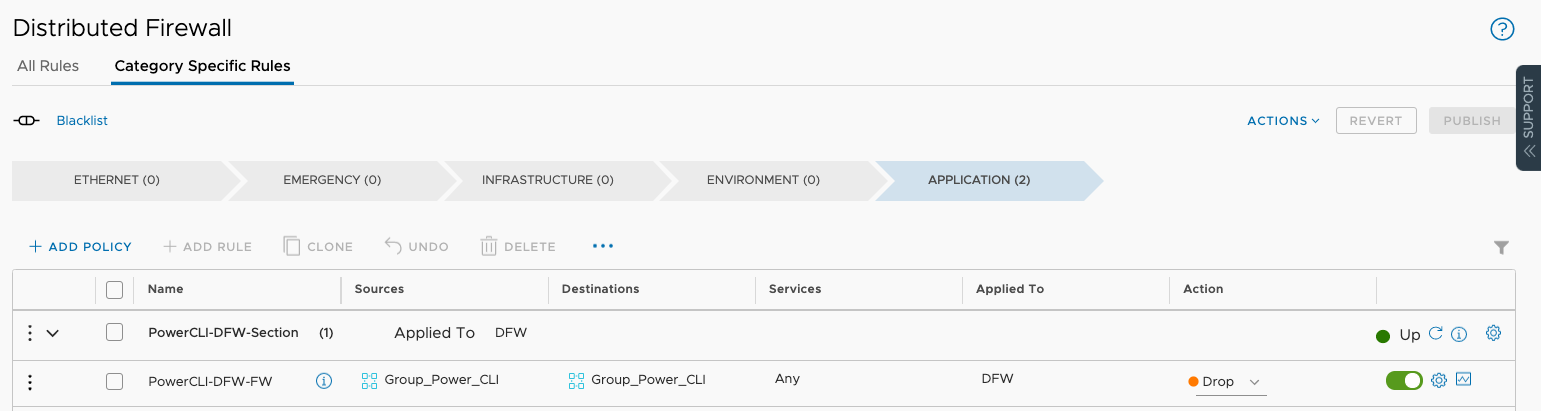
And so is the Distributed Firewall section and security rule:
If I want to get details about a network called “odyssey-network”, Get-NSXTSegment will pull all the information for me. And I can pull out all the properties of the network and create some additional variables.
PS /Users/nicolasvibert/> $new_network = Get-NSXTSegment -Name "odyssey-network"

Retrievig NSX-T Segments ...
PS /Users/nicolasvibert/> $new_network


Name      : odyssey-network
ID        : 1c2f52f0-b3fe-11ea-bd4e-4f79e6ea72ab
TYPE      : ROUTED
Network   : 192.168.20.0/24
Gateway   : 192.168.20.1/24
DHCPRange : 192.168.20.2-192.168.20.40
PS /Users/nicolasvibert/> $new_network_range = $new_network.Network
PS /Users/nicolasvibert/> $new_network_range

192.168.20.0/24                                                                                                                                                                                                                                           PS /Users/nicolasvibert/> $new_network_gateway = $new_network.Gateway
PS /Users/nicolasvibert/> $new_network_gateway

192.168.20.1/24
PS /Users/nicolasvibert/> $new_network_type = $new_network.TYPE
PS /Users/nicolasvibert/> $new_network_type

ROUTED

PS /Users/nicolasvibert/> $new_network_dhcp_range = $new_network.DHCPRange
PS /Users/nicolasvibert/> $new_network_dhcp_range

192.168.20.2-192.168.20.40
Hopefully you can see how easy it is to use PowerCLI to create and manage NSX-T resources in your VMware Cloud on AWS SDDC.
VMware Cloud on AWS
Imagine you have deployed a VMware Cloud on AWS SDDC (via the user interface, PowerCLI or Terraform) but you now want to access the vCenter.
If you want to get details about your VMware Cloud on AWS SDDC, Get-SDDC is the way to go:
PS /Users/nicolasvibert> Get-VMCSDDC


Name           DeploymentState SddcType   AccessState AccountLinkState CreatedByUser
----           --------------- --------   ----------- ---------------- -------------
test       Ready           MultiHost  Enabled                      acme@vmware.com
VMC-SET-EA-M11 Ready           SingleHost Enabled     Delayed          nvibert@vmware.com

PS /Users/nicolasvibert> $sddc = Get-VMCSDDC
There are two of them in my VMware Cloud organization. I don’t have to specify the org ID because the first command “Connect-VMCServer” used a refresh token and a refresh token is tied to an org.
The output from the command is an array (a collection of one or more objects) with two entries in it.
I’m only looking for the second one (array[0] will return the first entry of an array and array[1] will return the second one):
PS /Users/nicolasvibert> $sddc[0]


Name     DeploymentState SddcType  AccessState AccountLinkState CreatedByUser
----     --------------- --------  ----------- ---------------- -------------
test Ready           MultiHost Enabled                      acme@vmware.com

PS /Users/nicolasvibert> $sddc[1]


Name           DeploymentState SddcType   AccessState AccountLinkState CreatedByUser
----           --------------- --------   ----------- ---------------- -------------
VMC-SET-EA-M11 Ready           SingleHost Enabled     Delayed          nvibert@vmware.com
If I want the vCenter FDQN of this SDDC, specify “.VCenterUrl” at the end:
PS /Users/nicolasvibert> $sddc[1].VCenterUrl

https://vcenter.sddc-A-B-C-D.vmwarevmc.com/
If you want to connect to the vCenter over PowerCLI, you don’t want the entire URI but just the FQDN of the vCenter. So we want to remove “https://” and the last “/” from the character. The following command makes it easy to extract this data:
PS /Users/nicolasvibert> $longVcenterServer = $sddc[1].VCenterUrl
PS /Users/nicolasvibert> $longVcenterServer

https://vcenter.sddc-A-B-C-D.vmwarevmc.com/
PS /Users/nicolasvibert> $vCenterServer = ([System.Uri]$longvCenterServer).Host
PS /Users/nicolasvibert> $vCenterServer

vcenter.sddc-A-B-C-D.vmwarevmc.com
If I want the default credentials automatically created during the SDDC creation, the commands below will fetch them for me.
$vCenterAdmin = (Get-VMCSDDCDefaultCredential -Org $OrgName -Sddc $SddcName).cloud_username
$vCenterPassword = (Get-VMCSDDCDefaultCredential -Org $OrgName -Sddc $SddcName).cloud_password
vCenter
Now that I have pulled the vCenter’s FQDN and credentials, I can connect to it with the following command.
Connect-VIserver -Server $vCenterServer -User $vCenterAdmin -Password $vCenterPassword
Once you are connected to your vCenter, you can pretty much do anything you would do with the user interface. I’m going to look at a couple of different items: content library and VM operations.
Let’s check whether your content library is correctly configured or if your VMs are powered up or connected to the right network.
PS /Users/nicolasvibert> $correct_content_library_name = "S3 CL"
PS /Users/nicolasvibert> $content_library = Get-ContentLibrary -Name $correct_content_library_name
PS /Users/nicolasvibert> $content_library


Name                                                                                     Type       Pub
                                                                                                    lis
                                                                                                    hed
----                                                                                     ----       ---
S3 CL                                                                                    Subscribed
It’s a subscribed Content Library. If I want to check which URL it is subscribed to, I can simply find it like this:
PS /Users/nicolasvibert> $content_library.SubscriptionUri.AbsoluteUri

https://s3-us-west-2.amazonaws.com/XXXXXXX/lib.json
And yes, it’s hosted on AWS S3 and that is not officially supported… Read more about it here if you’re interested.
If you want to check your VMs and which network they are attached to, use Get-VM and Get-Network Adapter:
PS /Users/nicolasvibert> $VM = Get-VM -Name Odyssey-VM

PS /Users/nicolasvibert> $VM


Name                 PowerState Num CPUs MemoryGB
----                 ---------- -------- --------
Odyssey-VM           PoweredOff 2        4.000

PS /Users/nicolasvibert> $VM.PowerState

PoweredOff

PS /Users/nicolasvibert> $NetworkAdapter = Get-NetworkAdapter -VM "Odyssey-Name"

PS /Users/nicolasvibert> $network = $NetworkAdapter.NetworkName

PS /Users/nicolasvibert> $network

odyssey-network
PowerCLI is remarkably easy to use.
Pester
Now, going back to the premise of the post: how are we validating the tasks the Odyssey users are doing? We’ll be using Pester, a PowerShell testing framework.
It’s a clever way to run a battery of tests and verify whether an environment is healthy or configured correctly.
What is especially good about it is that it really simplifies how you validate whether the output of a command is one you expect.
Here is an example of a Pester script. Assume that I want to check that the user correctly configures the SDDC with the expected variables (Firewall rule allowing access to vCenter over port 443 and a network created with the right gateway and DHCP range).
#Requires -Modules "Pester"

# Expected results are the following

$correct_mgw_rule_name = "vCenter Inbound Rule"
$correct_mgw_rule_name_destination = "vCenter"
$correct_mgw_rule_port = "HTTPS"
$correct_network_segment_name = "odyssey-network"
$correct_network_range = "192.168.100.0/24"
$correct_network_gateway = "192.168.100.1/24"
$correct_type = "ROUTED"
$correct_dhcp_range = "192.168.100.2-192.168.100.40"

$OrgName = “”
$SDDCName = “”
$RefreshToken = ""

Install-Module -Name VMware.VMC
Install-Module -Name VMware.VMC.NSXT
Connect-VmcServer -RefreshToken $RefreshToken
Connect-NSXTProxy -RefreshToken $RefreshToken -OrgName $OrgName -SDDCName $SDDCName


Describe "The MGW Rule" {

    $vcenterMGWRule = Get-NSXTFirewall -GatewayType MGW -Name $correct_mgw_rule_name
    $vCenterMGWRuleDestination = $vCenterMGWRule.Destination
    $vCenterMGWRulePort = $vCenterMGWRule.Services
    $new_network = Get-NSXTSegment -Name "odyssey-network"
    $new_network_range = $new_network.Network
    $new_network_gateway = $new_network.Gateway
    $new_network_type = $new_network.TYPE
    $new_network_dhcp_range = $new_network.DHCPRange

    It "exists" {
        $vcenterMGWRule | Should -Not -BeNullOrEmpty
    }

    It "has vCenter as the destination" {
        $vCenterMGWRuleDestination | Should -Be $correct_mgw_rule_name_destination
    }

    It "has HTTPS as the destination" {
        $correct_mgw_rule_port | Should -BeIn $vCenterMGWRulePort
    }

    It "has ALLOW as the action" {
        $vCenterMGWRule.Action | Should -Be "ALLOW"
    }

    It "has a correct network configured, with the correct network mask" {
        $new_network.Name | Should -Be $correct_network_segment_name
    }

    It "has a correct network range configured." {
        $new_network_range | Should -Be $correct_network_range
    }

    It "has a correct network gateway configured." {
        $new_network_gateway | Should -Be $correct_network_gateway
    }

    It "has a correct network type." {
        $new_network_type | Should -Be $correct_type
    }

    It "has a correct DHCP range configured." {
        $new_network_dhcp_range | Should -Be $correct_dhcp_range
    }

}
If you look above, there are 9 blocks of tests, using ‘assertions‘. They are located within the Describe block which contains all the tests needed to verify the task is complete.
Pester just validates tests such as: is the value of $vCenterMGWRule.Action “ALLOW” ? Is the variable $vcenterMGWRule Null or Empty?
With the one below, we check whether “$correct_mgw_rule_port” (defined before as “HTTPS”) is one of the specified ports in the network rule. If the user has selected HTTPS, the result will be positive. If the user has selected HTTPS AND ICMP, it will also be true.
    It "has HTTPS as the destination" {
        "HTTPS" | Should -BeIn $vCenterMGWRulePort
    }
If the user hasn’t selected HTTPS, then we will see an issue in the result.
Let’s try this.
PS /Users/nicolasvibert/Documents/VMC on AWS/Scripts/HoL> ./Odyssey/ValidateMGW.Tests.ps1


Server                         User
------                         ----
vmc.vmware.com                 nvibert


Retrievig NSX-T Segments ...                                                                                                                                                                                    Starting discovery in 1 files.                                                                          Retrievig NSX-T Segments ...                                                                            Discovery finished in 23.86s.                                                                           [+] /Users/nicolasvibert/Documents/VMC on AWS/Scripts/HoL/Odyssey/ValidateMGW.Tests.ps1 23.94s (30ms|51ms)                                                                                                      Tests completed in 23.94s
Tests Passed: 9, Failed: 0, Skipped: 0 NotRun: 0
Now, let’s see what happens when I purposely chose the wrong port to open. I should expect Pester to return me an error:
You can drill down to see the result of the tests:
PS /Users/nicolasvibert/Documents/VMC on AWS/Scripts/HoL/Odyssey> $result = Invoke-Pester ./ValidateMGW.Tests.ps1 -PassThru


Starting discovery in 1 files.
Retrievig NSX-T Segments ...                                                                  Discovery finished in 22.67s.                                                                 [-] The MGW Rule.has HTTPS as the destination 4.38s (4.38s|2ms)                                Expected collection ICMP ALL to contain 'HTTPS', but it was not found.                        at $correct_mgw_rule_port | Should -BeIn $vCenterMGWRulePort, /Users/nicolasvibert/Documents/VMC on AWS/Scripts/HoL/Odyssey/ValidateMGW.Tests.ps1:61
 at <ScriptBlock>, /Users/nicolasvibert/Documents/VMC on AWS/Scripts/HoL/Odyssey/ValidateMGW.Tests.ps1:61
Tests completed in 41.68s                                                                     Tests Passed: 8, Failed: 1, Skipped: 0 NotRun: 0                                              PS /Users/nicolasvibert/Documents/VMC on AWS/Scripts/HoL/Odyssey> $result

Containers            : {[-] /Users/nicolasvibert/Documents/VMC on
                        AWS/Scripts/HoL/Odyssey/ValidateMGW.Tests.ps1}
Result                : Failed
FailedCount           : 1
FailedBlocksCount     : 0
FailedContainersCount : 0
PassedCount           : 8
SkippedCount          : 0
NotRunCount           : 0
TotalCount            : 9
Duration              : 00:00:41.6772081
Executed              : True
ExecutedAt            : 26/06/2020 15:23:20
Version               : 5.0.0-
PSVersion             : 7.0.2
PSBoundParameters     : {[PassThru, True], [Path, System.String[]]}
Plugins               :
PluginConfiguration   :
PluginData            :
Configuration         : PesterConfiguration
DiscoveryDuration     : 00:00:22.6714933
UserDuration          : 00:00:18.9468134
FrameworkDuration     : 00:00:00.0589014
Failed                : {[-] has HTTPS as the destination}
FailedBlocks          : {}
FailedContainers      : {}
Passed                : {[+] exists, [+] has vCenter as the destination, [+] has ALLOW as
                        the action, [+] has a correct network configured, with the correct
                        network mask…}
Skipped               : {}
NotRun                : {}
Tests                 : {[+] exists, [+] has vCenter as the destination, [-] has HTTPS as
                        the destination, [+] has ALLOW as the action…}


PS /Users/nicolasvibert/Documents/VMC on AWS/Scripts/HoL/Odyssey> $result.FailedCount

1
PS /Users/nicolasvibert/Documents/VMC on AWS/Scripts/HoL/Odyssey> $result.Failed
Failed                 FailedBlocksCount      FailedContainersCount
FailedBlocks           FailedContainers       FailedCount
PS /Users/nicolasvibert/Documents/VMC on AWS/Scripts/HoL/Odyssey> $result.Failed


Name              : has HTTPS as the destination
Path              : {The MGW Rule, has HTTPS as the destination}
Data              : {}
ExpandedName      : has HTTPS as the destination
Result            : Failed
ErrorRecord       : {Expected collection ICMP ALL to contain 'HTTPS', but it was not found.}
StandardOutput    :
Duration          : 00:00:04.3887273
ItemType          : Test
Id                :
ScriptBlock       :
                            $vcenterMGWRule = Get-NSXTFirewall -GatewayType MGW -Name
                    $correct_mgw_rule_name
                            $vCenterMGWRulePort = $vCenterMGWRule.Services
                            $correct_mgw_rule_port | Should -BeIn $vCenterMGWRulePort

Tag               :
Focus             : False
Skip              : False
Block             : [-] The MGW Rule
First             : False
Last              : False
Include           : False
Exclude           : False
Explicit          : False
ShouldRun         : True
Executed          : True
ExecutedAt        : 26/06/2020 15:23:53
Passed            : False
Skipped           : False
UserDuration      : 00:00:04.3820137
FrameworkDuration : 00:00:00.0067136
PluginData        :
FrameworkData     :
What we can do now is interpret the result. If result.FailedCount is null, then it means the test is successful and in the context of VMware Odyssey, it means that the user has completed the task successfully.
I’ll add more of my Pester scripts to my GitHub page eventually.
Hope you find this post useful.
Thanks for reading!

3 thoughts on “Deep Dive on PowerCLI, NSX-T, Pester and VMware Cloud on AWS”