
Update 16th July: I have published this sample configuration as a Module here.

A recent update to the Terraform provider for NSX-T has provided operators the ability to deploy next-generation firewalling policies and rules.
I covered how to use the provider in previous posts but I stuck to the simple features we supported at the time (creating network segments or Layer 4 security rules (I also covered L4 vs L7 in a previous post)).
Conveniently, this Terraform provider update came out as the same time as the availability of NSX Advanced Firewall on VMware Cloud on AWS (read more about it on Sandeep’s blog).
This is perfect to build DMZs, to host web-facing applications and more generally to restrict the attack surface and to meet some of the stricter compliance requirements that a basic L4 firewall cannot address.
I’ll cover the use cases in a future blog post but today, I want to geek out on Terraform.
Let’s go and try this out!
My example focuses on NSX-T on VMC but it could apply equally well to any NSX-T environment (just the authentication differ slightly).
NSX Advanced Firewall
The term above covers a lot of different features but I will focus on two specific ones:
- Context-Aware Firewalling
- Distributed IDS/IPS
Context-Aware Firewalling
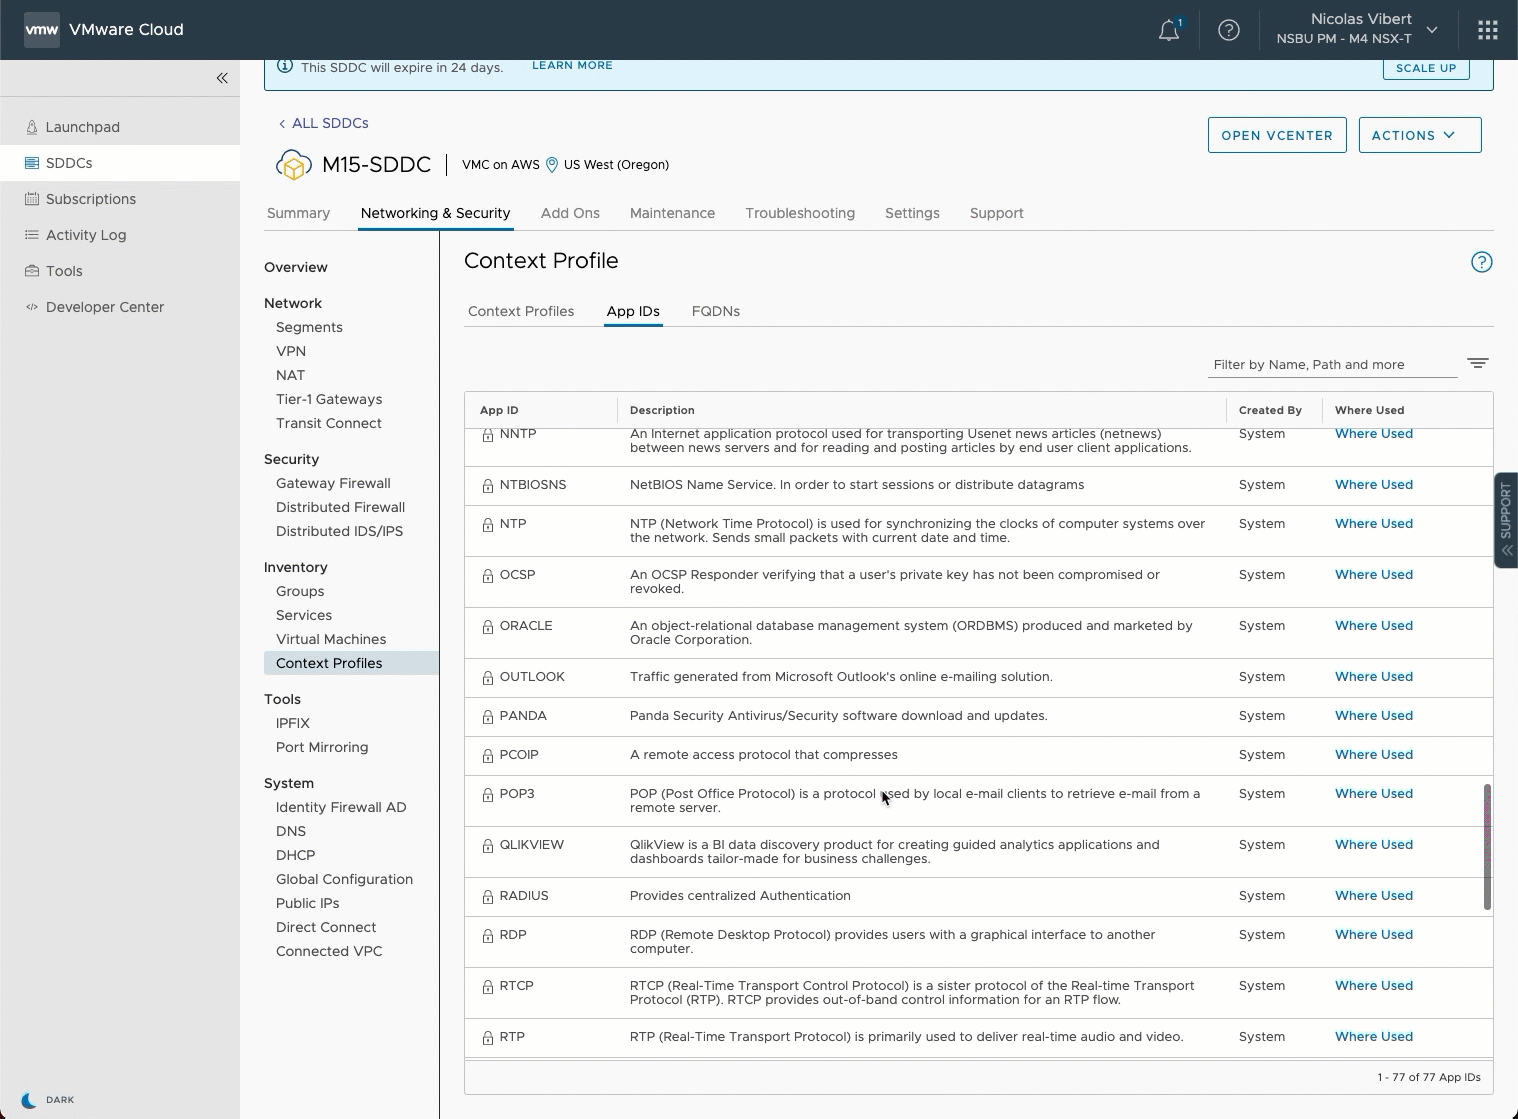
Context-Aware Firewalling provides deep packet inspection and the ability to apply layer 7 protection based on application profiles or based on FQDN.
Application profiles (“App IDs”) identify which application a packet/flow belongs to: see the full list here. Essentially, the firewall can now recognize common enterprise applications and apply security policies. This is smarter than just building a rule based on TCP/UDP ports, which can be easily obfuscated.
FQDN Filtering is focused on filtering traffic going out to the web – in simple terms, you can apply specific policies based on the web site a machine is trying to access.
As I write this, there are 527 pre-defined URLs but you can create your own on the User Interface (I don’t think it’s possible to do that with Terraform yet).
The way it works in NSX is by doing “DNS Snooping” – we intercept DNS queries to map a FQDN to an IP – and therefore, if you want to apply a rule based on FQDN on NSX-T, you need a first “DNS Snooping rule” to intercept DNS queries to map them to an IP address.
A rule set will look like this (this is what we’ll create with Terraform):

Distributed IDS/IPS
I won’t spend too much time going over this as there are already a few blogs out there covering the subject and I want to focus on Terraform but essentially, the Distributed IDS/IPS builds on the Distributed Firewall context and adds further security based on signatures.
Simply put, the Distributed IPS/IDS compares passing traffic with malicious traffic patterns. The signatures not only include these traffic patterns but, when applicable, the CVSS score (the severity of the vulnerability) and the CVE (the details and reference of the vulnerability).
To configure it on NSX, you need to set up a IDS/IPS profile (or use the default one) and then create a security rule and apply against that profile. You can find more details on Joerg’s blog post here.
Each profile is made of signatures, of different severities (Critical, High, Medium and Low) and of different attack types. The default profile only includes the Critical signatures.
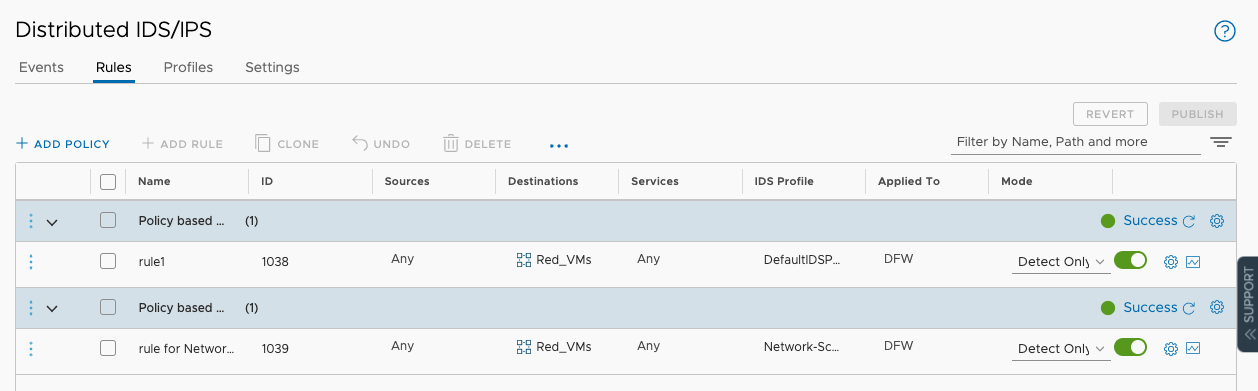
The profile I am creating with Terraform ( “Network-Scan-Policy” ) is based on one type of Attack – the Network Scan one.

We are also configuring these 2 IPS security policies (also known as a section) with a single rule in each, that leverage the profile created.
The second rule below protects a VM in the “Red_VMs” group against port scanning (like nmap): the Distributed IPS will identify the pattern and raise an alert.
Terraform Set up
I’ve been starting to use Terraform Cloud more often now and that will be where I run Terraform from. Check out my other posts to see how to run Terraform locally.
Walkthrough
My config is on GitHub and on the Terraform Registry as a Module but you can also find it below. What I’ve always liked with Terraform is how easy it is to read. If you understand the technology it’s interacting with, you’ll be able to read the code below.
I’ve used some of the configuration we used previously with Gilles in our VMworld session. We create a security group based on a VMs matching a certain NSX Tag (Blue or Red) and then we create profiles and security rules using these groups and profiles.
provider "nsxt" {
  host                 = var.host
  vmc_token            = var.vmc_token
  allow_unverified_ssl = true
  enforcement_point    = "vmc-enforcementpoint"
}

variable "host" {}
variable "vmc_token" {}

/*=====================================
Create Security Group based on NSX Tags
======================================*/
resource "nsxt_policy_group" "Blue_VMs" {
  display_name = "Blue_VMs"
  description  = "Terraform provisioned Group"
  domain       = "cgw"
  criteria {
    condition {
      key         = "Tag"
      member_type = "VirtualMachine"
      operator    = "EQUALS"
      value       = "Blue|NSX_tag"
    }
  }
}

resource "nsxt_policy_group" "Red_VMs" {
  display_name = "Red_VMs"
  description  = "Terraform provisioned Group"
  domain       = "cgw"
  criteria {
    condition {
      key         = "Tag"
      member_type = "VirtualMachine"
      operator    = "EQUALS"
      value       = "Red|NSX_tag"
    }
  }
}


/*=====================================
Create Context Profile
======================================*/

resource "nsxt_policy_context_profile" "contextProfile" {
  display_name = "Context Profile"
  description  = "Terraform provisioned ContextProfile"
  domain_name {
    description = "test-domain-name-attribute"
    value       = ["*.itunes.apple.com"]
  }
}

data "nsxt_policy_context_profile" "defaultDNSProfile" {
  display_name = "DNS"
}

/*=====================================
Create DFW rules
======================================*/

resource "nsxt_policy_security_policy" "NSXAdvancedFW" {
  display_name = "NSX Advanced FW"
  description  = "Terraform provisioned Security Policy"
  category     = "Application"
  domain       = "cgw"
  locked       = false
  stateful     = true
  tcp_strict   = false

  rule {
    display_name = "DNS Snooping"
    source_groups = [
    nsxt_policy_group.Red_VMs.path]
    services = ["/infra/services/DNS","/infra/services/DNS-UDP"]
    action   = "ALLOW"
    profiles = [data.nsxt_policy_context_profile.defaultDNSProfile.path]
    logged   = true
  }
  rule {
    display_name = "Context-Aware Profile"
    source_groups = [
    nsxt_policy_group.Red_VMs.path]
    action   = "DROP"
    profiles = [nsxt_policy_context_profile.contextProfile.path]
    logged   = true
  }
}

/*=====================================
Create Profiles or Refer to existing Default Profile
======================================*/

resource "nsxt_policy_intrusion_service_profile" "networkScanProfile" {
  display_name = "Network-Scan-Policy"
  description  = "Terraform-provisioned Profile for network-scanning"
  severities   = ["HIGH", "CRITICAL", "MEDIUM", "LOW"]

  criteria {
    attack_types      = ["network-scan"]
  }

  overridden_signature {
    action       = "REJECT"
    enabled      = true
    signature_id = "2019876"
        }
}
data "nsxt_policy_intrusion_service_profile" "defaultProfile" {
  display_name = "DefaultIDSProfile"
}

/*=====================================
Create IPS Policies and Rules
======================================*/


resource "nsxt_policy_intrusion_service_policy" "policyBasedDefaultProfile" {
  display_name = "Policy based on the default IDS/IPS Profile"
  description  = "Terraform provisioned Policy"
  locked       = false
  stateful     = true
  domain       = "cgw"
  rule {
    display_name       = "rule1"
    destination_groups = [nsxt_policy_group.Red_VMs.path]
    action             = "DETECT"
    logged             = true
    ids_profiles       = [data.nsxt_policy_intrusion_service_profile.defaultProfile.path]
  }
}

resource "nsxt_policy_intrusion_service_policy" "policyBasedOnNetworkScanProfile" {
  display_name = "Policy based on the newly created Network Scan profile"
  description  = "Terraform provisioned Policy"
  locked       = false
  stateful     = true
  domain       = "cgw"
  rule {
    display_name       = "rule for Network Scan"
    destination_groups = [nsxt_policy_group.Red_VMs.path]
    action             = "DETECT"
    logged             = true
    ids_profiles       = [nsxt_policy_intrusion_service_profile.networkScanProfile.path]
  }
}
What the above does is creating:
- 2 security groups
- Distributed IDS/IPS configuration, including:
- A IPS profile
- Two IPS security policy with associated security rules using the security groups and IPS profile.
- Context-Aware Firewalling configuration, including:
- A Context profile
- A DFW security policy using the security groups and context profile
There are a few things worth mentioning:
- The FW rules created are sub-objects, nested within the policies.
- In some of the configuration above, you’ll see we refer to the “path” of the object and not its id or name. It’s sometimes confusing but that’s the way it is done on the provider. The path is unique and represents the API path of the resource you are referring to. Sometimes, as you can see in line 128, you can refer to the path of the object you are creating. Other times (line 131), you need to refer to an existing profile’s path by using a data block. In line 77, I refer directly to the path of the services to show another example.
Demo
In Part 1, I go through my set up with Terraform Cloud, my GitHub repo and my VMware Cloud on AWS environment with the NSX-T Advanced Firewall. I also walk through some of the Distributed Firewall and Distributed IDS/IPS.
In Part 2, we look at the Terraform code, make a change to the Terraform config and commit the change before watching Terraform Cloud deploying the resources. We then have a look on the NSX console to see what has been created.
Thanks for reading and watching!

One thought on “NSX Advanced Firewall As Code with Terraform”