
There’s been many times in my career where I’ve wanted to build virtual networking labs – not just for testing network designs but primarily for learning.
While studying for my CCIE, I remember using GNS3. It was pretty good but not always stable. I eventually moved to renting physical racks as I was spending as much time troubleshooting GNS3 as troubleshooting networks. I haven’t used GNS3 in many years so I am sure it has drastically improved.
But now that containerization is ubiquitous and there are some great open source routing platforms available, we have far more options available to us.
One that I have been really impressed with is Containerlab.
In many ways, Containerlab takes some of the best aspects of modern infrastructure deployment and applies them to networking. By this, I mean you can:
- Use a declarative approach by writing network topologies in YAML
- Leverage open source and commercial routing platforms
- Use containers or virtual-machine to deploy your topology
- Leverage topology models that others have built (as users can share theirs on version control systems like GitHub).
The main reason I needed containerlab was to test and document some of the recent BGP enhancements on Cilium. By using BGP, Cilium enables you to connect your Kubernetes cluster to your Top-of-Rack (ToR) switches. This is actually a pretty cool feature as it avoids needed 3rd party appliances to connect back to your core DC network.
With containerlab, we can recreate a “DC-like” environment that I can connect my Cilium-enabled cluster.
Getting Started with Containerlab
The main requirements for Containerlab are Linux and Docker.
Installing it on an fresh Amazon Linux machine on EC2 took just a few minutes. I had to install Docker first with a few commands (sudo amazon-linux-extras install docker, sudo service docker start and sudo usermod -a -G docker ec2-user) – it’s not the focus of the post so we’ll skip them.
The instructions on the official Containerlab website were clear and I got going in minutes:
[ec2-user@ip-172-31-34-214 ~]$ bash -c "$(curl -sL https://get.containerlab.dev)"
Downloading https://github.com/srl-labs/containerlab/releases/download/v0.27.1/containerlab_0.27.1_linux_amd64.rpm
Preparing to install containerlab 0.27.1 from package

                           _                   _       _
                 _        (_)                 | |     | |
 ____ ___  ____ | |_  ____ _ ____   ____  ____| | ____| | _
/ ___) _ \|  _ \|  _)/ _  | |  _ \ / _  )/ ___) |/ _  | || \
( (__| |_|| | | | |_( ( | | | | | ( (/ /| |   | ( ( | | |_) )
\____)___/|_| |_|\___)_||_|_|_| |_|\____)_|   |_|\_||_|____/

    version: 0.27.1
     commit: 39860e1c
       date: 2022-06-07T10:45:29Z
     source: https://github.com/srl-labs/containerlab
 rel. notes: https://containerlab.dev/rn/0.27/#0271
Containerlab comes with a set of sample labs so that you can practice with simple topologies and expand as needed:
[ec2-user@ip-172-31-34-214 ~]$ # copy over the lab files
[ec2-user@ip-172-31-34-214 ~]$ cp -a /etc/containerlab/lab-examples/*
[ec2-user@ip-172-31-34-214 ~]$ ls -la
total 20
drwx------ 28 ec2-user ec2-user 4096 Jun  9 09:32 .
drwxr-xr-x  3 root     root       22 Jun  9 08:40 ..
-rw-------  1 ec2-user ec2-user  122 Jun  9 09:30 .bash_history
-rw-r--r--  1 ec2-user ec2-user   18 Jul 15  2020 .bash_logout
-rw-r--r--  1 ec2-user ec2-user  193 Jul 15  2020 .bash_profile
-rw-r--r--  1 ec2-user ec2-user  231 Jul 15  2020 .bashrc
drwxr-xr-x  2 ec2-user ec2-user   27 Jun  9 09:30 br01
drwx------  3 ec2-user root       25 Jun  9 09:29 .cache
drwxr-xr-x  2 ec2-user ec2-user   29 Jun  9 09:30 cert01
drwxr-xr-x  2 ec2-user ec2-user   29 Jun  9 09:30 clos01
drwxr-xr-x  3 ec2-user ec2-user  106 Jun  9 09:30 clos02
drwxr-xr-x  2 ec2-user ec2-user  104 Jun  9 09:30 clos03
drwxr-xr-x  4 ec2-user ec2-user   66 Jun  9 09:30 cvx01
drwxr-xr-x  4 ec2-user ec2-user   65 Jun  9 09:30 cvx02
drwxr-xr-x  5 ec2-user ec2-user  128 Jun  9 09:30 frr01
drwxr-xr-x  2 ec2-user ec2-user   99 Jun  9 09:30 ixiac01
drwxr-xr-x  2 ec2-user ec2-user   30 Jun  9 09:30 sonic01
drwxr-xr-x  2 ec2-user ec2-user   28 Jun  9 09:30 srl01
drwxr-xr-x  2 ec2-user ec2-user   60 Jun  9 09:30 srl02
drwxr-xr-x  2 ec2-user ec2-user   28 Jun  9 09:30 srl03
drwxr-xr-x  2 ec2-user ec2-user   32 Jun  9 09:30 srlceos01
drwxr-xr-x  2 ec2-user ec2-user   32 Jun  9 09:30 srlcrpd01
drwxr-xr-x  2 ec2-user ec2-user   76 Jun  9 09:30 srlfrr01
drwx------  2 ec2-user ec2-user   29 Jun  9 08:40 .ssh
drwxr-xr-x  2 ec2-user ec2-user  121 Jun  9 09:30 templated01
drwxr-xr-x  2 ec2-user ec2-user  121 Jun  9 09:30 templated02
drwxr-xr-x  2 ec2-user ec2-user   58 Jun  9 09:30 vr01
drwxr-xr-x  2 ec2-user ec2-user   57 Jun  9 09:30 vr02
drwxr-xr-x  2 ec2-user ec2-user   57 Jun  9 09:30 vr03
drwxr-xr-x  2 ec2-user ec2-user   59 Jun  9 09:30 vr04
drwxr-xr-x  2 ec2-user ec2-user   49 Jun  9 09:30 vr05
drwxr-xr-x  2 ec2-user ec2-user   59 Jun  9 09:30 vxlan01
As you can see above, there are lots of sample labs in the folder above. I’ve had mixed success deploying them because, sometimes the documentation is slightly out of date, or sometimes you might need to some credentials (for example, to access the Arista EoS appliance).
What worked well for me was using the sample lab for Nokia SR Linux and FRR.
The topology we are using is very simple – we just specify the type of appliances (srl for the Nokia SR Linux and linux for the frrouting image) and then we just link them up together. The network topology is defined in YAML and while this is a simple design, you can scale up with many nodes.
name: srlfrr01

topology:
  nodes:
    srl:
      kind: srl
      image: ghcr.io/nokia/srlinux
    frr:
      kind: linux
      image: frrouting/frr:v7.5.0
      binds:
        - daemons:/etc/frr/daemons

  links:
    - endpoints: ["srl:e1-1", "frr:eth1"]
Let’s deploy the topology with the containerlab deploy command:
[ec2-user@ip-172-31-34-214 ~]$ cd srlfrr01/
[ec2-user@ip-172-31-34-214 srlfrr01]$ sudo containerlab deploy -t srlfrr01.clab.yml
INFO[0000] Containerlab v0.27.1 started
INFO[0000] Parsing & checking topology file: srlfrr01.clab.yml
INFO[0000] Could not read docker config: open /root/.docker/config.json: no such file or directory
INFO[0000] Pulling docker.io/frrouting/frr:v7.5.0 Docker image
INFO[0005] Done pulling docker.io/frrouting/frr:v7.5.0
INFO[0005] Creating lab directory: /home/ec2-user/srlfrr01/clab-srlfrr01
INFO[0005] Creating docker network: Name="clab", IPv4Subnet="172.20.20.0/24", IPv6Subnet="2001:172:20:20::/64", MTU="1500"
INFO[0005] Creating container: "frr"
INFO[0005] Creating container: "srl"
INFO[0006] Creating virtual wire: srl:e1-1 <--> frr:eth1
INFO[0006] Running postdeploy actions for Nokia SR Linux 'srl' node
INFO[0023] Adding containerlab host entries to /etc/hosts file
+---+-------------------+--------------+-----------------------+-------+---------+----------------+----------------------+
| # |       Name        | Container ID |         Image         | Kind  |  State  |  IPv4 Address  |     IPv6 Address     |
+---+-------------------+--------------+-----------------------+-------+---------+----------------+----------------------+
| 1 | clab-srlfrr01-frr | 0441d9240b7f | frrouting/frr:v7.5.0  | linux | running | 172.20.20.2/24 | 2001:172:20:20::2/64 |
| 2 | clab-srlfrr01-srl | 74c73eb5eb90 | ghcr.io/nokia/srlinux | srl   | running | 172.20.20.3/24 | 2001:172:20:20::3/64 |
+---+-------------------+--------------+-----------------------+-------+---------+----------------+----------------------+
[ec2-user@ip-172-31-34-214 srlfrr01]$
Easy enough, right?
There are Docker containers so we can access their shell. Below I am configuring FRR using the vtysh shell – it will feel really familiar to anyone who’s used Cisco CLI before:
$ docker exec -it 0441d9240b7f /bin/ash
/ #
/ # vtysh

Hello, this is FRRouting (version 7.5_git).
Copyright 1996-2005 Kunihiro Ishiguro, et al.

frr#
frr# config t
frr(config)# interface eth1
frr(config-if)#  ip address 192.168.1.2/24
frr(config-if)# !
frr(config-if)# interface lo
frr(config-if)#  ip address 10.10.10.2/32
frr(config-if)# !
frr(config-if)# router bgp 65001
frr(config-router)#  bgp router-id 10.10.10.2
frr(config-router)#  neighbor 192.168.1.1 remote-as 65001
frr(config-router)#  !
frr(config-router)#  address-family ipv4 unicast
frr(config-router-af)#   network 10.10.10.2/32
frr(config-router-af)#  exit-address-family
frr(config-router)#
frr(config-router)# exit
frr(config)# exit
frr# write memory
Note: this version of vtysh never writes vtysh.conf
Building Configuration...
Configuration saved to /etc/frr/zebra.conf
Configuration saved to /etc/frr/ospfd.conf
Configuration saved to /etc/frr/ospf6d.conf
Configuration saved to /etc/frr/ldpd.conf
Configuration saved to /etc/frr/bgpd.conf
Configuration saved to /etc/frr/isisd.conf
Configuration saved to /etc/frr/pimd.conf
Configuration saved to /etc/frr/nhrpd.conf
Configuration saved to /etc/frr/staticd.conf
Configuration saved to /etc/frr/bfdd.conf
frr# exit
/ # exit
Above, we set up some very basic routing – we created a loopback0 address and set up BGP to peer with the Nokia SR Linux appliance and advertise the loopback’s IP address. Note that this configuration file can be found in the srlfrr01 directory.
Next, let’s up the Nokia SRL Linux appliance by this time, using SSH:
[ec2-user@ip-172-31-34-214 srlfrr01]$ ssh admin@clab-srlfrr01-srl
................................................................
:                  Welcome to Nokia SR Linux!                  :
:              Open Network OS for the NetOps era.             :
:                                                              :
:    This is a freely distributed official container image.    :
:                      Use it - Share it                       :
:                                                              :
: Get started: https://learn.srlinux.dev                       :
: Container:   https://go.srlinux.dev/container-image          :
: Docs:        https://doc.srlinux.dev/22-3                   :
: Rel. notes:  https://doc.srlinux.dev/rn22-3-2                :
: YANG:        https://yang.srlinux.dev/v22.3.2                :
: Discord:     https://go.srlinux.dev/discord                  :
: Contact:     https://go.srlinux.dev/contact-sales            :
................................................................

admin@clab-srlfrr01-srl's password:
Using configuration file(s): []
Welcome to the srlinux CLI.
Type 'help' (and press <ENTER>) if you need any help using this.
--{ running }--[  ]--
A:srl# # enter candidate datastore
enter candidate

# configure loopback and data interfaces
set / interface ethernet-1/1 admin-state enable
set / interface ethernet-1/1 subinterface 0 admin-state enable
set / interface ethernet-1/1 subinterface 0 ipv4 address 192.168.1.1/24

set / interface lo0 subinterface 0 admin-state enable
set / interface lo0 subinterface 0 ipv4 address 10.10.10.1/32
set / network-instance default interface ethernet-1/1.0
set / network-instance default interface lo0.0

# configure BGP
set / network-instance default protocols bgp admin-state enable
set / network-instance default protocols bgp router-id 10.10.10.1
set / network-instance default protocols bgp autonomous-system 65001
set / network-instance default protocols bgp group ibgp ipv4-unicast admin-state enable
set / network-instance default protocols bgp group ibgp export-policy export-lo
set / network-instance default protocols bgp neighbor 192.168.1.2 admin-state enable
set / network-instance default protocols bgp neighbor 192.168.1.2 peer-group ibgp
set / network-instance default protocols bgp neighbor 192.168.1.2 peer-as 65001

# create export policy
set / routing-policy policy export-lo statement 10 match protocol local
set / routing-policy policy export-lo statement 10 action accept

# commit config
commit now
All changes have been committed. Leaving candidate mode.
--{ + running }--[  ]--
A:srl#
Again, if you’re remotely familiar with networking, you’ll see that we are setting up our IP and the BGP configuration (the configuration above can also be found in the sample lab folder srlfrr01). Let’s go back to FRR as I am more familiar with its command-line (as it feels exactly like a Cisco CLI):
frr# show ip bgp summary

IPv4 Unicast Summary:
BGP router identifier 10.10.10.2, local AS number 65001 vrf-id 0
BGP table version 3
RIB entries 5, using 960 bytes of memory
Peers 1, using 14 KiB of memory

Neighbor        V         AS   MsgRcvd   MsgSent   TblVer  InQ OutQ  Up/Down State/PfxRcd   PfxSnt
192.168.1.1     4      65001        50        50        0    0    0 00:23:13            2        1

Total number of neighbors 1
frr# show ip route
Codes: K - kernel route, C - connected, S - static, R - RIP,
       O - OSPF, I - IS-IS, B - BGP, E - EIGRP, N - NHRP,
       T - Table, v - VNC, V - VNC-Direct, A - Babel, D - SHARP,
       F - PBR, f - OpenFabric,
       > - selected route, * - FIB route, q - queued, r - rejected, b - backup

K>* 0.0.0.0/0 [0/0] via 172.20.20.1, eth0, 00:35:55
B>* 10.10.10.1/32 [200/0] via 192.168.1.1, eth1, weight 1, 00:20:35
C>* 10.10.10.2/32 is directly connected, lo, 00:24:39
C>* 172.20.20.0/24 is directly connected, eth0, 00:35:55
B   192.168.1.0/24 [200/0] via 192.168.1.1 inactive, weight 1, 00:20:35
C>* 192.168.1.0/24 is directly connected, eth1, 00:24:39
frr#
frr# ping 10.10.10.1
PING 10.10.10.1 (10.10.10.1): 56 data bytes
64 bytes from 10.10.10.1: seq=0 ttl=64 time=5.796 ms
64 bytes from 10.10.10.1: seq=1 ttl=64 time=6.177 ms
BGP has come up and, from the FRR appliance, I can ping the Loopback IP address advertised over BGP from the SRL router. Nice!
As mentioned earlier, I am currently testing some enhancements around BGP on Cilium and for this, we are using containerlab to build a more sophisticated environment than the one above.
Here is what I am using (I need to give credit to Louis De Los Santos and Yutaro Hayakawa – they built the topology I am using in my tests). It’s working great and it shows some of the great potential of containerlab:
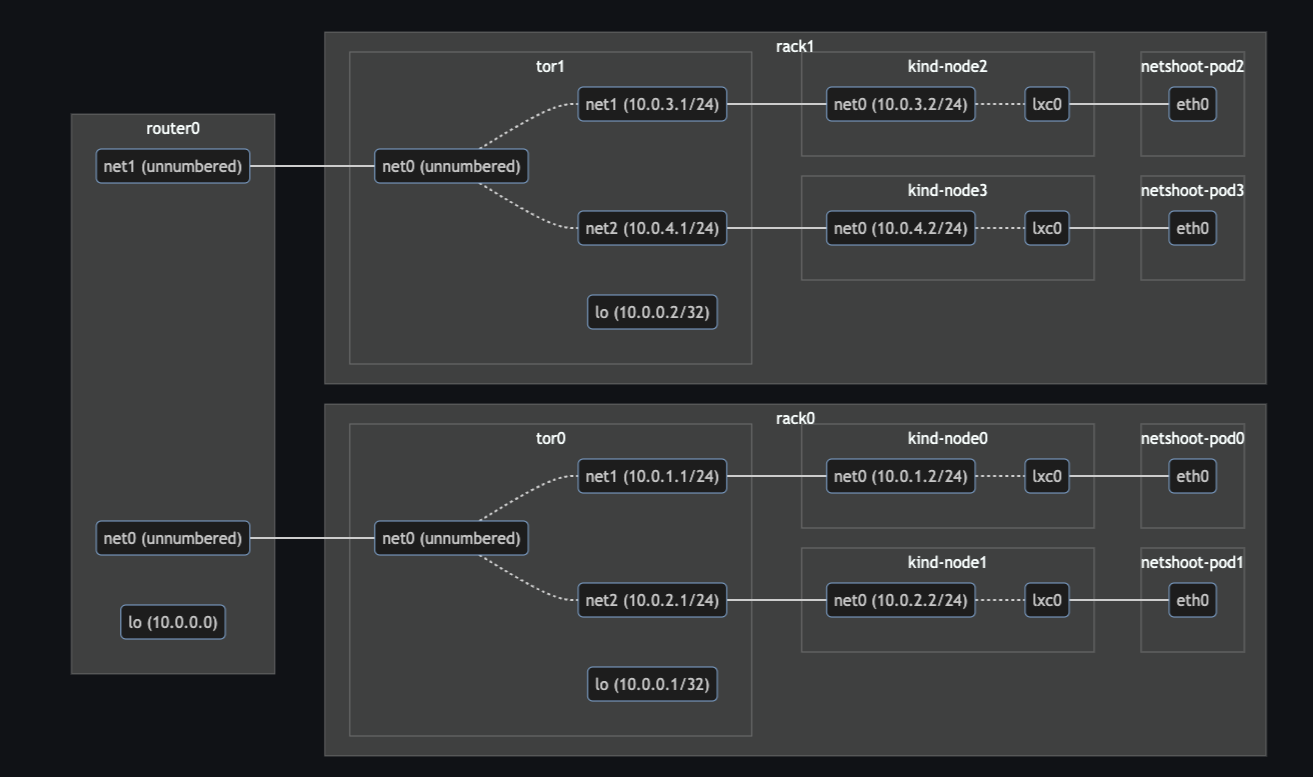
Note that the diagram above was created in Markdown using Mermaid. Mermaid will soon deserve another short blog post:
But that’s a post for another day!
Thanks for reading.

Hi I dont see you’re providing ping from SRL, do you have ping with network-instance other that mgmt ?
LikeLike