
After my recent HashiCorp webinar on VMware-As-Code, a VMware colleague that I hadn’t worked with before, got in touch. Nicolas works on the VMware NSX Advanced Load-Balancing team (formerly known as AVI) side and on top of sharing a name and a nationality, we both share a love of automation!
We started working on a project to automate the deployment of load-balancing solution on VMware Cloud on AWS (and most of it applies to any vCenter environment).
You may recall I wrote a previous post on Load-Balancing solutions – prior to the AVI acquisition, I had already blogged about deploying AVI on VMware Cloud but a lot of the deployment was manual and required some knowledge of the overall AVI architecture and concepts of controllers and service engine.
And while it wasn’t that difficult, wouldn’t it be nice to deploy a fully configured load-balancer + a sample two-tier application with absolute zero effort AND little to no knowledge of automation skills?
It turned out that Nicolas B had already done an awful lot of automation with Avi and vCenter but we needed to test it, validate it and document it with VMware Cloud on AWS.
Requirements
Preparing the AVI controller and Ubuntu images
First, we will need to download the AVI controller. Head out to https://portal.avinetworks.com , sign up (manual approval is required unfortunately but hopefully the software will soon move to my.vmware.com), go to Software and download the OVA controller.
It should be something like:
controller-20.1.2-9171.ova
We also recommend you download an Ubuntu image – that will be used as a jump box and for the sample app. You can download it directly here.
Now that you have the OVAs downloaded, you just need to upload them as template.
One of the ways to do this would be to use OVFTool and thankfully William Lam had some handy blog posts on this:
For some reason (probably my fat fingers), it took me longer to get the script to work so for posterity, here is you can easily import the downloaded OVAs to VMC. Update the settings as needed.
ovftool.exe --acceptAllEulas --allowAllExtraConfig --name=controller-20.1.1-9071-template --datastore=WorkloadDatastore --network:EMEA-VMC-TEST-01 --vmFolder=Templates --importAsTemplate C:\Users\nvibert\Downloads\controller-20.1.2-9171.ova vi://cloudadmin@vmc.local:password@vcenter.sddc-A-B-C-D.vmwarevmc.com/SDDC-Datacenter/host/Cluster-1/Resources/Compute-ResourcePool/

ovftool.exe --acceptAllEulas --allowAllExtraConfig --name=ubuntu-bionic-18.04-cloudimg-template --datastore=WorkloadDatastore --network:EMEA-VMC-TEST-01 --vmFolder=Templates --importAsTemplate C:\Users\nvibert\Downloads\bionic-server-cloudimg-amd64.ova vi://cloudadmin@vmc.local:password@vcenter.sddc-A-B-C-D.vmwarevmc.com/SDDC-Datacenter/host/Cluster-1/Resources/Compute-ResourcePool/
Just make sure you have direct ESXi host access from the VM running OVFtool, like Willian explained in his blog.

Alternatively, deploy the VM from OVF and convert it to a template.
Setting access to vCenter and ESXi
Just make sure you allow access to vCenter and ESXi for provisioning :

Setting the variables
On my Mac, it would be simply
export TF_VAR_vmc_nsx_server=https://nsx-1-2-3-4.rp.vmwarevmc.com/vmc/reverse-proxy/api/orgs/aaaa-bbbb-cccc-dddd/sddcs/eeee-ffff-gggg-hhhh
export TF_VAR_vmc_nsx_token=XXXXXXXXXXXXXXXXXXXXXXXXX
export TF_VAR_vmc_org_id=aaaa-bbbbb-ccccc-ddddd
export TF_VAR_vmc_vsphere_password=password
export TF_VAR_vmc_vsphere_server=vcenter.sddc-1-2-3-4.vmwarevmc.com
export TF_VAR_vmc_vsphere_user=cloudadmin@vmc.local
If the password includes a character that the Mac Terminal doesn’t like, wrap the passwords with the ‘ symbol.
Setting the public key
You need to set up a RSA key pair to enable connectivity between the jump host and the controller. The easiest way to do that is with ssh-keygen:
root@terraform-test:~/aviVMC# ssh-keygen
Generating public/private rsa key pair.
Enter file in which to save the key (/root/.ssh/id_rsa): cloudKey
Enter passphrase (empty for no passphrase):
Enter same passphrase again:
Your identification has been saved in cloudKey.
Your public key has been saved in cloudKey.pub.
The key fingerprint is:
SHA256:----------------------- root@terraform-test
The key's randomart image is:
+---[RSA 2048]----+
|                 |
|           o .   |
|          = + o  |
|         = o o   |
|    +   S @ o    |
|  .X . o ^ B +   |
|  oo=.o = X + .  |
| ...o o+ . +     |
|  oo.o..E .      |
+----[SHA256]-----+
Just take a note of where you are deploying the key as you might need to update the path.
Installing Terraform
The tool leverages Terraform. While you don’t need to know Terraform to leverage this tool, you will need to install Terraform on your client.
Getting ready
We’re almost there – just go to your terminal and clone the GitHub repo with the code (this blog post is based on the v1.08 repo version):
git clone https://github.com/tacobayle/aviVmc ; cd aviVmc
In variables.tf, you will just need to update the path to whoever you have created the key pair – for me, it meant doing this:
public_key_path = "cloudKey.pub"

private_key_path = "cloudKey"
Everything else – you can leave as is. You’re welcome to update the script as you see fit of course.
Let’s go!
Just two commands are now required – terraform init:
nvibert-a01:aviVmc nicolasvibert$ terraform init

Initializing the backend...

Initializing provider plugins...
- Using previously-installed hashicorp/null v3.0.0
- Using previously-installed hashicorp/template v2.2.0
- Using previously-installed terraform-providers/nsxt v3.1.0
- Using previously-installed hashicorp/vsphere v1.24.2
- Using previously-installed hashicorp/time v0.6.0
- Using previously-installed terraform-providers/vmc v1.4.0

The following providers do not have any version constraints in configuration,
so the latest version was installed.

To prevent automatic upgrades to new major versions that may contain breaking
changes, we recommend adding version constraints in a required_providers block
in your configuration, with the constraint strings suggested below.

* hashicorp/null: version = "~> 3.0.0"
* hashicorp/template: version = "~> 2.2.0"
* hashicorp/time: version = "~> 0.6.0"
* hashicorp/vsphere: version = "~> 1.24.2"
* terraform-providers/nsxt: version = "~> 3.1.0"
* terraform-providers/vmc: version = "~> 1.4.0"

Terraform has been successfully initialized!

You may now begin working with Terraform. Try running "terraform plan" to see
any changes that are required for your infrastructure. All Terraform commands
should now work.

If you ever set or change modules or backend configuration for Terraform,
rerun this command to reinitialize your working directory. If you forget, other
commands will detect it and remind you to do so if necessary.
You are now ready to create all the resources:
nvibert-a01:aviVmc nicolasvibert$ terraform apply
var.avi_password
  Enter a value: VMware1!VMware1!

var.vmc_vsphere_password
  Enter a value: mvA*u!S3VY8GxsL

data.template_file.jumpbox_userdata: Refreshing state...
data.template_file.mysql_userdata[0]: Refreshing state...
data.template_file.opencart_userdata[0]: Refreshing state...
data.template_file.opencart_userdata[1]: Refreshing state...
data.template_file.backend_userdata[0]: Refreshing state...
data.template_file.backend_userdata[1]: Refreshing state...
data.template_file.client_userdata[0]: Refreshing state...
data.vsphere_datacenter.dc: Refreshing state...
data.vsphere_virtual_machine.client: Refreshing state...
data.vsphere_compute_cluster.compute_cluster: Refreshing state...
data.vsphere_virtual_machine.backend: Refreshing state...
data.vsphere_virtual_machine.mysql: Refreshing state...
data.vsphere_datastore.datastore: Refreshing state...
data.vsphere_virtual_machine.opencart: Refreshing state...
data.vsphere_virtual_machine.controller_template: Refreshing state...
data.vsphere_resource_pool.pool: Refreshing state...
data.vsphere_virtual_machine.jump: Refreshing state...
data.nsxt_policy_transport_zone.tzMgmt: Refreshing state...

An execution plan has been generated and is shown below.
Resource actions are indicated with the following symbols:
  + create
 <= read (data resources)

Terraform will perform the following actions:

  # data.vsphere_network.networkBackend will be read during apply
  # (config refers to values not yet known)
 <= data "vsphere_network" "networkBackend"  {
      + datacenter_id = "datacenter-3"
      + id            = (known after apply)
      + name          = "avi-backend"
      + type          = (known after apply)
    }

  # data.vsphere_network.networkMgmt will be read during apply
  # (config refers to values not yet known)
 <= data "vsphere_network" "networkMgmt"  {
      + datacenter_id = "datacenter-3"
      + id            = (known after apply)
      + name          = "avi-mgmt"
      + type          = (known after apply)
    }


Plan: 55 to add, 0 to change, 0 to destroy.

Do you want to perform these actions?
  Terraform will perform the actions described above.
  Only 'yes' will be accepted to approve.

  Enter a value: yes

vsphere_tag_category.ansible_group_jump: Creating...
vsphere_tag_category.ansible_group_opencart: Creating...
vsphere_tag_category.ansible_group_client: Creating...
vsphere_tag_category.ansible_group_mysql: Creating...
vsphere_tag_category.ansible_group_controller: Creating...
vsphere_folder.folderSe: Creating...
vsphere_tag_category.ansible_group_backend: Creating...
This script is pretty extensive and will do the following:
- Create 2 folders within vCenter
- Create 7 NSX-T groups
- Create 3 NSX-T segment(s)
- Create 12 vSphere tags
- Spin up 1 Avi Controller VM(s)
- Spin up 2 backend VM(s)
- Spin up 2 web opencart VM(s)
- Spin up 1 mysql VM(s)
- Spin up 1 client VM(s)
- Spin up 1 jump VM with ansible installed – userdata to install packages
- Request 6 Public IPs for Jump host, Controller and Virtual Services
- Create 6 NSX-T NAT Rule(s) for Jump host, Controller and Virtual Services
- Create 7 NSX-T policy Group for Jump host, Controller and Virtual Services
- Create 2 NSX-T Services for Virtual Services (only HTTP (tcp/80 and tcp/443) and DNS (udp/53))
- Create 7 NSX-T Gateway Policies for Jump host, Controller and Virtual Services
- Create a yaml variable file – in the jump server
- Call Ansible to run the opencart config (git clone)
- Call Ansible to do the Avi configuration (git clone)
Results!
The results are pretty spectacular – let’s review them.
All the VMC and networking configuration is done with Terraform and the APIs:


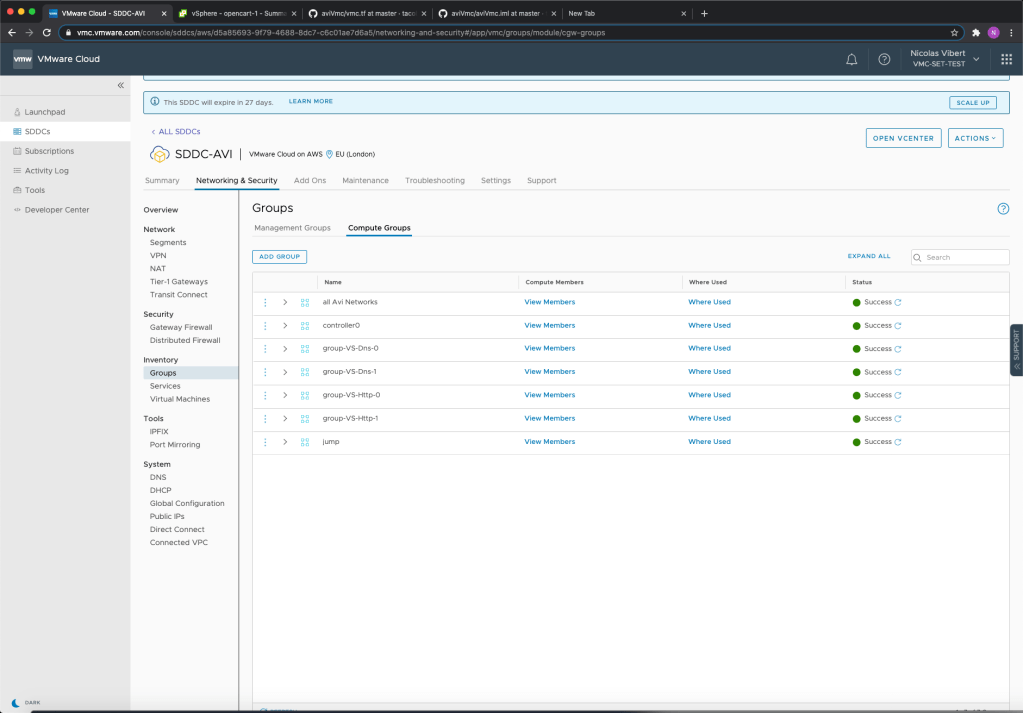


vCenter has been configured with VMs, tags and categories:


And two sample applications have been deployed. The first one is a very smart-looking open source “app store” called Opencart:

The second one is a very simple load-balanced application:

What about AVI ? Well, both the control plane (AVI Controller) and the data plane (AVI Service Engines) have been automatically deployed. You can see below the load-balancer pools:

The Virtual IPs:

And the service engines:

And what’s even more amazing is the level of visibility you get about each service – impressive!

Video walkthrough
In this first video, Nic and I go through the preparations and requirements…
We come back half an hour later to see the infrastructure deployed by the script:
And finally, we review the applications deployed the script and the great visibility provided by the AVI Load-Balancer:
Thanks for reading and watching! If you have any feedback on the tool, connect on Twitter, LinkedIn or via GitHub.

4 thoughts on “Load-Balancing-As-A-Service with VMware NSX Load Balancer”