
Thanks to Josef Karasiak, Kjell Perman, Henrik Leion, Sami Suro, Sebastian Ramirez and Robert Gustafsson for their help with this project. And a reminder that all content on my personal blog represent my own and not those of my employer.
I have been guilty since I started blogging of perhaps focusing too much on tech and not enough on how and why customers use some of the tools I describe.
So let’s talk about a customer engagement I’ve had in the past couple of months. Technologies discussed in the post include Terraform, Ansible, PowerCLI, VMware (including VMware Cloud on AWS and NSX) and AWS.
Warning – this is a pretty technical blog… but will be worth reading. What we will be going through is how a customer can deploy all of the following from code:
- AWS infrastructure
- VMware Cloud on AWS SDDC
- NSX-T network and security rules
- vSphere tags
- Virtual Machines and EC2 instances
- Software and scripts on the VMs and EC2 instances
Impressive, right?
Let’s start with an introduction to the customer.
TietoEVRY is a leading digital services and software company in the Nordics. Its payment solutions are used by banks and financial services providers in more than 30 countries globally.
They have already been using VMware Cloud on AWS and have published a great reference document describing how they use our platform to offer their Software-As-a-Service.
They got in touch middle of September through one of my colleagues who had come across my Terraform presentation with Gilles (Gilles will feature heavily in this project).
While they already use VMware Cloud on AWS, TietoEVRY had previously deployed and configured it manually and via the User Interface. They now wanted the ability to deploy their applications entirely from code for reasons of speed and consistency and Terraform was selected as the tool of choice.
There was a lot of enthusiasm to get the pilot started and, compared to the inertia I sometimes face in my customer engagements, it was refreshing to see how quickly TietoEVRY wanted to get the pilot rolling. However, we faced a couple of challenges initially:
- While the team was very familiar with VMware Cloud on AWS and AWS, they didn’t have a lot of experience with Terraform yet.
- The team hadn’t fully decided what they wanted to automate and what the ‘manual’ tasks would have been (before you automate, work out the steps required to do it manually).
- Multiple engineers were going to work on the Terraform infrastructure so running Terraform locally wasn’t going to be possible.
Building the team
The first task was to get the right pilot team together, with the right skillset.
From a training perspective, I recommended the webinar I presented with Grant from HashiCorp:
I also recommended the good walk-throughs offered by HashiCorp:
https://learn.hashicorp.com/terraform
Best way to learn is to practice though so we rapidly got the team to try out the platform.
Once the team was completed by Henrik Leion (a DevOps/Software architect, with extensive Ansible and Terraform experience) and resources from AWS, HashiCorp and VMware, we were ready to start.
Selecting the communications platform
One of the reasons the pilot ended up being successful is actually because of we set up a dedicated communications workspace to discuss any challenges and progress – it enabled all participants across various companies to quickly communicate. It might be obvious but in most of my typical interactions with customers, we tend to use e-mails for communications and it’s not always effective and reactive.
Selecting the Terraform environment
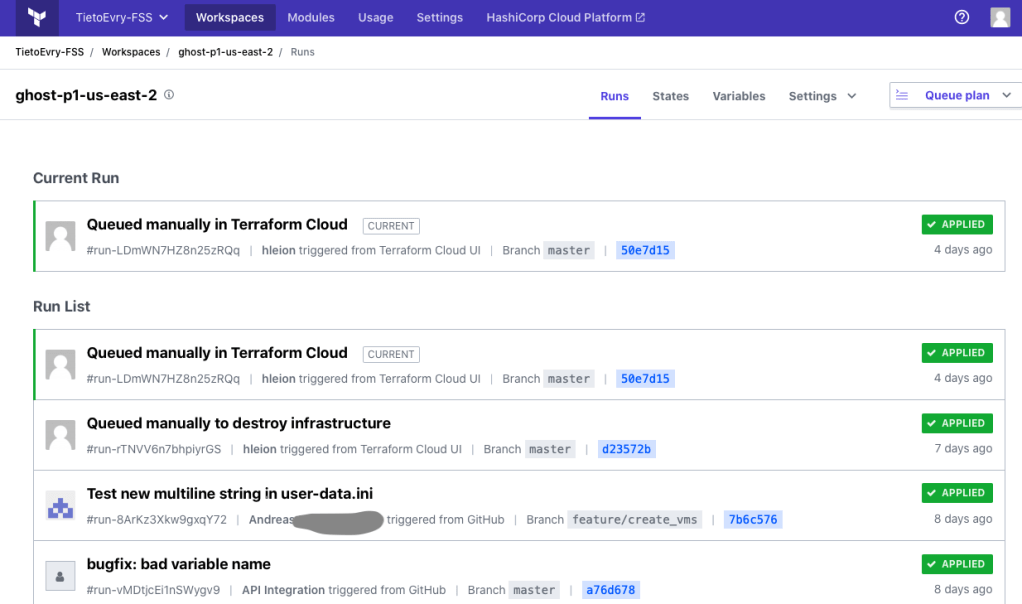
Once we got the team going and communications flowing, we had to decide how and where we are going to run Terraform from and TietoEVRY selected Terraform Cloud, the hosted version of Terraform. The code was stored on GitHub and it enabled the team to collaborate together on the project, to keep track of changes, store states, etc…
You can read more about Terraform Cloud here and some of its premium features, like Sentinel.
Defining the requirements
The idea was to do similar to what we demoed during our VMworld session.

Using an automation tool – ideally Terraform – and code, TietoEVRY would:
- Deploy an AWS VPC and subnets
- Deploy a VMware Cloud on AWS SDDC
- Deploy NSX-T networks and security rules for micro-segmentation
- Deploy VMs in the newly configured SDDC and have them secured by the NSX-T rules
TietoEVRY used a lot of the code we showcased during our VMworld session and can be found here.
Steps 1 and 2 – Deploying AWS and VMware Cloud on AWS
Steps 1 and Step 2 were pretty straight-forward. I’ve documented Step 2 extensively and it’s pretty simple to deploy the SDDC.
Step 3 – Deploying NSX-T networks and security rules
Step 3 and Terraform for NSX-T required a bit more efforts but we were able to create networks, security groups and rules (on the edge firewalls and on the distributed firewall). Again, there is plenty of content here to help you getting started with Terraform for NSX-T.
Step 4 – Deploying VMs
Once the SDDC is deployed and secured with NSX-T rules, it was time to deploy VMs.
First task: decide where to store the templates and OVF we were going to deploy the VMs from.
I’ll let Henrik take over from here. In the upcoming paragraphs, Henrik explains in details the challenges faced when using the Terraform for vSphere provider and why we ultimately turned to a different tool for the VM provisioning. It’s pretty technical but I think it would be useful for anyone who wants to automate their virtual machine provisioning.
In Henrik’s own words:
We publish OVF templates from our main region and upload them to an S3 bucket using this approach.
We want each remote region to have a Content Library which subscribes to this main S3 backed Content Library, so that we can deploy new versions and update across the globe.
In the end, it turned out great, but we did run into some trouble along the way.
- First of all, our applications are published as OVF templates and deploying an OVF in VMC requires ESXi access, but those APIs are not available on the internet, so we couldn’t just have Terraform Cloud create the VMs for us directly
Let me briefly interrupt Henrik – for the reader, I explained this in details in a previous blog post. Back to Henrik –
- So using the approach from on https://github.com/gchek/VMworld2020, we created an EC2 instance in the AWS VPC connected to VMC, using Terraform EC2 provider, where we installed Terraform (using AWS user data at launch). Then we cloned the same GitHub repo as we use in Terraform Cloud, including the remote workspace reference to Terraform Cloud state, and we could now reach ESXi and run terraform commands manually but with the remote state in Terraform Cloud.
- But when we ran terraform, we hit the next problem. The Terraform vsphere_virtual_machine resource can deploy OVF templates from local or remote URLs, but not from a subscribing Content Library
- In addition to this, even though it is possible to clone an OVF, the vsphere_virtual_machine resource then requires that network and disks are specified verbatim. Apparently, it is not possible to get the specification from the OVF template. Our VMs were a bit complex, with multiple disks and NICs, so we really didn’t want to duplicate this specification.
- So, the terraform provider wasn’t enough for our use case. So on recommendation from Nico we decided to try PowerCLI to deploy the OVF. With that it was possible to deploy an OVF template from a subscribed Content Library into a Virtual Machine, and since it is a deploy – the VM has the same disks and network as the OVF
The team used my previous blog post on PowerCLI to achieve this. Back to Henrik:
- In the end, by having a three-step-process where we:
- deploy and OVF into a VM,
- convert the VM into a VM template and
- clone the VM template
We achieved our goal of subscribing to OVF templates and deploying multiple instances of those VMs in a remote SDDC.
However, we were not satisfied with the syntax or possibility of automating PowerCLI scripts, so we decided to take a look at Ansible instead. We already knew that we wanted Ansible to do some tweaking and maintenance operations on the VMs, so using Ansible to create the VMs was not too big of a deal.
First we replaced the automated Terraform installation on the bastion EC2 with Ansible, including the community.vmware collection from Ansible Galaxy, and rerun the p1 workspace. The SDDC remains intact, but the EC2 instance is recreated on account of the user-data.ini file being changed.
In addition to installing Ansible, we also had Terraform Cloud generate a configuration file for Ansibles dynamic VMware inventory, so we had Ansible integrated with vSphere already when the bastion host booted. With the dynamic inventory, VMs are discovered by Ansible and grouped by vSphere tags as soon as they are created.
So, based on https://github.com/gchek/VMworld2020 repo, our solution looks like this:
p1/EC2s/EC2s.tf:

variable "bastion_key"          {}
variable "BASTION_AMI"          {}

variable "Bastion_subnet" {}
variable "Bastion_IPrange" {}
variable "Bastion_SG" {}

variable "vc_public_IP" {}
variable "cloud_username" {}
variable "cloud_password" {}
variable “esxi_host” {}


/*============
Open up for public ssh
===========*/

data "aws_subnet" "connected_subnet" {
  id = var.Bastion_subnet
}

resource "aws_default_security_group" "defaultsecgroup" {
  vpc_id = data.aws_subnet.connected_subnet.vpc_id

  ingress {
    protocol  = "tcp"
    self      = false
    cidr_blocks = ["0.0.0.0/0"]
    from_port = 22
    to_port   = 22
  }
  egress {
    from_port   = 0
    to_port     = 0
    protocol    = "-1"
    cidr_blocks = ["0.0.0.0/0"]
  }
}


/*================
EC2 Instances
=================*/
resource "aws_network_interface" "nic" {
  subnet_id                     = var.Bastion_subnet
  security_groups               = [aws_default_security_group.default.id]
  private_ips                   = [cidrhost(data.aws_subnet.connected_subnet.cidr_block, 100)]
}
resource "aws_instance" "host" {
  ami                           = var.BASTION_AMI
  instance_type                 = "t2.micro"
  network_interface {
    network_interface_id        = aws_network_interface.bastion_host_nic.id
    device_index                = 0
  }
  key_name                      = var.bastion_key
  user_data                     = file("${path.module}/user-data.ini")

  provisioner "file" {
    content            = <<-EOF
    plugin: vmware_vm_inventory
    strict: False
    hostname: ${var.vc_public_IP}
    username: ${var.cloud_username}
    password: ${var.cloud_password}
    esxi_host: ${var.esxi_host}
    validate_certs: False
    with_tags: True
    EOF
    destination        = "~/inventory.vmware.yml"
    connection {
            type = "ssh"
            user = "replace_with_your_user"
            host = self.public_ip
            private_key = "replace_with_private_key"
    }
  }

  tags = {
    Name = "Bastion-host"
  }
}

/*================
Outputs variables for other modules to use
=================*/


output "EC2_IP"           {value = aws_instance.bastion_host.public_ip}
output "EC2_DNS"          {value = aws_instance.bastion_host.public_dns}
The file provisioner creates the configuration file for the dynamic Ansible inventory using the vSphere credentials generated by the VMC provider. We’ll see if we can use AWS Secrets Manager instead of piping to file someday, but for now, we just use the default plain text config files.
Below is the p1/EC2s/user-data.ini, which is executed when the EC2 instance boots up the first time. It installs Ansible, but also generates an Ansible config file which enables the Ansible vmware_vm_inventory
#!/bin/bash
#
#  This script runs when the EC2 bastion is deployed and
#  installs Git and Ansible with some VMware plugins
#

sudo yum update -y
sudo yum install -y git

# Executed by root.
# See https://docs.aws.amazon.com/AWSEC2/latest/UserGuide/user-data.html
sudo amazon-linux-extras install -y  ansible2
curl https://bootstrap.pypa.io/get-pip.py -o get-pip.py
python get-pip.py
su - user_name -c 'pip install --upgrade git+https://github.com/vmware/vsphere-automation-sdk-python.git --use-feature=2020-resolver'
su - user_name -c 'ansible-galaxy collection install community.vmware'

su - user_name -c 'cat > ~/ansible.cfg <<- EOM
[inventory]
enable_plugins = vmware_vm_inventory
EOM'
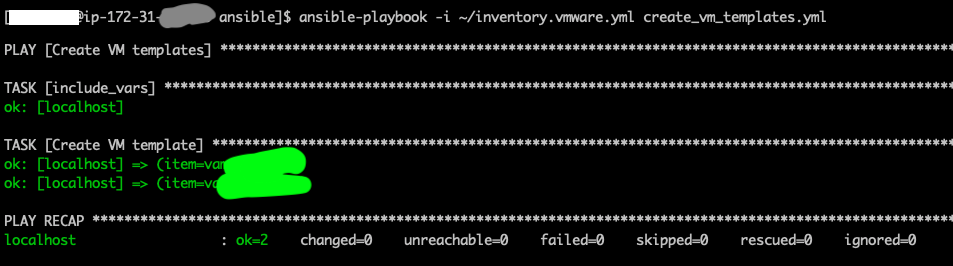
So, next we log into the Bastion host in EC2, check out the Ansible code from our GitHub repo and we can create the VM templates, from the Content Library which was created by Terraform Cloud. We simply have an Ansible variable “ovf_templates” containing a list of template names we want to clone.
One neat trick is that we just import the inventory.vmware.yml file as variable file, thus getting access to all the vcenter credentials and esxi host which Terraform generated for us in EC2s.tf.
#
# Playbook creating VM templates based on a subscribed Content Library
#
# Usage: ansible-playbook -i inventory.vmware.yml create_vm_templates.yml
#
# Author: Henrik Leion
#

---
- name: Create VM templates
  hosts: localhost
  gather_facts: no
  tasks:
  - include_vars:
      file: ~/inventory.vmware.yml
      name: vcenter
  - name: Create VM template
    community.vmware.vmware_content_deploy_ovf_template:
      hostname: "{{ vcenter.hostname }}"
      username: "{{ vcenter.username }}"
      password: "{{ vcenter.password }}"
      validate_certs: False
      ovf_template: "{{ item }}"
      name: "{{ item }}-template"
      datacenter: "{{ datacenter_name }}"
      cluster: "{{ cluster_name }}"
      host: "{{ vcenter.esxi_host }}"
      datastore: "{{ datastore }}"
      folder: Templates
      resource_pool: "{{ resource_pool }}"
    loop: "{{ ovf_templates }}"
Once the VM templates are created (the creation includes downloading the actual files into the Content Library, so it takes a while), we can tag and deploy VMs. In this example, we have VM name prefix and just append a number. The same number is used in the static IP as well. The example is abbreviated with some hardcoded variables, for simplicity. The real solution is still based on static IP, but with a more complex numbering scheme, which is quite easy to manage with Ansible.
The Network segment is duplicated here in an Ansible variable. Next iteration, we’ll obtain it from vSphere instead.
#
# Playbook creating the VMs
#
# Usage: ansible-playbook -i ~/inventory.vmware.yml -e vm_prefix=Foo create_vm.yml
#
# Author: Henrik Leion
#

---
- name: Create a VM from a template
  hosts: localhost
  gather_facts: no
  vars:
    network_segments:         #See p2/NSX/NSX.tf
      segment12:
        name:      segment12
        type:         static
        ip_prefix: A.B.C.D
        gateway:   A.B.C.E
        netmask:   255.255.255.0
  tasks:
  - include_vars:
      file: ~/inventory.vmware.yml
      name: vcenter
  - name: Clone the  template
    vmware_guest:
      hostname: "{{ vcenter.hostname }}"
      username: "{{ vcenter.username }}"
      password: "{{ vcenter.password }}"
      validate_certs: False
      name: "{{ vm_prefix }}-{{ item }}"
      template: “{{ vm_template }}”
      datacenter: "{{ datacenter_name }}"
      folder: "Workloads"
      state: poweredon
      cluster: "{{ cluster_name }}"
      resource_pool: "{{ resource_pool }}"
      networks:
        - name:    "{{ network_segments.segment12.name }}"
          type:    "{{ network_segments. segment12.type }}"
          ip:      "{{ network_segments.fe segment12.ip_prefix }}.{{ item }}"
          gateway: "{{ network_segments. segment12.gateway }}"
          netmask: "{{ network_segments. segment12.netmask }}"
      wait_for_ip_address: yes
   register: my_vms
   loop: #the number is used in the static IP on the last position
      - 10
      - 11
Finally, we added vSphere tags to group the VMs. Thanks to the dynamic inventory, these vSphere tags are immediately mapped into Ansible inventory groups, and thus can be used to limit your Ansible commands to a set of VMs.
Above, when creating the VMs, we register the them into an variable “my_vms”. We can continue the Ansible play above and add some vSphere Categories and Tags and apply them to the VMs like so:
  - name: Assert MyCategory category exist
    vmware_category:
      hostname: "{{ vcenter.hostname }}"
      username: "{{ vcenter.username }}"
      password: "{{ vcenter.password }}"
      validate_certs: False
      category_name: MyCategory
    register: my_category
  - name: Create myTag tag
    vmware_tag:
      hostname: "{{ vcenter.hostname }}"
      username: "{{ vcenter.username }}"
      password: "{{ vcenter.password }}"
      validate_certs: False
      category_id: "{{ my_category.category_results.category_id }}"
      tag_name: myTag
      tag_description: My tag
  - name: Tag the created VMs
    vmware_tag_manager:
      hostname: "{{ vcenter.hostname }}"
      username: "{{ vcenter.username }}"
      password: "{{ vcenter.password }}"
      validate_certs: False
      object_name: "{{ item.instance.hw_name }}"
      object_type: VirtualMachine
      tag_names:
         - myTag
    loop: "{{ my_vms.results }}"
Now, if we check the Ansible inventory, we already have the VMs grouped under “myTag”, in addition to the other groups the dynamic inventory automatically creates, like “poweredOn, “ubuntu64Guest” etc:
> ansible-inventory --list -i ~/inventory.vmware.yml

{
"myTag": {
        "hosts": [
            "Foo-10_42158fb7-f4fd-f954-58a6-740c0b01859d",
            "Foo-11_4215d63a-8daf-b5f8-54c5-07cbca74614e"
        ]
    },
…
}
And we can apply any Ansible playbook on just these VMs:
> ansible-playbook -i ~/inventory.vmware.yml -l myTag any_playbook.yml
The VMware Ansible modules are idempotent, so that re-running a playbook doesn’t create duplicate VMs or Tags. Ansible just reports the resources as ‘OK’.
Thanks Henrik for the huge amount of details!
Wow, so entirely from code, this customer is now deploying:
- AWS infrastructure
- VMware Cloud on AWS SDDC
- NSX-T network and security rules
- vSphere tags
- Virtual Machines and EC2 instances
- Software and scripts on the VMs and EC2 instances
But in many ways, the pilot was successful not just because of the technologies but because we took the time to build the team with the right skillset and to define what we wanted to automate and our pilot success criteria.
Next steps
There is still much more we can automate! One of the areas TietoEVRY would like to explore next would be the automation of load-balancers configuration. Conveniently, that has been one my other Autumn projects 😁 and was published last week: Automating Load-Balancing Deployment on VMware Cloud on AWS.
Thanks to the entire team involved in this project!
