
The Python Client for VMware Cloud on AWS has had a few minor upgrades over the past few months. It’s been great to hear that more and more customers that are using it for automation, operation and migrations. The code is also being used for side projects such VMware Hands on Labs or for other tools.
You can find the code on GitHub.
Here are some of the highlights:
Dockerfile
With the Python requirements.txt file now the repo (thanks Fuat!), you can easily install all the Python packages required to run PyVMC. Just run the following command:
$ pip install -r requirements.txt
I also added a Dockerfile to allow you to build a Docker image to run PyVMC:
FROM python:3.7-alpine

COPY . /app

WORKDIR /app

RUN pip install -r requirements.txt
Build the container with the following command:
nicolasvibert$ docker build . -t pyvmc:latest
Sending build context to Docker daemon  992.3kB
Step 1/5 : FROM python:3.7-alpine
 ---> 72e4ef8abf8e
Step 2/5 : COPY . /app
 ---> 4d51d14b0efe
Step 3/5 : WORKDIR /app
 ---> Running in 4189cb18afbe
Removing intermediate container 4189cb18afbe
 ---> 22a0737684a2
Step 4/5 : RUN pip install -r requirements.txt
 ---> Running in e0bdfe31c063
Collecting certifi==2020.6.20
  Downloading certifi-2020.6.20-py2.py3-none-any.whl (156 kB)
Collecting chardet==3.0.4
  Downloading chardet-3.0.4-py2.py3-none-any.whl (133 kB)
Collecting configparser==5.0.1
  Downloading configparser-5.0.1-py3-none-any.whl (22 kB)
Collecting idna==2.10
  Downloading idna-2.10-py2.py3-none-any.whl (58 kB)
Collecting PTable==0.9.2
  Downloading PTable-0.9.2.tar.gz (31 kB)
Collecting requests==2.24.0
  Downloading requests-2.24.0-py2.py3-none-any.whl (61 kB)
Collecting urllib3==1.25.10
  Downloading urllib3-1.25.10-py2.py3-none-any.whl (127 kB)
Collecting wcwidth==0.2.5
  Downloading wcwidth-0.2.5-py2.py3-none-any.whl (30 kB)
Building wheels for collected packages: PTable
  Building wheel for PTable (setup.py): started
  Building wheel for PTable (setup.py): finished with status 'done'
  Created wheel for PTable: filename=PTable-0.9.2-py3-none-any.whl size=22907 sha256=132c5f0d80f164721621fb6d42379314980bb2d86a6a02b1d8e0fbe933da9f9c
  Stored in directory: /root/.cache/pip/wheels/33/df/2f/674985b3f8a2de3f96357d1eadef5110f74fa91b3785e52a54
Successfully built PTable
Installing collected packages: urllib3, idna, chardet, certifi, wcwidth, requests, PTable, configparser
Successfully installed PTable-0.9.2 certifi-2020.6.20 chardet-3.0.4 configparser-5.0.1 idna-2.10 requests-2.24.0 urllib3-1.25.10 wcwidth-0.2.5
Removing intermediate container e0bdfe31c063
 ---> 79a1a0880d3f
Step 5/5 : RUN apk add --no-cache bash
 ---> Running in 0f01ba655917
fetch http://dl-cdn.alpinelinux.org/alpine/v3.12/main/x86_64/APKINDEX.tar.gz
fetch http://dl-cdn.alpinelinux.org/alpine/v3.12/community/x86_64/APKINDEX.tar.gz
(1/1) Installing bash (5.0.17-r0)
Executing bash-5.0.17-r0.post-install
Executing busybox-1.31.1-r19.trigger
OK: 12 MiB in 36 packages
Removing intermediate container 0f01ba655917
 ---> be964519cfea
Successfully built be964519cfea
Successfully tagged pyvmc:latest
nicolasvibert$
Now that you have your image ready:
nvibert-a01:pyvmc 1.3 nicolasvibert$ docker images pyvmc:latest
REPOSITORY   TAG       IMAGE ID       CREATED         SIZE
pyvmc        latest    be964519cfea   3 minutes ago   53.8MB
You can start running commands or enter the interactive shell with bash:
$ docker run --name pyvmc --rm -i -t pyvmc:latest bash
bash-5.0#

$ docker run -it pyvmc:latest python3 pyVMC.py show-org-users
+--------------+-------------+-------------------------+
|  First Name  |  Last Name  |        User Name        |
+--------------+-------------+-------------------------+
|   Nico       |   Vibert    |   nvibert@vmware.com    |
+--------------+-------------+-------------------------+

$ docker run -it pyvmc:latest python3 pyVMC.py help

Welcome to PyVMC !

Here are the currently supported commands:

To get a list of your VMs:
        show-vms

To display a lit of your SDDCs:
        show-sddcs

To get a view of your selected SDDC:
        show-sddc-state

To show the list of organization users:
        show-org-users

To show your access token:
        get-access-token

To show your current networks:
        show-network

To create a new network:
        new-network

To remove a network:
        remove-network

To show the CGW security rules:
        show-cgw-rule

To create a new CGW security rule
        new-cgw-rule [NAME] [SOURCE-GROUPS] [DESTINATION-GROUPS] [SERVICE] [ACTION] [SCOPE] [SEQUENCE-NUMBER]

To delete a CGW security rule:
        remove-cgw-rule [RULE_ID]

To show the MGW security rules:
        show-mgw-rule

To create a new MGW security rule
        new-mgw-rule [NAME] [SOURCE-GROUPS] [DESTINATION-GROUPS] [SERVICE] [ACTION] [SEQUENCE-NUMBER]

To delete a MGW security rule:
        remove-mgw-rule [RULE_ID]

To show the DFW sections:
        show-dfw-section

To create a new DFW section
        new-dfw-section [NAME][CATEGORY]

To delete a DFW section:
        remove-dfw-section [RULE_ID]

To show the DFW security rules within a section
        show-dfw-section-rules [SECTION]

To create a new DFW security rule
        new-dfw-rule [NAME] [SOURCE-GROUPS] [DESTINATION-GROUPS] [SERVICE] [ACTION] [SECTION] [SEQUENCE-NUMBER]

To delete a DFW rule:
        remove-dfw-rule [SECTION_ID][RULE_ID]

To show the configured NAT rules:
        show-nat

To show the statistics for a specific NAT rule:
        show-nat [NAT-RULE-ID] for statistics of a rule

To create a new NAT rule:
        new-nat-rule

To remove a NAT rule:
        remove-nat-rule

To create a new group:
        new-group [CGW/MGW] [Group_ID]

To show existing groups:
        show-group [CGW/MGW] [Group_ID]

To remove a group:
        remove-group [CGW/MGW][Group_ID]

To show services:
        show-services

To show a specific service:
        show-services [SERVICE-ID]

To create a new service:
        new-service

To remove a service
        remove-service [SERVICE-ID]

To show DNS zones:
        show-dns-zones

To show DNS services:
        show-dns-services

To show the public IP used for VPN services:
        show-vpn-internet-ip

To show the configured VPN:
        show-vpn

To show the VPN statistics:
        show-vpn [VPN_ID]

To show the VPN IPSEC profiles:
        show-vpn-ipsec-profile

To show the VPN IPSEC tunnel profiles:
        show-vpn-ipsec-tunnel-profile

To show the VPN IPSec endpoints:
        show-vpn-ipsec-endpoints

To show the Shadow AWS Account VMC is deployed in:
        show-shadow-account

To show the BGP AS number:
        show-sddc-bgp-as

To update the BGP AS number:
        set-bgp-as [ASN]

To show whether DX is preferred over VPN:
        show-sddc-bgp-vpn

To show the VPC connected to the SDDC:
        show-sddc-connected-vpc

To show the MTU configured over the Direct Connect:
        show-mtu

To set the MTU configured over the Direct Connect:
        set-mtu

To change whether to use S3 over the Internet or via the ENI:
        set-sddc-connected-services

To show the public IPs:
        show-sddc-public-ip

To request a new public IP:
        new-sddc-public-ip

To remove an existing public IP:
        remove-sddc-public-ip

To update the description of an existing public IP:
        set-sddc-public-ip
Egress Interface Counters
With a simple command, you can check the counters on the Internet interface. It’s not an info available on the VMC console but often, customers want to check how much traffic exits the Internet interface as it’s chargeable (as it’s common practice in the cloud world).
William Lam actually already collected these stats in his PowerCLI tool but for those who prefer Python, you can get the values with PyVMC:
bash-3.2$ python3 pyVMC.py show-egress-interface-counters
Current Total Bytes count on Internet interface is 1661194442505 Bytes.
For anyone who wants to stream the data, you can actually use Wavefront (aka VMware Tanzu Observability). We use the same code and SDKs I use in a previous blog post.
wavefront_sender = WavefrontProxyClient(
   host="ec2-A-B-C-D.eu-west-2.compute.amazonaws.com",
   metrics_port=2878,
   distribution_port=2878,
   tracing_port=30000,
)

wavefront_sender.send_metric(name="sddc_egress_data", value=total_stat, tags={"sddc":"vmc-early-access"}, timestamp=timestamp,source="nvibert_sddc_early_access")
     print(strftime("%Y-%m-%d %H:%M:%S", gmtime()))
     time.sleep(30)
Routing Table
There isn’t in the user console the ability to display the routing table and it sometimes can be handy for troubleshooting purposes. A customer asked for it and Gilles had already wrote a script to extract it. It’s now integrated in PyVMC:
bash-3.2$ python3 pyVMC.py show-t0-routes
---------------------------------------
Route type:     t0c
Network:        10.2.160.0/21
Admin distance: 0
Next hop:
---------------------------------------
Route type:     t0c
Network:        10.2.176.0/21
Admin distance: 0
Next hop:
---------------------------------------
Route type:     t1c
Network:        192.168.1.0/24
Admin distance: 3
Next hop:       100.64.48.1
---------------------------------------
Route type:     t1c
Network:        169.254.101.0/30
Admin distance: 3
Next hop:       100.64.48.3
---------------------------------------
Route type:     t0c
Network:        100.64.48.0/31
Admin distance: 0
Next hop:
---------------------------------------
Route type:     t0s
Network:        10.2.192.12/32
Admin distance: 1
Next hop:       100.64.48.1
---------------------------------------
Route type:     t1s
Network:        10.2.0.0/17
Admin distance: 3
Next hop:       100.64.48.3
---------------------------------------
Route type:     t1s
Network:        10.2.192.5/32
Admin distance: 3
Next hop:       100.64.48.3
---------------------------------------
Route type:
Network:        ::/0
Admin distance: 0
Next hop:       ::ffff:127.0.0.3
---------------------------------------
Route type:     t0c
Network:        fe80::/64
Admin distance: 0
Next hop:
---------------------------------------
Route type:     t0c
Network:        fcf5:3e58:6c3a:a000::/64
Admin distance: 0
Next hop:
---------------------------------------
Route type:     t0c
Network:        fcf5:3e58:6c3a:a001::/64
Admin distance: 0
Next hop:
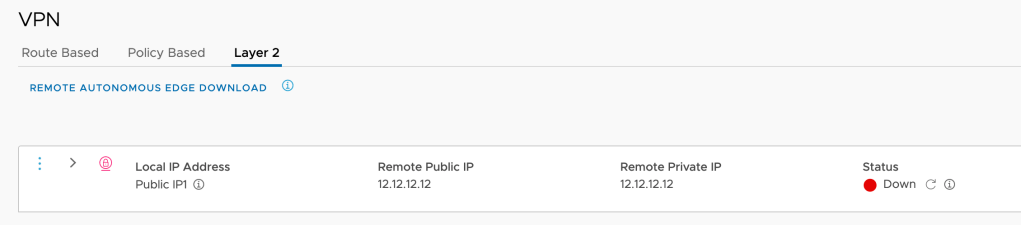
L2 VPN
I wrote about this in a previous blog but let me repeat this briefly – run the following command to create a L2VPN:
nvibert-a01$ python3 pyVMC.py new-l2vpn l2vpn-api-runvmc Public-IP1 12.12.12.12
Creating an IPSec VPN IKE Profile...

Creating an IPSec VPN Tunnel Profile...
Creating an IPSec VPN Session...
Creating an L2 VPN Session...
nvibert-a01$
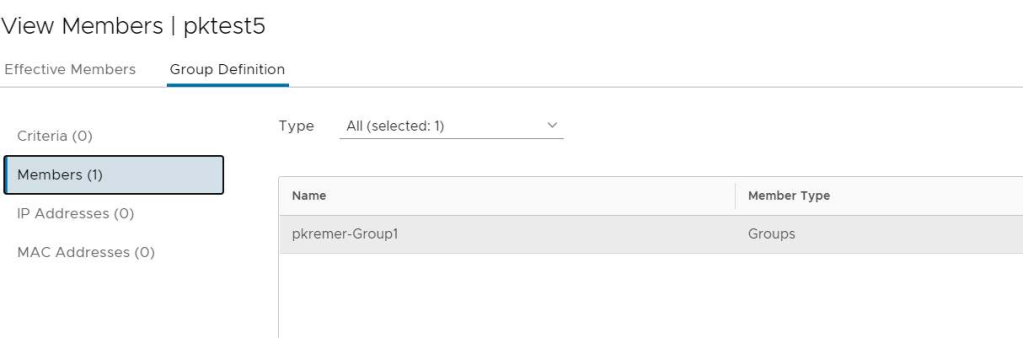
Nested Groups
This function was pushed by Patrick Kremer:
python pyVMC.py new-group cgw pktest5 group-based pkremer-Group1
This will create new group pktest5 and will add existing group pkremer-Group1 as a member.
That’s it!
If you have any feedback about the tool, please do get in touch.

One thought on “PyVMC Update: Release 1.2”