
I always like a coding challenge so when my colleague Itonaga-san asked on an internal Slack channel how to create a NSX L2VPN using the APIs, that gave me an opportunity to help a colleague and get coding!

My first question though was – why? The response was that a customer in Japan was trying to configure as much as possible through the APIs after having deployed a brand new SDDC (for speed and consistency).
This is a great use case for automation and while there are many upper-layer ways to achieve this, sometimes it’s good to go back to the raw APIs.
So here are the typical steps to take to get started with the APIs on VMware Cloud on AWS.
1) Look at the documentation
As Itonaga-san mentioned, there are some great documentations on the VMC APIs published here. I would aways start there. This portal is still quite new but I really like what they’ve done with it.
2) Check the Developer Center on VMware Cloud on AWS
One of the best features that comes with VMware Cloud on AWS is the embedded Developer Center where you can run API commands directly from the console.
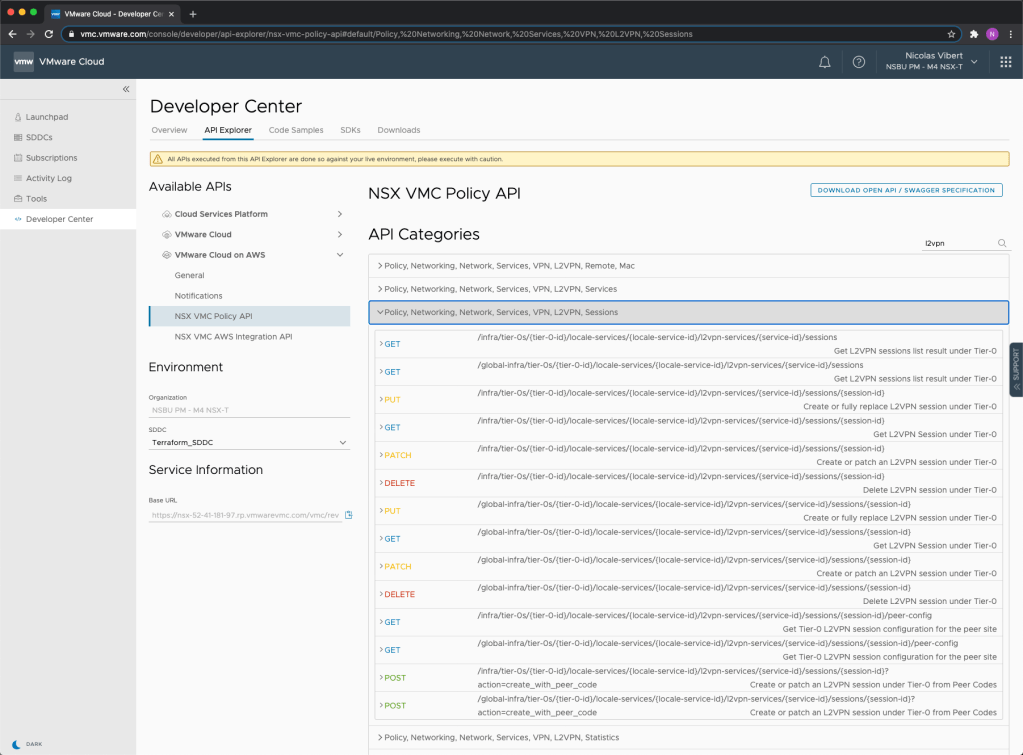
When you combine it with the improving API docs, it gets easier for our users to consume the platforms.
However, it turned out that configuring the L2VPN was slightly more complicated than most commands. When you create an L2 VPN on the User Interface, it’s a few clicks and we hide what happens under the hood. You can’t do that with the APIs.
3) Capture API calls with Firefox
Patrick documented this in a great post after he and I were troubleshooting some previous APIs issues. The Firefox Network Debugger enables you to capture all API commands made when you interact through the browser. If you use Chrome, use the Control+Shift+J or Command+Option+J (Mac) commands to open the Networking Debugger.
As you can see below, you can also filter based on the URL used in the API calls (for VMC, I always filter based on “vmwarevmc.com”).
So I opened up Firefox and went to the VMC console and recorded with the Firefox Network Debugger while I was creating the L2VPN on the user interface.
I then copied the whole payload and tried to work out what was happening:
{
   "resource_type":"Infra",
   "children":[
      {
         "resource_type":"ChildResourceReference",
         "id":"vmc",
         "target_type":"Tier0",
         "children":[
            {
               "resource_type":"ChildResourceReference",
               "id":"default",
               "target_type":"LocaleServices",
               "children":[
                  {
                     "resource_type":"ChildResourceReference",
                     "id":"default",
                     "target_type":"L2VPNService",
                     "children":[
                        {
                           "L2VPNSession":{
                              "id":"a0c710d0-2fc7-11eb-b74b-4542915b04a2",
                              "resource_type":"L2VPNSession",
                              "parent_path":"/infra/tier-0s/vmc/locale-services/default/l2vpn-services/default",
                              "display_name":"L2VPN",
                              "transport_tunnels":[
                                 "/infra/tier-0s/vmc/locale-services/default/ipsec-vpn-services/default/sessions/a0c710d0-2fc7-11eb-b74b-4542915b04a2"
                              ],
                              "tags":null,
                              "description":null
                           },
                           "resource_type":"ChildL2VPNSession"
                        }
                     ]
                  },
                  {
                     "resource_type":"ChildResourceReference",
                     "id":"default",
                     "target_type":"IPSecVpnService",
                     "children":[
                        {
                           "IPSecVpnSession":{
                              "resource_type":"RouteBasedIPSecVpnSession",
                              "id":"a0c710d0-2fc7-11eb-b74b-4542915b04a2",
                              "parent_path":"/infra/tier-0s/vmc/locale-services/default/ipsec-vpn-services/default",
                              "display_name":"L2VPN",
                              "enabled":true,
                              "tcp_mss_clamping":{
                                 "direction":"NONE"
                              },
                              "peer_address":"1.1.1.1",
                              "peer_id":"1.1.1.1",
                              "local_endpoint_path":"/infra/tier-0s/vmc/locale-services/default/ipsec-vpn-services/default/local-endpoints/Public-IP1",
                              "psk":"None",
                              "tunnel_profile_path":"/infra/ipsec-vpn-tunnel-profiles/a0c710d0-2fc7-11eb-b74b-4542915b04a2",
                              "ike_profile_path":"/infra/ipsec-vpn-ike-profiles/a0c710d0-2fc7-11eb-b74b-4542915b04a2",
                              "tunnel_interfaces":[
                                 {
                                    "ip_subnets":[
                                       {
                                          "ip_addresses":[
                                             "169.254.31.253"
                                          ],
                                          "prefix_length":30
                                       }
                                    ]
                                 }
                              ],
                              "tags":null,
                              "description":null
                           },
                           "resource_type":"ChildIPSecVpnSession"
                        }
                     ]
                  }
               ]
            }
         ]
      },
      {
         "IPSecVpnIkeProfile":{
            "resource_type":"IPSecVpnIkeProfile",
            "id":"a0c710d0-2fc7-11eb-b74b-4542915b04a2",
            "path":"/infra/ipsec-vpn-ike-profiles/a0c710d0-2fc7-11eb-b74b-4542915b04a2",
            "encryption_algorithms":[
               "AES_128"
            ],
            "digest_algorithms":[
               "SHA2_256"
            ],
            "dh_groups":[
               "GROUP14"
            ],
            "ike_version":"IKE_V2"
         },
         "resource_type":"ChildIPSecVpnIkeProfile"
      },
      {
         "IPSecVpnTunnelProfile":{
            "resource_type":"IPSecVpnTunnelProfile",
            "id":"a0c710d0-2fc7-11eb-b74b-4542915b04a2",
            "path":"/infra/ipsec-vpn-tunnel-profiles/a0c710d0-2fc7-11eb-b74b-4542915b04a2",
            "encryption_algorithms":[
               "AES_GCM_128"
            ],
            "digest_algorithms":[

            ],
            "dh_groups":[
               "GROUP14"
            ],
            "enable_perfect_forward_secrecy":true
         },
         "resource_type":"ChildIPSecVpnTunnelProfile"
      }
   ]
}
OK, this looks a bit complicated and there are lots of references to children objects. And while I could do with a single API call (this is actually what happens when you configure it on the console), I found it easier to deconstruct into multiple objects.
There are essentially 4 objects being created with the payload above:
- IPSecVPNTunnelProfile
- IPSecVpnIkeProfile
- IPSecVpnSession
- L2VPNSession
The IPSecVPNSession refers to the first 2 objects and input from the customer (local and remote endpoints) and the L2VPNSession refers to the IPSecVPNSession.
This is what I built with the APIs – let’s look below how to do it.

Deconstructing an API call with VMware Cloud on AWS
To make the right REST API call, there are 3 things we need to get right:
- Header
- URL
- Payload
For any API calls with VMware Cloud on AWS, the header is pretty much the same:
myHeader = {'csp-auth-token': access_token}
With the access_token being a temporary 30-minute token we exchanged with the “API token” created on the VMC console. This is how you do it (typically, the API token would be longer than a couple of hours but obviously I wanted the token expired by the time this video was up).
To get that access_token, you need to make a REST API POST call. In Python, this would look like this:
def getAccessToken(myKey):
    """ Gets the Access Token using the Refresh Token """
    params = {'refresh_token': myKey}
    headers = {'Content-Type': 'application/json'}
    response = requests.post('https://console.cloud.vmware.com/csp/gateway/am/api/auth/api-tokens/authorize', params=params, headers=headers)
    jsonResponse = response.json()
    access_token = jsonResponse['access_token']
    return access_token
The above makes a POST API call to the URL above and populates the API request with the API token (the ‘long-lived’ one) and in response, we get an access_token (the ‘short-lived’ one) which we will use for subsequent API calls.
We then use the access_token in our headers.
Now to the URL – the correct URL path was already given to me in the Firefox Networking debugger output – every object has a path ("/infra/ipsec-vpn-tunnel-profiles/a0c710d0-2fc7-11eb-b74b-4542915b04a2") and for any NSX object on VMware Cloud on AWS, the beginning of the path will always be :
https://nsx-A.B.C.D.rp.vmwarevmc.com/vmc/reverse-proxy/api/orgs/org_id/sddcs/sddc_id/sks-nsxt-manager/policy/api/v1/
So if I want to create a new object (for example IPSEC VPN Tunnel Profile) with the id “nico-vmc-api”, I will need to make a REST API call of the type PUT to the URL:
https://nsx-A.B.C.D.rp.vmwarevmc.com/vmc/reverse-proxy/api/orgs/org_id/sddcs/sddc_id/sks-nsxt-manager/policy/api/v1/infra/ipsec-vpn-tunnel-profiles/nico-vmc-api
Finally, the payload or content of our API packet. If you’re creating something, you need to provide the details of what you’re creating in the payload. For a VPN, it might include details like encryption algorithms.
json_data = {
   "resource_type":"IPSecVpnIkeProfile",
   "display_name":"l2vpn-api-runvmc",
   "id":"l2vpn-api-runvmc",
   "encryption_algorithms":[
      "AES_128"
   ],
   "digest_algorithms":[
      "SHA2_256"
   ],
   "dh_groups":[
      "GROUP14"
   ],
   "ike_version":"IKE_V2"
}
And now you’ve got your URL, your header and your payload, you can just make a REST API request – you can use POSTMAN, curl (and the developer.vmware.com portal also lists examples with curl) but I much prefer the simplicity of Python:
response = requests.put(myURL, headers=myHeader, json=json_data)
Build a Layer 2 VPN with the APIs
Now that we’ve got it all worked out – the objects we want to create, the URL paths, the content of the payloads and the headers, we can start making these API calls:
Step 1: Creating an IPSec VPN IKE Profile
PUT API call to:
https://nsx-A.B.C.D.rp.vmwarevmc.com/vmc/reverse-proxy/api/orgs/org_id/sddcs/sddc_id/sks-nsxt-manager/policy/api/v1/infra/ipsec-vpn-ike-profiles/name
With the following payload
{
   "resource_type":"IPSecVpnIkeProfile",
   "display_name":"l2vpn-api-runvmc",
   "id":"l2vpn-api-runvmc",
   "encryption_algorithms":[
      "AES_128"
   ],
   "digest_algorithms":[
      "SHA2_256"
   ],
   "dh_groups":[
      "GROUP14"
   ],
   "ike_version":"IKE_V2"
}
Step 2: Creating an IPSec VPN Tunnel Profile
PUT API call to:
https://nsx-A.B.C.D.rp.vmwarevmc.com/vmc/reverse-proxy/api/orgs/org_id/sddcs/sddc_id/sks-nsxt-manager/policy/api/v1/infra/ipsec-vpn-tunnel-profiles/name
With the following payload
{
   "resource_type":"IPSecVpnTunnelProfile",
   "display_name":"l2vpn-api-runvmc",
   "id":"l2vpn-api-runvmc",
   "encryption_algorithms":[
      "AES_GCM_128"
   ],
   "digest_algorithms":[

   ],
   "dh_groups":[
      "GROUP14"
   ],
   "enable_perfect_forward_secrecy":True
}
Step 3: Creating an IPSec VPN Session
PUT API call to:
https://nsx-A.B.C.D.rp.vmwarevmc.com/vmc/reverse-proxy/api/orgs/org_id/sddcs/sddc_id/sks-nsxt-manager/policy/api/v1/infra/IPSecVpnService/name
With the following payload (update the peer_ip address accordingly):
{
   "resource_type":"RouteBasedIPSecVpnSession",
   "display_name":"l2vpn-api-runvmc",
   "id":"l2vpn-api-runvmc",
   "tcp_mss_clamping":{
      "direction":"NONE"
   },
   "peer_address":"12.12.12.12",
   "peer_id":"12.12.12.12",
   "psk":"None",
   "tunnel_profile_path":"/infra/ipsec-vpn-tunnel-profiles/l2vpn-api-runvmc",
   "ike_profile_path":"/infra/ipsec-vpn-ike-profiles/l2vpn-api-runvmc",
   "local_endpoint_path":"/infra/tier-0s/vmc/locale-services/default/ipsec-vpn-services/default/local-endpoints/Public-IP1",
   "tunnel_interfaces":[
      {
         "ip_subnets":[
            {
               "ip_addresses":[
                  "169.254.31.249"
               ],
               "prefix_length":30
            }
         ]
      }
   ]
}
Step 4: Creating an L2 VPN Session
PUT API call to:
https://nsx-A.B.C.D.rp.vmwarevmc.com/vmc/reverse-proxy/api/orgs/org_id/sddcs/sddc_id/sks-nsxt-manager/policy/api/v1/infra/ipsec-vpn-ike-profiles/name
With the following payload
{
   "transport_tunnels":[
      "/infra/tier-0s/vmc/locale-services/default/ipsec-vpn-services/default/sessions/l2vpn-api-runvmc"
   ],
   "resource_type":"L2VPNSession",
   "id":"l2vpn-api-runvmc",
   "display_name":"L2VPN"
}
Python version with PyVMC
Now this is all cool but what if we could just run a single command that would run all these API commands for you? Let me make your life easier. Go and download the Python Client for VMware Cloud on AWS, set it up (it takes 2 minutes) and run the following command:
nvibert-a01$ python3 pyVMC.py new-l2vpn l2vpn-api-runvmc Public-IP1 12.12.12.12
Creating an IPSec VPN IKE Profile...

Creating an IPSec VPN Tunnel Profile...
Creating an IPSec VPN Session...
Creating an L2 VPN Session...
nvibert-a01$
And the result is a L2 VPN client!
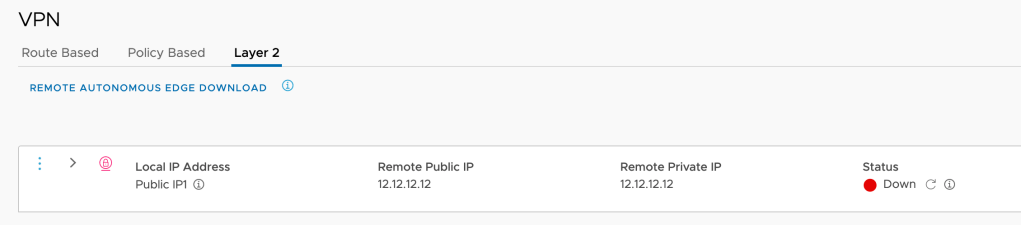
Thanks for reading.

5 thoughts on “NSX-T L2VPN with APIs and Python”