
I recently had a requirement where a customer needed to access the VMware Cloud on AWS NSX-T manager directly. By default, any APIs calls relating to Network and Security on VMC on AWS have to be targeted to the NSX-T Reverse Proxy and not directly to the NSX-T platform.
The Reverse Proxy is public-facing and its FQDN look like something like this: nsx-52-39-251-191.rp.vmwarevmc.com.
If you do a DNS lookup of this FQDN, you will see it sits behind an AWS Elastic Load Balancer.
$ nslookup nsx-52-39-251-191.rp.vmwarevmc.com
Server:		10.16.142.68
Address:	10.16.142.68#53

Non-authoritative answer:
nsx-52-39-251-191.rp.vmwarevmc.com	canonical name = aa3ae79fb247348c39738118af9135aa-558074589.us-west-2.elb.amazonaws.com.
Name:	aa3ae79fb247348c39738118af9135aa-558074589.us-west-2.elb.amazonaws.com
Address: 34.208.223.205
Name:	aa3ae79fb247348c39738118af9135aa-558074589.us-west-2.elb.amazonaws.com
Address: 54.148.152.125
Name:	aa3ae79fb247348c39738118af9135aa-558074589.us-west-2.elb.amazonaws.com
Address: 44.240.91.71
While that works great (and every single post on my blog that covers Terraform or PyVMC leverages this architecture), some customers might want to hit the NSX-T manager directly for compliance or latency reasons.
William Lam talked about this in this post: https://www.virtuallyghetto.com/2019/05/connecting-to-nsx-t-policy-api-using-nsx-t-private-ip-in-vmc.html
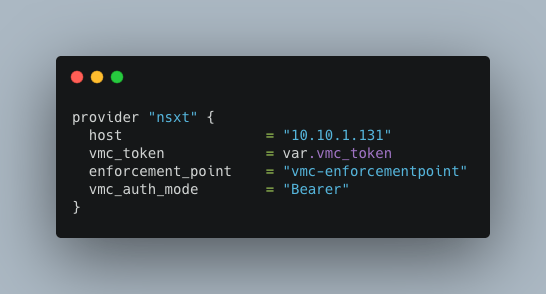
Our Terraform for NSX-T provider didn’t support this option yet but the developers kindly took my request and added this option below. It’s now possible to hit directly the NSX-T Manager ‘s private IP by specifying its private IP and by specifying the authentication mode to “Bearer” (see below) as the authentication changes when you’re not using the Reverse Proxy.
That’s the only change you need to make and you’re good to go.
provider "nsxt" {
  host                 = "10.10.1.131"
  vmc_token            = var.vmc_token
  allow_unverified_ssl = true
  enforcement_point    = "vmc-enforcementpoint"
  vmc_auth_mode        = "Bearer"
}
You can use the existing Terraform for NSX-T examples I have posted in the past.
Walkthrough Video
I tested it by running Terraform in an EC2 instance in the Connected VPC.
Installing Terraform on an EC2 instance
If you want to install the latest version of Terraform on an EC2 instance, the following command will do the trick:
sudo yum install -y yum-utils
sudo yum-config-manager --add-repo https://rpm.releases.hashicorp.com/AmazonLinux/hashicorp.repo
sudo yum -y install terraform
If you want to install a more specific version – because your configuration files are not entirely compatible with the newer version for some reason, you can do the following (example with 0.13.5 – as I finish writing this blog, we are now at Terraform v1.0.0).
sudo wget https://releases.hashicorp.com/terraform/0.13.5/terraform_0.13.5_linux_amd64.zip
sudo unzip terraform_0.13.5_linux_amd64.zip
sudo mv terraform /usr/local/bin/
You can find the URLs of the Terraform releases here.
Compiling a Custom Provider
I had to beta test this feature before the change was included in the provider (with this commit) and to do so, I had to download the Terraform provider from GitHub on my EC2 instance, compile it and run it.
I explained in previous blog posts how to do it but it’s worth reviewing this again – at the very least for my own recollection when I need to do this again or when I ask customers to try out a new version.
First, we need to install Git and Go as we will need to download the code.
sudo yum -y install git
sudo yum -y install go
export GOPATH=$HOME/go
sudo mkdir -p $GOPATH/src/github.com/terraform-providers
cd $GOPATH/src/github.com/terraform-providers
sudo git clone https://github.com/vmware/terraform-provider-nsxt.git
Then we run “go get” and “go guild” in order to download the packages and compiling the provider respectively:
cd terraform-provider-nsxt/
sudo go get
sudo go build -o terraform-provider-nsxt
Now that we have a provider – in which folder should we put it and how do we force Terraform to use it? By default, Terraform will download the provider from the Hashicorp registry. There are elegant ways to do it – using the registry was one. Here is a – hmmm – dirty way to do it.
By running a “terraform init” with the TF_Log on, you can see in which folder it will put the file.
[ec2-user@ip-172-201-10-218 terraform-provider-nsxt]$ sudo TF_LOG=trace terraform init

2020/12/22 11:30:18 [TRACE] providercache.fillMetaCache: scanning directory .terraform/providers
2020/12/22 11:30:18 [TRACE] getproviders.SearchLocalDirectory: .terraform/providers is a symlink to .terraform/providers
2020/12/22 11:30:18 [TRACE] getproviders.SearchLocalDirectory: found registry.terraform.io/hashicorp/vsphere v1.24.3 for linux_amd64 at .terraform/providers/registry.terraform.io/hashicorp/vsphere/1.24.3/linux_amd64

Partner and community providers are signed by their developers.
If you'd like to know more about provider signing, you can read about it here:
https://www.terraform.io/docs/plugins/signing.html

Terraform has been successfully initialized!

You may now begin working with Terraform. Try running "terraform plan" to see
any changes that are required for your infrastructure. All Terraform commands
should now work.

If you ever set or change modules or backend configuration for Terraform,
rerun this command to reinitialize your working directory. If you forget, other
commands will detect it and remind you to do so if necessary.
Here, you can see on line 5, the directory where Terraform would download the provider.
If you move the provider previously created into that folder, it will overwrite the ‘official’ one with the one compiled from GitHub.
sudo cp terraform-provider-nsxt .terraform/providers/registry.terraform.io/vmware/nsxt/3.1.0/linux_amd64/
And that’s it! Run “terraform init” again and you will be good to go.
Thanks for reading.
