
This is the second post in my eBPF series: in my first post, I shared my experience with applying my first basic eBPF code through the use of a tool called Bumblebee. In this part 2, I’m going to check out what is probably the most popular eBPF programs: Cilium. In part 3, we’ll look at Cilium’s observability platform, Hubble.
As I explained in the previous post, eBPF gives you the ability to run sandboxed code in the kernel. One of the most popular use cases for eBPF would be for networking and security. Let’s go and take a look.
I’ll acknowledge that my knowledge of Kubernetes isn’t deep enough to say whether to go with Cilium or a different Container Network Interface (CNI). I am mainly curious about eBPF use cases and Cilium appears to be the most popular. This post, like pretty much anything else on my blog, is just my way to document my learnings.
Getting Started with Cilium
I am going to follow methodically the quick installation guides on the Cilium docs and provide more context when I feel it’s required. Sometimes when you follow a guide blindly, you don’t get what is really happening so I will try to clarify where possible.
Cilium is a networking and security platform for Kubernetes and Hubble provides flow monitoring for applications running within Kubernetes pods.
We will cover Cilium in this post and Hubble in the next one.
First things first, we’re going to need a Kubernetes cluster as a starting point.
You can use your own K8S cluster or a managed K8S service. For this test, I started with AWS EKS. Cilium is a Container Network Interface (CNI) that is compatible with AWS EKS (see list here). A CNI manages, at the very least, the IP address allocation when a pod is scheduled or when it goes away. The Cilium CNI can also provide a number of additional of networking features. K8S cluster comes with a basic CNI: Cilium is a more advanced one as we will see later.
What we will be doing in this blog is:
- Download and install eksctl
- Deploy a K8S cluster with eksctl
- Download and install Cilium
- Verify Cilium installation
Deploying AWS EKS
We’re going to be using eksctl to deploy K8S on AWS EKS. eksctl is a CLI for AWS EKS. It makes it very easy to deploy K8S clusters on EKS. eksctl is straight forward to install.
Once you have eksctl installed and your AWS environmental variables stored with your access key, we’re ready to go and use eksctl:
% export AWS_ACCESS_KEY_ID=ASIA2LEU5EPE && export AWS_SECRET_ACCESS_KEY=dCLc6ZvwesvZ && export AWS_SESSION_TOKEN=IQoJb3JpZ2luX2 && export AWS_SESSION_EXPIRATION=2022-01-29T05:10:56Z%
eksctl uses Infrastructure-As-Code (CloudFormation) to build and manage Kubernetes clusters. Let’s define a config file for eksctl:
% export NAME="$(whoami)-$RANDOM"
cat <<EOF >eks-config.yaml
apiVersion: eksctl.io/v1alpha5
kind: ClusterConfig

metadata:
  name: ${NAME}
  region: us-west-2

managedNodeGroups:
- name: ng-1
  desiredCapacity: 2
  privateNetworking: true
  ## taint nodes so that application pods are
  ## not scheduled until Cilium is deployed.
  taints:
   - key: "node.cilium.io/agent-not-ready"
     value: "true"
     effect: "NoSchedule"
EOF
eksctl create cluster -f ./eks-config.yaml
Right, let’s review what we are doing here instead of blindly following the tutorial:
- We set up a variable called $NAME and concatenate our username to a random string and then create a YAML file, using this $NAME variable as the name for our cluster. The YAML file will have the required parameters by eksctl to build the K8S according to your specifications. Note we will use us-west-2 as the default AWS region.
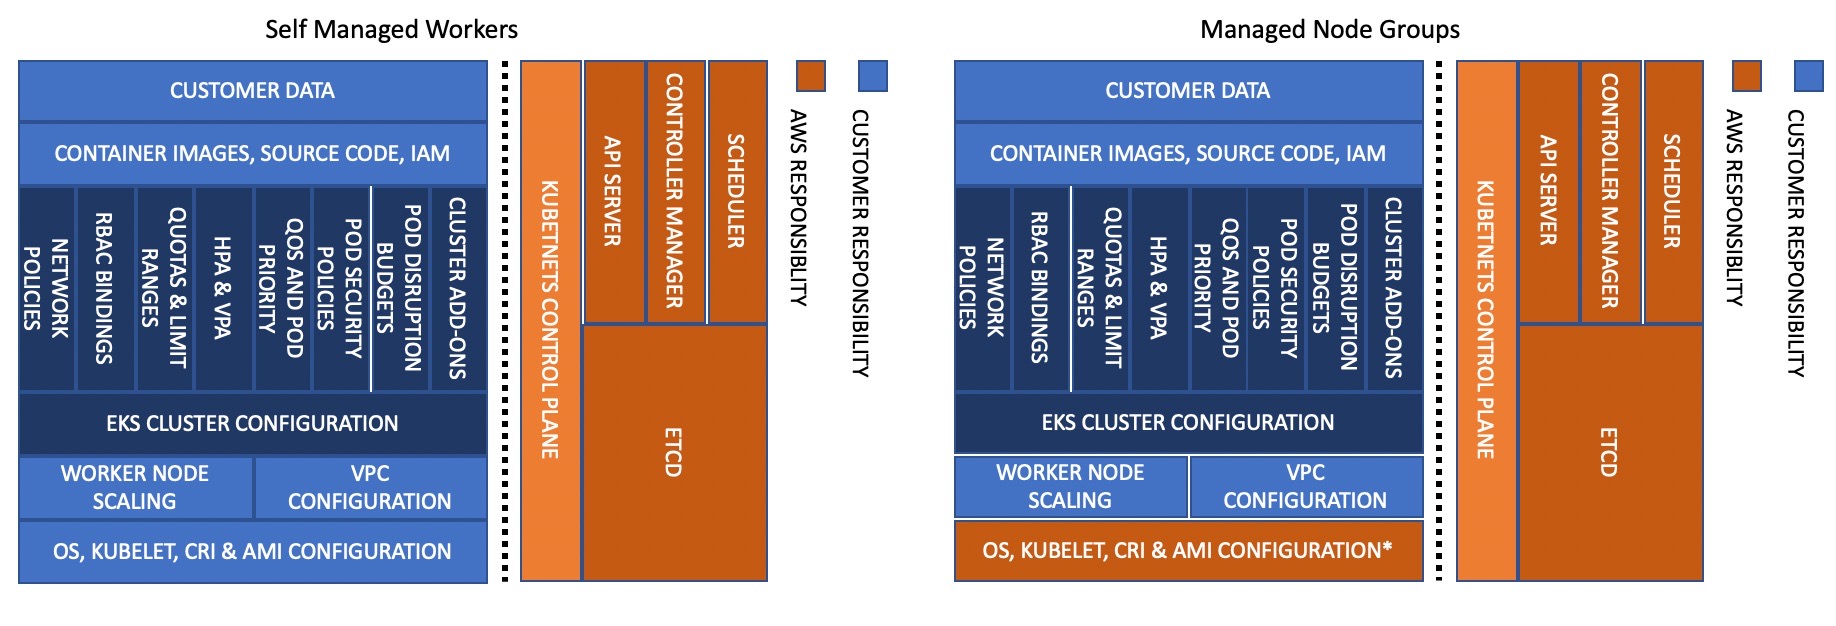
- EKS leverages managedNodeGroups – it’s how it manages the lifecycle of the nodes running Kubernetes. See the differences below:
- We use “privateNetworking” option so that all subnets used by the cluster are private.
- We use “tainting” to wait for Cilium to be deployed before deploying the application pods. Tainting is used to prevent pods from being scheduled onto appropriate nodes until Cilium is ready. In my own words (those of a networker), it’s a bit like “route poisoning” where we don’t want to use a router for a specific path.
We are going to run eksctl against this configuration. eksctl will essentially launch a CloudFormation stack and, in this scenario, create 32 resources on our behalf:
Let’s go:
% eksctl create cluster -f ./eks-config.yaml
2022-01-28 17:11:52 eksctl version 0.80.0
2022-01-28 17:11:52 using region us-west-2
2022-01-28 17:11:58 setting availability zones to [us-west-2b us-west-2a us-west-2d]
2022-01-28 17:11:58 subnets for us-west-2b - public:192.168.0.0/19 private:192.168.96.0/19
2022-01-28 17:11:58 subnets for us-west-2a - public:192.168.32.0/19 private:192.168.128.0/19
2022-01-28 17:11:58 subnets for us-west-2d - public:192.168.64.0/19 private:192.168.160.0/19
2022-01-28 17:11:58 nodegroup "ng-1" will use "" [AmazonLinux2/1.21]
2022-01-28 17:11:58 using Kubernetes version 1.21
2022-01-28 17:11:58 [creating EKS cluster "nicovibert-23189" in "us-west-2" region with managed nodes
2022-01-28 17:11:58 1 nodegroup (ng-1) was included (based on the include/exclude rules)
2022-01-28 17:11:58 will create a CloudFormation stack for cluster itself and 0 nodegroup stack(s)
2022-01-28 17:11:58 will create a CloudFormation stack for cluster itself and 1 managed nodegroup stack(s)
2022-01-28 17:11:58 if you encounter any issues, check CloudFormation console or try 'eksctl utils describe-stacks --region=us-west-2 --cluster=nicovibert-23189'
2022-01-28 17:11:58 Kubernetes API endpoint access will use default of {publicAccess=true, privateAccess=false} for cluster "nicovibert-23189" in "us-west-2"
2022-01-28 17:11:58 CloudWatch logging will not be enabled for cluster "nicovibert-23189" in "us-west-2"
2022-01-28 17:11:58 you can enable it with 'eksctl utils update-cluster-logging --enable-types={SPECIFY-YOUR-LOG-TYPES-HERE (e.g. all)} --region=us-west-2 --cluster=nicovibert-23189'
2022-01-28 17:11:58 [ℹ]
2 sequential tasks: { create cluster control plane "nicovibert-23189",
    2 sequential sub-tasks: {
        wait for control plane to become ready,
        create managed nodegroup "ng-1",
    }
}
2022-01-28 17:11:58 building cluster stack "eksctl-nicovibert-23189-cluster"
2022-01-28 17:12:05 deploying stack "eksctl-nicovibert-23189-cluster"
2022-01-28 17:12:35 waiting for CloudFormation stack "eksctl-nicovibert-23189-cluster"
2022-01-28 17:13:11 waiting for CloudFormation stack "eksctl-nicovibert-23189-cluster"
2022-01-28 17:14:17 waiting for CloudFormation stack "eksctl-nicovibert-23189-cluster"
2022-01-28 17:26:43 building managed nodegroup stack "eksctl-nicovibert-23189-nodegroup-ng-1"
2022-01-28 17:26:43 deploying stack "eksctl-nicovibert-23189-nodegroup-ng-1"
2022-01-28 17:26:43 waiting for CloudFormation stack "eksctl-nicovibert-23189-nodegroup-ng-1"
2022-01-28 17:27:01 waiting for CloudFormation stack "eksctl-nicovibert-23189-nodegroup-ng-1"
2022-01-28 17:27:26 waiting for CloudFormation stack "eksctl-nicovibert-23189-nodegroup-ng-1"
2022-01-28 17:27:51 waiting for CloudFormation stack "eksctl-nicovibert-23189-nodegroup-ng-1"
2022-01-28 17:28:13 waiting for CloudFormation stack "eksctl-nicovibert-23189-nodegroup-ng-1"
2022-01-28 17:28:38 waiting for CloudFormation stack "eksctl-nicovibert-23189-nodegroup-ng-1"
2022-01-28 17:29:03 waiting for CloudFormation stack "eksctl-nicovibert-23189-nodegroup-ng-1"
2022-01-28 17:29:25 waiting for CloudFormation stack "eksctl-nicovibert-23189-nodegroup-ng-1"
2022-01-28 17:29:49 waiting for CloudFormation stack "eksctl-nicovibert-23189-nodegroup-ng-1"
2022-01-28 17:30:11 waiting for CloudFormation stack "eksctl-nicovibert-23189-nodegroup-ng-1"
2022-01-28 17:30:17 waiting for the control plane availability...
2022-01-28 17:30:17 saved kubeconfig as "/Users/nicovibert/.kube/config"
2022-01-28 17:30:17 no tasks
2022-01-28 17:30:17 all EKS cluster resources for "nicovibert-23189" have been created
2022-01-28 17:30:23 nodegroup "ng-1" has 2 node(s)
2022-01-28 17:30:23 node "ip-192-168-125-151.us-west-2.compute.internal" is ready
2022-01-28 17:30:23 node "ip-192-168-152-125.us-west-2.compute.internal" is ready
2022-01-28 17:30:23 waiting for at least 2 node(s) to become ready in "ng-1"
2022-01-28 17:30:23 nodegroup "ng-1" has 2 node(s)
2022-01-28 17:30:23 node "ip-192-168-125-151.us-west-2.compute.internal" is ready
2022-01-28 17:30:23 node "ip-192-168-152-125.us-west-2.compute.internal" is ready
2022-01-28 17:30:38 kubectl command should work with "/Users/nicovibert/.kube/config", try 'kubectl get nodes'
2022-01-28 17:30:38 EKS cluster "nicovibert-23189" in "us-west-2" region is ready
It took about 20 minutes. Yes, it was a lot of resources but personally (and no offense to AWS), but I usually find GKE way faster to build K8S clusters.
Installing Cilium
Now that we’ve got our cluster ready, let’s install Cilium. It was pretty straight-forward, with a single command:
% curl -L --remote-name-all https://github.com/cilium/cilium-cli/releases/latest/download/cilium-darwin-amd64.tar.gz{,.sha256sum}
shasum -a 256 -c cilium-darwin-amd64.tar.gz.sha256sum
sudo tar xzvfC cilium-darwin-amd64.tar.gz /usr/local/bin
rm cilium-darwin-amd64.tar.gz{,.sha256sum}

  % Total    % Received % Xferd  Average Speed   Time    Time     Time  Current
                                 Dload  Upload   Total   Spent    Left  Speed
100   155  100   155    0     0    589      0 --:--:-- --:--:-- --:--:--   589
100   665  100   665    0     0   1501      0 --:--:-- --:--:-- --:--:--  1501
100 15.3M  100 15.3M    0     0  5936k      0  0:00:02  0:00:02 --:--:-- 7854k
100   165  100   165    0     0    970      0 --:--:-- --:--:-- --:--:--   970
100   675  100   675    0     0   1674      0 --:--:-- --:--:-- --:--:--  1674
100    93  100    93    0     0    159      0 --:--:-- --:--:-- --:--:--   159
cilium-darwin-amd64.tar.gz: OK
x cilium
The command above downloads the Cilium image and its hash. We then use shasum to verify that the download was successful by checking the SHA file.
We then unzip Cilium and put it in our executables folder (/usr/local/bin). We then remove the downloaded programs and its SHA.
Let’s install Cilium on our AWS EKS cluster. It’s a single command:
% cilium install
Auto-detected Kubernetes kind: EKS
using Cilium version "v1.11.1"
Auto-detected cluster name: nicovibert-23189-us-west-2-eksctl-io
Auto-detected IPAM mode: eni
Auto-detected datapath mode: aws-eni
Patching the "aws-node" DaemonSet to evict its pods...
Found CA in secret cilium-ca
Generating certificates for Hubble...
Creating Service accounts...
Creating Cluster roles...
Creating ConfigMap for Cilium version 1.11.1...
Creating EKS Node Init DaemonSet...
Creating Agent DaemonSet...
Creating Operator Deployment...
Waiting for Cilium to be installed and ready...
Cilium was successfully installed! Run 'cilium status' to view installation health
Nice! It’s a silly detail but I like the little icons on the installation logs.
You can see above that we are removing aws-node as the default CNI and replacing it with Cilium.
Verifying Cilium
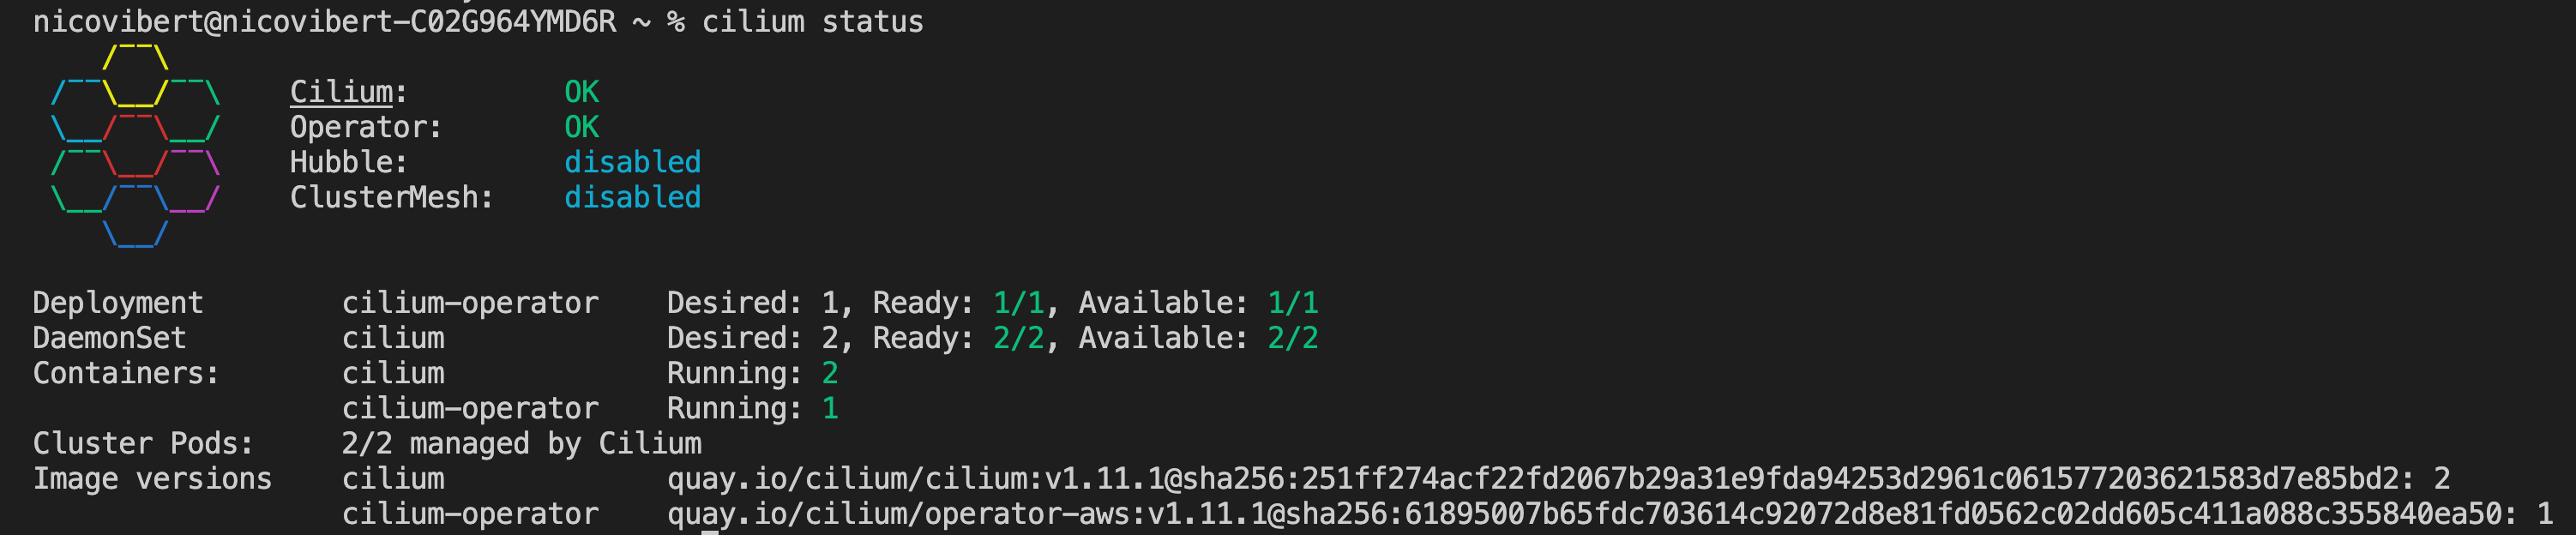
Let’s check the installation status. All looking good!
We can also see all the endpoints managed by Cilium (each pod is represented by an endpoint in Cilium):
% kubectl get cep --all-namespaces
NAMESPACE     NAME                              ENDPOINT ID   IDENTITY ID   INGRESS ENFORCEMENT   EGRESS ENFORCEMENT   VISIBILITY POLICY   ENDPOINT STATE   IPV4              IPV6
cilium-test   client-6488dcf5d4-f24xw           1600          9534                                                                         ready            192.168.108.152
cilium-test   client2-5998d566b4-nszft          637           1165                                                                         ready            192.168.117.47
cilium-test   echo-other-node-f4d46f75b-gqnpb   3743          39224                                                                        ready            192.168.154.245
cilium-test   echo-same-node-745bd5c77-5dp8w    281           3785                                                                         ready            192.168.15.245
kube-system   coredns-85d5b4454c-c5vjx          2664          12628                                                                        ready            192.168.124.19
kube-system   coredns-85d5b4454c-pkz7m          402           12628                                                                        ready            192.168.114.134
kube-system   hubble-relay-57bb755b8-mtrpq      2032          6996                                                                         ready            192.168.136.250
kube-system   hubble-ui-58f7cf457d-x7k8z        342           61236                                                                        ready            192.168.148.44
By now, we have deployed Cilium as the CNI. As mentioned previously, we are not using the AWS default CNI (deployed with a DaemonSet named aws-node) but instead we’ll be using Cilium:
% kubectl get DaemonSet -n=kube-system
NAME                   DESIRED   CURRENT   READY   UP-TO-DATE   AVAILABLE   NODE SELECTOR                     AGE
aws-node               0         0         0       0            0           io.cilium/aws-node-enabled=true   2d20h
cilium                 2         2         2       2            2           <none>                            2d19h
cilium-eks-node-init   2         2         2       2            2           <none>                            2d19h
kube-proxy             2         2         2       2            2           <none>                            2d20h
A DaemonSet means we’ll have a Pod in charge of the network configuration running on each node of the cluster.
We can find out more information about the Cilium CNI:
% kubectl describe DaemonSet cilium -n=kube-system
Name:           cilium
Selector:       k8s-app=cilium
Node-Selector:  <none>
Labels:         k8s-app=cilium
Annotations:    deprecated.daemonset.template.generation: 1
Desired Number of Nodes Scheduled: 2
Current Number of Nodes Scheduled: 2
Number of Nodes Scheduled with Up-to-date Pods: 2
Number of Nodes Scheduled with Available Pods: 2
Number of Nodes Misscheduled: 0
Pods Status:  2 Running / 0 Waiting / 0 Succeeded / 0 Failed
Pod Template:
  Labels:           k8s-app=cilium
  Service Account:  cilium
  Init Containers:
   ebpf-mount:
    Image:      quay.io/cilium/cilium:v1.11.1@sha256:251ff274acf22fd2067b29a31e9fda94253d2961c061577203621583d7e85bd2
    Port:       <none>
    Host Port:  <none>
    Command:
      nsenter
      --mount=/hostproc/1/ns/mnt
      --
      sh
      -c
      mount | grep "/sys/fs/bpf type bpf" || { echo "Mounting eBPF filesystem..."; mount bpffs /sys/fs/bpf -t bpf; }
    Requests:
      cpu:        100m
      memory:     100Mi
    Environment:  <none>
    Mounts:
      /hostproc from host-proc (rw)
   clean-cilium-state:
    Image:      quay.io/cilium/cilium:v1.11.1@sha256:251ff274acf22fd2067b29a31e9fda94253d2961c061577203621583d7e85bd2
    Port:       <none>
    Host Port:  <none>
    Command:
      /init-container.sh
    Requests:
      cpu:     100m
      memory:  100Mi
    Environment:
      CILIUM_ALL_STATE:       <set to the key 'clean-cilium-state' of config map 'cilium-config'>      Optional: true
      CILIUM_BPF_STATE:       <set to the key 'clean-cilium-bpf-state' of config map 'cilium-config'>  Optional: true
      CILIUM_WAIT_BPF_MOUNT:  <set to the key 'wait-bpf-mount' of config map 'cilium-config'>          Optional: true
    Mounts:
      /sys/fs/bpf from bpf-maps (rw)
      /var/run/cilium from cilium-run (rw)
  Containers:
   cilium-agent:
    Image:      quay.io/cilium/cilium:v1.11.1@sha256:251ff274acf22fd2067b29a31e9fda94253d2961c061577203621583d7e85bd2
    Port:       <none>
    Host Port:  <none>
    Command:
      cilium-agent
    Args:
      --config-dir=/tmp/cilium/config-map
    Liveness:   http-get http://127.0.0.1:9876/healthz delay=120s timeout=5s period=30s #success=1 #failure=10
    Readiness:  http-get http://127.0.0.1:9876/healthz delay=5s timeout=5s period=30s #success=1 #failure=3
    Environment:
      K8S_NODE_NAME:                      (v1:spec.nodeName)
      CILIUM_K8S_NAMESPACE:               (v1:metadata.namespace)
      CILIUM_FLANNEL_MASTER_DEVICE:      <set to the key 'flannel-master-device' of config map 'cilium-config'>      Optional: true
      CILIUM_FLANNEL_UNINSTALL_ON_EXIT:  <set to the key 'flannel-uninstall-on-exit' of config map 'cilium-config'>  Optional: true
      CILIUM_CLUSTERMESH_CONFIG:         /var/lib/cilium/clustermesh/
      CILIUM_CNI_CHAINING_MODE:          <set to the key 'cni-chaining-mode' of config map 'cilium-config'>  Optional: true
      CILIUM_CUSTOM_CNI_CONF:            <set to the key 'custom-cni-conf' of config map 'cilium-config'>    Optional: true
    Mounts:
      /host/etc/cni/net.d from etc-cni-netd (rw)
      /host/opt/cni/bin from cni-path (rw)
      /lib/modules from lib-modules (ro)
      /run/xtables.lock from xtables-lock (rw)
      /sys/fs/bpf from bpf-maps (rw)
      /tmp/cilium/config-map from cilium-config-path (ro)
      /var/lib/cilium/clustermesh from clustermesh-secrets (ro)
      /var/lib/cilium/tls/hubble from hubble-tls (ro)
      /var/run/cilium from cilium-run (rw)
  Volumes:
   cilium-run:
    Type:          HostPath (bare host directory volume)
    Path:          /var/run/cilium
    HostPathType:  DirectoryOrCreate
   bpf-maps:
    Type:          HostPath (bare host directory volume)
    Path:          /sys/fs/bpf
    HostPathType:  DirectoryOrCreate
   cni-path:
    Type:          HostPath (bare host directory volume)
    Path:          /opt/cni/bin
    HostPathType:  DirectoryOrCreate
   etc-cni-netd:
    Type:          HostPath (bare host directory volume)
    Path:          /etc/cni/net.d
    HostPathType:  DirectoryOrCreate
   lib-modules:
    Type:          HostPath (bare host directory volume)
    Path:          /lib/modules
    HostPathType:
   xtables-lock:
    Type:          HostPath (bare host directory volume)
    Path:          /run/xtables.lock
    HostPathType:  FileOrCreate
   clustermesh-secrets:
    Type:        Secret (a volume populated by a Secret)
    SecretName:  cilium-clustermesh
    Optional:    true
   cilium-config-path:
    Type:      ConfigMap (a volume populated by a ConfigMap)
    Name:      cilium-config
    Optional:  false
   hubble-tls:
    Type:                Projected (a volume that contains injected data from multiple sources)
    SecretName:          hubble-server-certs
    SecretOptionalName:  <nil>
   host-proc:
    Type:               HostPath (bare host directory volume)
    Path:               /proc
    HostPathType:       DirectoryOrCreate
  Priority Class Name:  system-node-critical
Events:                 <none>
This is quite a verbose command! We can see above the containers that make up the DaemonSet. There are actually a couple of init containers that are run initially before the actual Cilium agent container is deployed. From what I understand, the init containers do some cleanup and install the eBPF components – you can even check the logs on the one of the init containers:
% kubectl logs cilium-eks-node-init-kwg5g  -n=kube-system
Deleting iptables rules created by the AWS CNI VPC plugin
!!! startup-script succeeded!
Done!
And then the Cilium agent is configured with a number of environmental variables, configuration files, certificates, secrets, probes (liveness and readiness), etc…
OK – I should be probably stop myself before I go down another rabbit’s hole!
We have now deployed Cilium as the CNI.
“So what?” you might be wondering? So do I! We’ve installed a new CNI but we haven’t worked out the benefits it gives us. We will explore that in Part 3.
Thanks for reading.

3 thoughts on “Exploring eBPF – Part 2: Getting Started with Cilium”